• Home
  • About
    • About Crafts by Amanda
    • Visit Our Recipe Site
  • Work With Us
  • Join
    • Free Newsletters
    • Join our Facebook craft group
↑
  • Tutorials
    • Tutorial Index
    • Adult Crafts
    • Crafts for Kids
    • Crafts for Seniors
    • Recycled Crafts
    • Seasonal Crafts
    • Holiday Crafts
    • Free Printables
    • Craft Collections
  • Adult Crafts
    • Bath & Body
    • Beach Crafts
    • Clay Pot Crafts
    • Crafts for Seniors
    • Decoupage Crafts for Adults
    • DIY Gift ideas
    • Garden Crafts
    • Home Decor Projects
    • Kitchen Crafts
    • Light Bulb Crafts
    • Luminary Crafts
    • Mason Jar Crafts
    • Needlework
    • Photo Display Ideas
    • Recycled Crafts for Adults
    • Wearable Crafts for Adults
  • Crafts for Kids
    • Animal Crafts for Kids
    • Back to School Crafts
    • Beach Crafts for Kids
    • Camp Crafts
    • Cardboard Tube Crafts for Kids
    • Decoupage Crafts for Kids
    • Easy Crafts for Kids
    • Nature Crafts for Kids
    • Other Kid’s Crafts
    • Paper Plate Crafts for Kids
    • Recycled Crafts for Kids
    • Slimes, Doughs, & Clay
    • Wearable Crafts for Kids
  • Holiday Crafts
    • 4th of July Crafts
    • Christmas Crafts
    • DIY Gift ideas
    • Earth Day Crafts
    • Easter Crafts
    • Father’s Day Crafts
    • Halloween Crafts
    • Memorial Day Crafts
    • Mother’s Day Crafts
    • New Year’s
    • Other Holidays
    • Patriot Day Crafts
    • St. Patrick’s Day Crafts
    • Thanksgiving Crafts
    • Valentine’s Day Crafts
  • Seasonal Crafts
    • Winter Crafts
    • Spring Crafts
    • Summer Crafts
    • Fall Crafts
  • Skip to primary navigation
  • Skip to main content
  • Skip to primary sidebar
  • Skip to footer

Crafts by Amanda

crafts for adults and kid's crafts

  • Tutorials
    • Tutorial Index
    • Adult Crafts
    • Crafts for Kids
    • Crafts for Seniors
    • Recycled Crafts
    • Seasonal Crafts
    • Holiday Crafts
    • Free Printables
    • Craft Collections
  • Adult Crafts
    • Bath & Body
    • Beach Crafts
    • Clay Pot Crafts
    • Crafts for Seniors
    • Decoupage Crafts for Adults
    • DIY Gift ideas
    • Garden Crafts
    • Home Decor Projects
    • Kitchen Crafts
    • Light Bulb Crafts
    • Luminary Crafts
    • Mason Jar Crafts
    • Needlework
    • Photo Display Ideas
    • Recycled Crafts for Adults
    • Wearable Crafts for Adults
  • Crafts for Kids
    • Animal Crafts for Kids
    • Back to School Crafts
    • Beach Crafts for Kids
    • Camp Crafts
    • Cardboard Tube Crafts for Kids
    • Decoupage Crafts for Kids
    • Easy Crafts for Kids
    • Nature Crafts for Kids
    • Other Kid’s Crafts
    • Paper Plate Crafts for Kids
    • Recycled Crafts for Kids
    • Slimes, Doughs, & Clay
    • Wearable Crafts for Kids
  • Holiday Crafts
    • 4th of July Crafts
    • Christmas Crafts
    • DIY Gift ideas
    • Earth Day Crafts
    • Easter Crafts
    • Father’s Day Crafts
    • Halloween Crafts
    • Memorial Day Crafts
    • Mother’s Day Crafts
    • New Year’s
    • Other Holidays
    • Patriot Day Crafts
    • St. Patrick’s Day Crafts
    • Thanksgiving Crafts
    • Valentine’s Day Crafts
  • Seasonal Crafts
    • Winter Crafts
    • Spring Crafts
    • Summer Crafts
    • Fall Crafts
Craft Tutorials | Crafts for Kids | Back to School Crafts | Textured Globe Craft

Textured Globe Craft

Author by Amanda Davis on April 10, 2010 Updated on January 15, 2019

5 from 1 vote
Jump to Project
54 shares
  • Share
  • Tweet
  • Flipboard
  • Email
Textured Globe Craft


As you probably already know, I have been making crafts for Kaboose.com for over four years now. I have a select handful of favorites, even though I’ve made over 500 for them to date! (wow, I still gasp when I think about that!) Usually I hold on to the projects for about a month, just in case there are any changes or new photo shoots needed, but after that I donate them to my kids’ elementary school. They display them in the office, library, and various other places in the school.

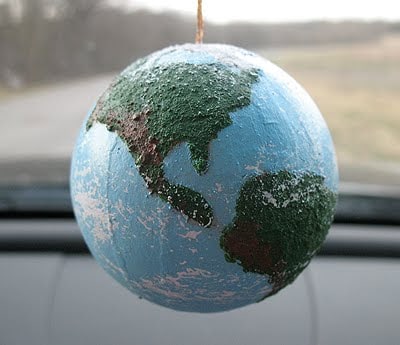
Some I keep for me, though. This globe is one of those keepers. I just love it. I love the way it came out, how it feels, and the comments I get when someone gets into my car for the first time. I have this globe hanging from my rear view mirror. I love all sorts of globe projects and look forward to making more.

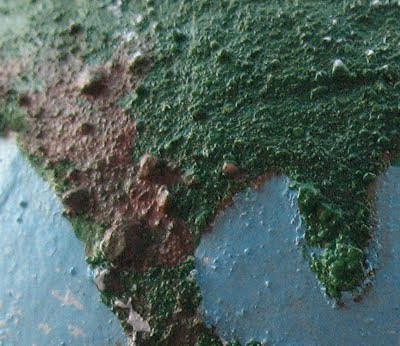
Here’s a close up, can you guess how I got the continents so textured?

2

This is a really fun project for kids, but it’s even fun for us adults ;) A great project for Earth Day!

Print Project
5 from 1 vote

Textured Globe Craft

Supplies

  • Paper mache globe ornament
  • Sand
  • Acrylic paints: white light blue, green and brown
  • White craft glue
  • Acrylic sealer spray
  • Paintbrush
  • Cotton ball
  • Cotton swab
  • Paper plate
  • Empty egg carton to use as a stand

Instructions

  • Place egg carton upside down and use to balance your globe on while you paint. Paint the entire paper mache globe with light blue paint and let dry. Repeat for a second coat.
  • Use a map of the Earth as a guide, then lightly pencil the continents onto the globe
  • Pour some sand onto a paper plate.
  • Fill each continent you just drew with dots of glue.
  • Gently roll the globe around in the sand until all continents are covered. Carefully tap off excess. Put globe onto egg carton to dry.
  • Once dry, give the globe one or two last taps to shake of any loose sand.
  • Paint the sanded continents green, except for Antarctica and the top of the globe, which should be painted white. Let dry completely.
  • Paint the sanded continents green, except for Antarctica and the top of the globe, which should be painted white. Let dry completely.
  • Use a cotton swab to gently dab brown paint onto areas of the green where your map may indicate deserts or more barren lands. Let dry.
  • Put some white paint onto a paper plate. Unravel a bit of your cotton ball and drag it lightly over the top of the white paint. Dab off excess onto plate and use the cotton ball to add cloudy areas around the globe. Let dry.
  • Spray entire globe with acrylic sealer spray.

I originally made this project for Kaboose, which was then bought out by Spoonful. Spoonful has since closed and the instructions were taken down. I am putting the instructions here until such time that Spoonful projects are redirected to a new home. At that time I will remove the instructions and link directly to the project on their site.

  • Author
  • Recent Posts
Amanda Davis
Amanda Davis is the crafty, entrepreneurial mother of four children. She loves to bake, cook, make kid's crafts and create decorative items for her home. She is a crafting expert and guru in the kitchen and has appeared online and in print publications many times over the years.
Latest posts by Amanda Davis (see all)
  • Spring Scavenger Hunt - May 9, 2025
  • How to Make Lip Scrub - May 2, 2025
  • How to Make Lavender Soap - April 22, 2025
54 shares
  • Share
  • Tweet
  • Flipboard
  • Email

Filed Under: Back to School Crafts, Earth Day Crafts Tagged With: adult, back to school, earth day, holidays, kid's crafts, painting

Reader Interactions

Free CraftsBy email every week

Latest crafts straight to your inbox!

Comments

  1. Carrie says

    November 3, 2021 at 3:29 pm

    What kind of sand did you use?

    Reply
  2. Amanda says

    June 15, 2011 at 11:20 am

    Thank you Krista, so nice of you!

    Reply
  3. KristaBee says

    June 14, 2011 at 7:57 pm

    I am such a HUGE fan of this craft. Thank you for the idea. I can't wait for my daughter to get older, so we can try some of your crafts together!

    Reply
  4. ~*~Ash~*~ says

    April 18, 2011 at 1:27 am

    I'm having an Earth Day Resources Linky Party and I'd love for this lesson to be on there! Check it out at:
    Teaching Happily Ever After: Earth Day!

    Reply
  5. Teri says

    September 9, 2010 at 2:23 pm

    That is a great idea. I'll save this one for doing with my niece and nephew in the future.

    Reply
  6. elizabeth @ twelvecrafts says

    September 7, 2010 at 2:58 pm

    Wow! I love the textured look. Visiting from CSI.

    Reply
  7. Valerie says

    September 7, 2010 at 1:19 pm

    This is fabulous. My second graders are studying the seven continents this year. This would be a great project for them.

    Reply
  8. Kristi Flanagan says

    April 22, 2010 at 4:36 pm

    Great idea – my kids will love this! Thanks for planting your creative seed at Punkin Seed Productions' Plant a Punkin Seed Party!

    Come plant again on Friday!

    Kristi
    Punkin Seed Productions

    Reply
  9. Jessica Hills says

    April 20, 2010 at 3:14 am

    That's so cool! Thanks so much for linking to Favorite Things Friday!

    Reply
  10. Stephanie Lynn says

    April 19, 2010 at 5:17 am

    Love this project! So creative – I can see why it's a keeper! Thanks so much for joining the Sunday Showcase! Hope you have a great week! ~ Stephanie Lynn

    Reply
  11. Carolyn @ My Backyard Eden says

    April 18, 2010 at 10:29 pm

    Very cool. The texture makes me want to reach out and touch it!

    Thanks for linking up to Make it Yours day! Enjoy the rest of your weekend!

    Reply
  12. Lori says

    April 16, 2010 at 11:10 pm

    Very cool!

    Thanks for joining Get Your Craft on Thursday. Please join me next week for another great party!

    Reply
  13. Bobbie says

    April 15, 2010 at 11:19 pm

    That is adorable! I would love for you to come over and link up to check me out saturday http://www.iamonly1woman.blogspot.com

    Reply
  14. Fawnda says

    April 15, 2010 at 7:04 pm

    Very cool! I love hte texture too! : )

    Reply
  15. Kim @ seven thirty three says

    April 15, 2010 at 12:56 pm

    That is amazing and I am working with the school on some Earth Day crafts so I'm going to go check it out now!

    Thanks for linking up with What are little boys made of?

    Reply
  16. michelle@somedaycrafts says

    April 15, 2010 at 12:47 am

    500 crafts! Make me tired just thinking about it. I love maps and globes. This is so cool!

    Reply
  17. Lanie Ree says

    April 14, 2010 at 2:16 pm

    Oh wow. I'm heading over to see how you did the texture right now.

    Thank you for linking this to A Little Craft Therapy with Life in the Pitts.

    Reply
  18. Allison Shops says

    April 12, 2010 at 10:19 pm

    Very cool. I would have to keep that one too. Did you mix sand into the mix? Going to go find out!
    Came over from BNOTP.

    Reply
  19. Sweet Little Smoothie says

    April 12, 2010 at 3:45 pm

    This is awesome!! Thanks for sharing!

    Reply
  20. Julie says

    April 12, 2010 at 12:25 pm

    This is so cool! Thanks for sharing!

    Reply
5 from 1 vote (1 rating without comment)

Leave a Reply Cancel reply

Your email address will not be published. Required fields are marked *

Rate This Project


The maximum upload file size: 640 MB. You can upload: image, video. Links to YouTube, Facebook, Twitter and other services inserted in the comment text will be automatically embedded. Drop files here

Primary Sidebar

Hi! I’m Amanda and I’m the founder and head designer of Crafts by Amanda. I have spent over 25 years creating projects to share, but it’s not just me anymore! It’s turned into a complete family affair. Come and meet the Creative Team!

Free CraftsBy email every week

Latest crafts straight to your inbox!

All Time Favorites

snowy pinecone candle jar luminaries

Winter Luminaries: Snowy Pinecone…

Make pretty winter luminaries that appear to be covered ... Go To project

Make this wonderful deco mesh pumpkin wreath to hang on your door this fall!

Deco Mesh Pumpkin Wreath…

Adorn your door this fall with a pretty deco mesh ... Go To project

Learn to make these adorable ladybug painted rocks. use special outdoor paint for this adorable garden craft so you can keep garden ladybugs all summer!

Ladybug Painted Rocks…

I'm going to show you how to make these adorable ... Go To project

Reuse those empty prescription pill bottles in all sorts of ways. From organizing to making cookies. Yes, cookies! See how to use your empty pill bottles!

20 Uses for Prescription Pill…

You've been collecting prescription pill bottles for ... Go To project

Meet the Family

Amanda

Founder and Designer

Kristen

Editorial Manager

Lindsay

Social Media Manager

As seen on:

Footer

Favorites

  • Jar Photo Frames
  • No-Sew Roman Shade
  • Paper Flowers
  • How to Make a Scrunchie
  • Mermaid Slime

About

  • Home
  • Meet the Creative Team
  • Work with Us
  • Privacy Policy
  • Accessibility
  • Contact Us

Images/text copyright Amanda Formaro 2020. To feature a post from Crafts by Amanda, you may use one photo credited and linked back directly to the project post.

Free CraftsBy email every week

Latest crafts straight to your inbox!

Copyright ©2025, Crafts by Amanda. All Rights Reserved.
Design by Pixel Me Designs

Rate This Tutorial

Your vote:


To share a photo with your comment click here!

A rating is required
A name is required
An email is required

Recipe Ratings without Comment

Something went wrong. Please try again.