• Home
  • About
    • About Crafts by Amanda
    • Visit Our Recipe Site
  • Work With Us
  • Join
    • Free Newsletters
    • Join our Facebook craft group
↑
  • Tutorials
    • Tutorial Index
    • Adult Crafts
    • Crafts for Kids
    • Crafts for Seniors
    • Recycled Crafts
    • Seasonal Crafts
    • Holiday Crafts
    • Free Printables
    • Craft Collections
  • Adult Crafts
    • Bath & Body
    • Beach Crafts
    • Clay Pot Crafts
    • Crafts for Seniors
    • Decoupage Crafts for Adults
    • DIY Gift ideas
    • Garden Crafts
    • Home Decor Projects
    • Kitchen Crafts
    • Light Bulb Crafts
    • Luminary Crafts
    • Mason Jar Crafts
    • Needlework
    • Photo Display Ideas
    • Recycled Crafts for Adults
    • Wearable Crafts for Adults
  • Crafts for Kids
    • Animal Crafts for Kids
    • Back to School Crafts
    • Beach Crafts for Kids
    • Camp Crafts
    • Cardboard Tube Crafts for Kids
    • Decoupage Crafts for Kids
    • Easy Crafts for Kids
    • Nature Crafts for Kids
    • Other Kid’s Crafts
    • Paper Plate Crafts for Kids
    • Recycled Crafts for Kids
    • Slimes, Doughs, & Clay
    • Wearable Crafts for Kids
  • Holiday Crafts
    • 4th of July Crafts
    • Christmas Crafts
    • DIY Gift ideas
    • Earth Day Crafts
    • Easter Crafts
    • Father’s Day Crafts
    • Halloween Crafts
    • Memorial Day Crafts
    • Mother’s Day Crafts
    • New Year’s
    • Other Holidays
    • Patriot Day Crafts
    • St. Patrick’s Day Crafts
    • Thanksgiving Crafts
    • Valentine’s Day Crafts
  • Seasonal Crafts
    • Winter Crafts
    • Spring Crafts
    • Summer Crafts
    • Fall Crafts
  • Skip to primary navigation
  • Skip to main content
  • Skip to primary sidebar
  • Skip to footer

Crafts by Amanda

crafts for adults and kid's crafts

  • Tutorials
    • Tutorial Index
    • Adult Crafts
    • Crafts for Kids
    • Crafts for Seniors
    • Recycled Crafts
    • Seasonal Crafts
    • Holiday Crafts
    • Free Printables
    • Craft Collections
  • Adult Crafts
    • Bath & Body
    • Beach Crafts
    • Clay Pot Crafts
    • Crafts for Seniors
    • Decoupage Crafts for Adults
    • DIY Gift ideas
    • Garden Crafts
    • Home Decor Projects
    • Kitchen Crafts
    • Light Bulb Crafts
    • Luminary Crafts
    • Mason Jar Crafts
    • Needlework
    • Photo Display Ideas
    • Recycled Crafts for Adults
    • Wearable Crafts for Adults
  • Crafts for Kids
    • Animal Crafts for Kids
    • Back to School Crafts
    • Beach Crafts for Kids
    • Camp Crafts
    • Cardboard Tube Crafts for Kids
    • Decoupage Crafts for Kids
    • Easy Crafts for Kids
    • Nature Crafts for Kids
    • Other Kid’s Crafts
    • Paper Plate Crafts for Kids
    • Recycled Crafts for Kids
    • Slimes, Doughs, & Clay
    • Wearable Crafts for Kids
  • Holiday Crafts
    • 4th of July Crafts
    • Christmas Crafts
    • DIY Gift ideas
    • Earth Day Crafts
    • Easter Crafts
    • Father’s Day Crafts
    • Halloween Crafts
    • Memorial Day Crafts
    • Mother’s Day Crafts
    • New Year’s
    • Other Holidays
    • Patriot Day Crafts
    • St. Patrick’s Day Crafts
    • Thanksgiving Crafts
    • Valentine’s Day Crafts
  • Seasonal Crafts
    • Winter Crafts
    • Spring Crafts
    • Summer Crafts
    • Fall Crafts
Craft Tutorials | Holiday Crafts | Halloween Crafts | Twirling Paper Monsters
Halloween Crafts

Twirling Paper Monsters

Author by Amanda Davis on September 25, 2017 Updated on August 13, 2019

5 from 1 vote
Jump to Project
Twirling Paper Monsters: fun decoration for Halloween or a monster party!
746 shares
  • Share
  • Tweet
  • Flipboard
  • Email

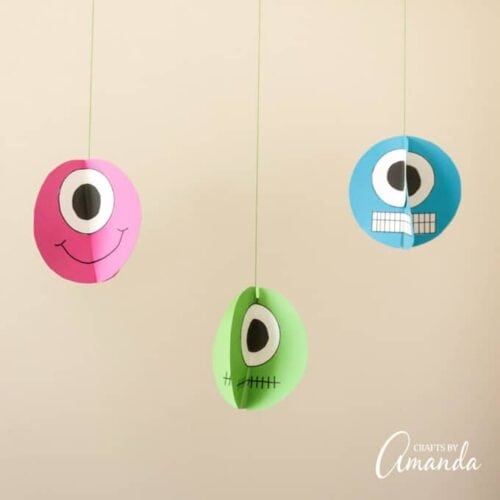
Whether it’s for Halloween or a monster themed birthday party, these twirling paper monsters are super cute and sure to be a big hit with the kids! This can even be a fun make and take party craft for kids. Each child can make one, you can hang them during your party and then let them take their paper monster home when they leave.

Paper monsters twirling on string


Paper monsters twirling horizontal

You could use construction paper for these, but I prefer cardstock. Cardstock is sturdier, doesn’t tear easily as construction paper does, and the colors are much more vibrant!

Watch the video above to see the monsters in action! I used a small fan to keep them going. If you have a ceiling fan, that should create enough breeze to keep your hanging monsters going. If not, a strategically placed desk fan does the job!

Yellow paper twirling monster

Making Twirling Paper Monsters

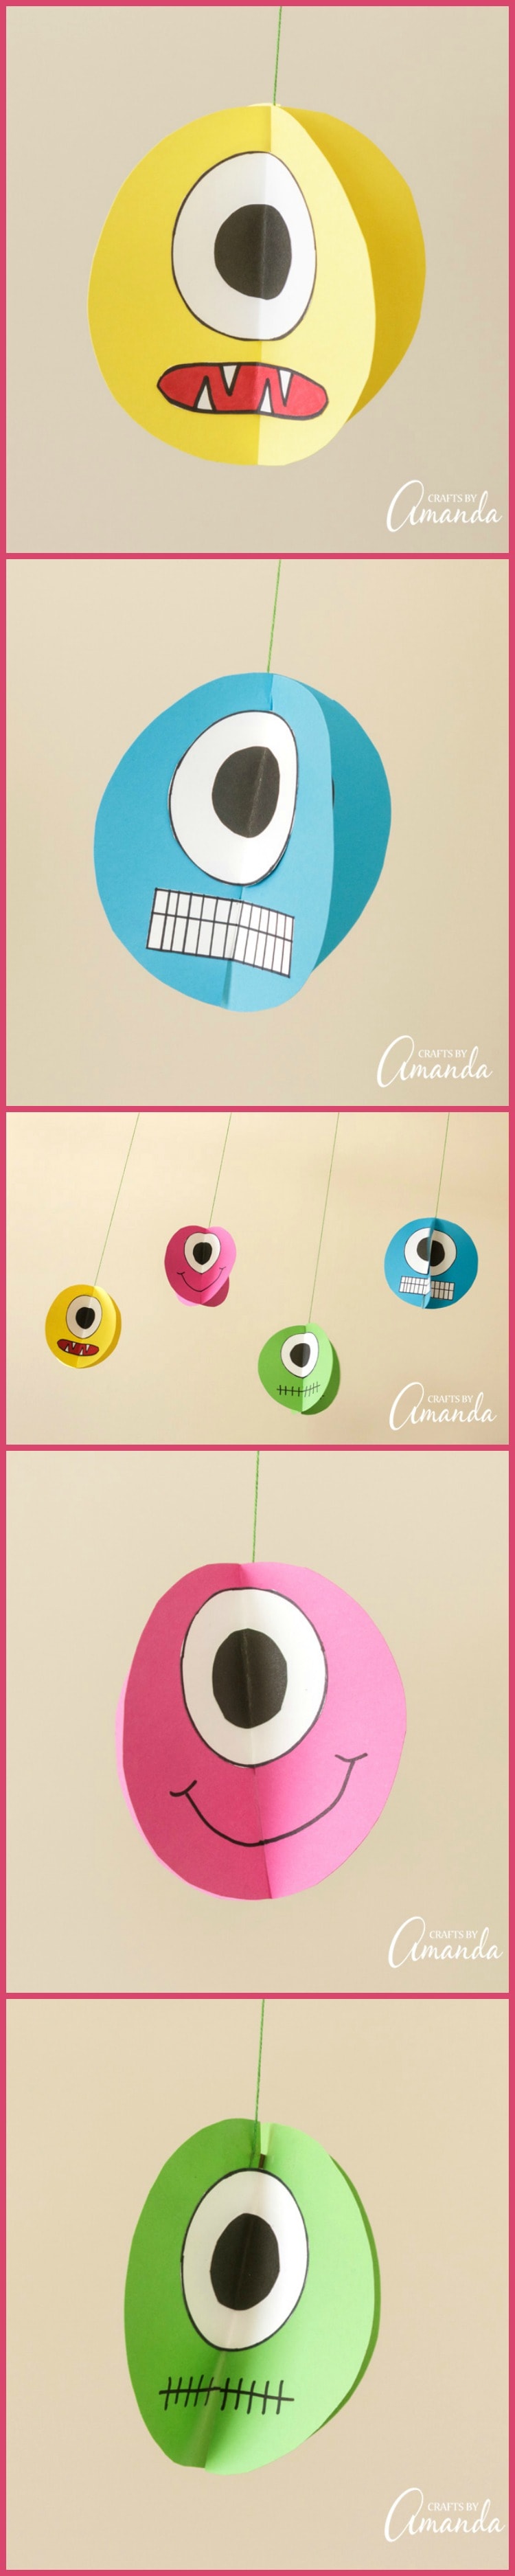
I’ve drawn patterns for you, you can print them in the supply list below. I included two fang mouths. One has a red background, the other I left blank in case kids want to color the inside of the mouth a different color.

You can use a marker to draw on mouths instead of using the patterns too!

Pink paper twirling monster

The squared off toothy mouth is a favorite of mine that you’ll see in many of my monster crafts on this blog.

Blue paper twirling monster

And of course, there’s the stitched mouth, another one you can use the black marker for. The stitched mouth is reminiscent of the Frankenstein monster. Honestly, it’s a total coincidence that the monster I chose for the stitched mouth just happened to be green like Frankie!

Green paper twirling monster

Kids can use whatever color cardstock they want and can mix and match the mouths too. So let’s get down to making them, shall we?

twirling paper monster supplies

Twirling Paper Monster Supplies:

  • Cardstock
  • Glue stick
  • Scissors
  • String
  • Patterns – click to print these
  • Black marker


First, you’ll want to print the patterns. Here’s what they are for:

  • Large circle – monster head, you need 2 of these circles in the same color for one monster.
  • Medium circle – this is for the white of the monster’s eye. You will need 4 of these for each monster.
  • Small circle – This is for the black part of the eye and you will need 4 of these. I suggest using the pattern to cut these from black cardstock. Another alternative is to cut 4 circles from white paper and color them in with black marker.
  • Fang mouth – I’ve included two types of these, one is already colored in red. I provided a blank one in case kids want a different color, they can fill it in themselves. You will need 4 of these for each monster.
  • Squared mouth – Simple, print and cut out. If you don’t want to print the pattern sheet multiple times, you can cut this mouth from the pattern sheet and photocopy it. You will need 4 of these for each monster.

Let’s make monsters!

First, cut two large circles from the same color card stock.

First, cut two large circles from the same color cardstock. Cut a slit in each circle that extends just a little past the center.

Join the two circles by sliding the two slits together.

Join the two circles by sliding the two slits together. If the circles don’t line up once combined, simply cut the slit a little longer until they do. This is the key to your twirling paper monsters!

Using a glue stick, apply a strip of glue along one of the slits.

With the circles combined and laying flat on the work surface, use a glue stick to apply a strip of glue along the side of one of the slits.

Cut a piece of string about 36-inches long and press oone end of that string into the glue.

Cut a piece of string about 36-inches long and press one end of that string into the glue.

Next use the glue stick to attach a medium circle to the large circle, covering the string.

Next use the glue stick to attach a medium circle to the large circle, covering the string.

Now glue a small black circle in the center of the medium white circle.

Now glue a small black circle in the center of the medium white circle.

Glue the mouth of your choice under the eye.

Glue the mouth of your choice under the eye.

Now you will need to crease the fold on the face you just created, making sure the paper eye and mouth stay in place.

Now you will need to crease the fold on the face you just created, making sure the paper eye and mouth stay in place.

Finish the monster by repeating the above steps for the remaining three sections.

Finish the monster by repeating the above steps for the remaining three sections.

Crease each section

This is what it will look like when done

Make a stitched mouth by drawing a horizontal line across the circle then drawing vertical lines 1/4-inch apart.

Make a stitched mouth by drawing a horizontal line across the circle then drawing vertical lines 1/4-inch apart.

Colorful twirling paper monsters

Hang your twirling paper monsters so that they alternate in height. If they are right next to each other they are likely to tangle. Varying the heights eliminates that problem!

Twirling paper monsters

Don’t you just love how silly their faces look in blurred motion! If you’d like to see other ideas for this twirling craft, check out my swirling twirling ladybugs, these twirling love bugs, and my twirling bee craft too!


Twirling Paper Monsters: fun decoration for Halloween or a monster party!
Print Project
5 from 1 vote

Twirling Paper Monsters

Author: Amanda Formaro

Supplies

  • Cardstock
  • Glue stick
  • Scissors
  • String
  • Patterns
  • Black marker

Instructions

  • First, cut two large circles from the same color card stock. Cut a slit in each circle that extends just a little past the center.
  • Join the two circles by sliding the two slits together. If the circles don't line up once combined, simply cut the slit a little longer until they do.
  • With the circles combined and laying flat on the work surface, use a glue stick to apply a strip of glue along one of the slits.
  • Cut a piece of string about 36-inches long and press one end of that string into the glue.
  • Next use the glue stick to attach a medium circle to the large circle, covering the string.
  • Now glue a small black circle in the center of the medium white circle.
  • Glue the mouth of your choice under the eye.
  • Now you will need to crease the fold on the face you just created, making sure the paper eye and mouth stay in place.
  • Finish the monster by repeating the above steps for the remaining three sections.
  • Hang your monsters so that they alternate in height. If they are right next to each other they are likely to tangle. Varying the heights eliminates that problem!
Twirling Paper Monsters
If your kids love monsters, they'll have a blast making these twirling paper monsters for their monster themed birthday or a Halloween party!
  • Author
  • Recent Posts
Amanda Davis
Amanda Davis is the crafty, entrepreneurial mother of four children. She loves to bake, cook, make kid's crafts and create decorative items for her home. She is a crafting expert and guru in the kitchen and has appeared online and in print publications many times over the years.
Latest posts by Amanda Davis (see all)
  • Spring Scavenger Hunt - May 9, 2025
  • How to Make Lip Scrub - May 2, 2025
  • How to Make Lavender Soap - April 22, 2025
746 shares
  • Share
  • Tweet
  • Flipboard
  • Email

Filed Under: Easy Crafts for Kids, Free Printables, Halloween Crafts, Other Kid's Crafts Tagged With: card stock, halloween, kid's crafts, Monster Crafts, paper, paper craft

Reader Interactions

Free CraftsBy email every week

Latest crafts straight to your inbox!

5 from 1 vote (1 rating without comment)

Leave a Reply Cancel reply

Your email address will not be published. Required fields are marked *

Rate This Project


The maximum upload file size: 640 MB. You can upload: image, video. Links to YouTube, Facebook, Twitter and other services inserted in the comment text will be automatically embedded. Drop files here

Primary Sidebar

Hi! I’m Amanda and I’m the founder and head designer of Crafts by Amanda. I have spent over 25 years creating projects to share, but it’s not just me anymore! It’s turned into a complete family affair. Come and meet the Creative Team!

Free CraftsBy email every week

Latest crafts straight to your inbox!

All Time Favorites

snowy pinecone candle jar luminaries

Winter Luminaries: Snowy Pinecone…

Make pretty winter luminaries that appear to be covered ... Go To project

Make this wonderful deco mesh pumpkin wreath to hang on your door this fall!

Deco Mesh Pumpkin Wreath…

Adorn your door this fall with a pretty deco mesh ... Go To project

Learn to make these adorable ladybug painted rocks. use special outdoor paint for this adorable garden craft so you can keep garden ladybugs all summer!

Ladybug Painted Rocks…

I'm going to show you how to make these adorable ... Go To project

Reuse those empty prescription pill bottles in all sorts of ways. From organizing to making cookies. Yes, cookies! See how to use your empty pill bottles!

20 Uses for Prescription Pill…

You've been collecting prescription pill bottles for ... Go To project

Meet the Family

Amanda

Founder and Designer

Kristen

Editorial Manager

Lindsay

Social Media Manager

As seen on:

Footer

Favorites

  • Jar Photo Frames
  • No-Sew Roman Shade
  • Paper Flowers
  • How to Make a Scrunchie
  • Mermaid Slime

About

  • Home
  • Meet the Creative Team
  • Work with Us
  • Privacy Policy
  • Accessibility
  • Contact Us

Images/text copyright Amanda Formaro 2020. To feature a post from Crafts by Amanda, you may use one photo credited and linked back directly to the project post.

Free CraftsBy email every week

Latest crafts straight to your inbox!

Copyright ©2025, Crafts by Amanda. All Rights Reserved.
Design by Pixel Me Designs

Rate This Tutorial

Your vote:


To share a photo with your comment click here!

A rating is required
A name is required
An email is required

Recipe Ratings without Comment

Something went wrong. Please try again.