• Home
  • About
    • About Crafts by Amanda
    • Visit Our Recipe Site
  • Work With Us
  • Join
    • Free Newsletters
    • Join our Facebook craft group
↑
  • Tutorials
    • Tutorial Index
    • Adult Crafts
    • Crafts for Kids
    • Crafts for Seniors
    • Recycled Crafts
    • Seasonal Crafts
    • Holiday Crafts
    • Free Printables
    • Craft Collections
  • Adult Crafts
    • Bath & Body
    • Beach Crafts
    • Clay Pot Crafts
    • Crafts for Seniors
    • Decoupage Crafts for Adults
    • DIY Gift ideas
    • Garden Crafts
    • Home Decor Projects
    • Kitchen Crafts
    • Light Bulb Crafts
    • Luminary Crafts
    • Mason Jar Crafts
    • Needlework
    • Photo Display Ideas
    • Recycled Crafts for Adults
    • Wearable Crafts for Adults
  • Crafts for Kids
    • Animal Crafts for Kids
    • Back to School Crafts
    • Beach Crafts for Kids
    • Camp Crafts
    • Cardboard Tube Crafts for Kids
    • Decoupage Crafts for Kids
    • Easy Crafts for Kids
    • Nature Crafts for Kids
    • Other Kid’s Crafts
    • Paper Plate Crafts for Kids
    • Recycled Crafts for Kids
    • Slimes, Doughs, & Clay
    • Wearable Crafts for Kids
  • Holiday Crafts
    • 4th of July Crafts
    • Christmas Crafts
    • DIY Gift ideas
    • Earth Day Crafts
    • Easter Crafts
    • Father’s Day Crafts
    • Halloween Crafts
    • Memorial Day Crafts
    • Mother’s Day Crafts
    • New Year’s
    • Other Holidays
    • Patriot Day Crafts
    • St. Patrick’s Day Crafts
    • Thanksgiving Crafts
    • Valentine’s Day Crafts
  • Seasonal Crafts
    • Winter Crafts
    • Spring Crafts
    • Summer Crafts
    • Fall Crafts
  • Skip to primary navigation
  • Skip to main content
  • Skip to primary sidebar
  • Skip to footer

Crafts by Amanda

crafts for adults and kid's crafts

  • Tutorials
    • Tutorial Index
    • Adult Crafts
    • Crafts for Kids
    • Crafts for Seniors
    • Recycled Crafts
    • Seasonal Crafts
    • Holiday Crafts
    • Free Printables
    • Craft Collections
  • Adult Crafts
    • Bath & Body
    • Beach Crafts
    • Clay Pot Crafts
    • Crafts for Seniors
    • Decoupage Crafts for Adults
    • DIY Gift ideas
    • Garden Crafts
    • Home Decor Projects
    • Kitchen Crafts
    • Light Bulb Crafts
    • Luminary Crafts
    • Mason Jar Crafts
    • Needlework
    • Photo Display Ideas
    • Recycled Crafts for Adults
    • Wearable Crafts for Adults
  • Crafts for Kids
    • Animal Crafts for Kids
    • Back to School Crafts
    • Beach Crafts for Kids
    • Camp Crafts
    • Cardboard Tube Crafts for Kids
    • Decoupage Crafts for Kids
    • Easy Crafts for Kids
    • Nature Crafts for Kids
    • Other Kid’s Crafts
    • Paper Plate Crafts for Kids
    • Recycled Crafts for Kids
    • Slimes, Doughs, & Clay
    • Wearable Crafts for Kids
  • Holiday Crafts
    • 4th of July Crafts
    • Christmas Crafts
    • DIY Gift ideas
    • Earth Day Crafts
    • Easter Crafts
    • Father’s Day Crafts
    • Halloween Crafts
    • Memorial Day Crafts
    • Mother’s Day Crafts
    • New Year’s
    • Other Holidays
    • Patriot Day Crafts
    • St. Patrick’s Day Crafts
    • Thanksgiving Crafts
    • Valentine’s Day Crafts
  • Seasonal Crafts
    • Winter Crafts
    • Spring Crafts
    • Summer Crafts
    • Fall Crafts
Craft Tutorials | Holiday Crafts | Valentine's Day Crafts | Twirling Lovebugs
Valentine's Day Crafts

Twirling Lovebugs

Author by Melissa Lennig on February 11, 2019 Updated on January 3, 2020

5 from 4 votes
Jump to Project
995 shares
  • Share
  • Tweet
  • Flipboard
  • Email

Our Twirling Lovebugs were inspired by our Twirling Ladybugs, crafters of all ages will love making these little cuties! Our Twirling Lovebugs are perfect for Valentine’s Day, but what a fun project for Mother’s Day as well. They are a fun, simple, and colorful decoration that will bring joy and smiles to all who see them.

Colorful Twirling Lovebugs


Twirling Lovebugs

Every holiday, I hang whimsical paper decorations above my family’s kitchen table. The decorations make the atmosphere feel festive and fun, delight my kids, and help them remember the answer to their most frequently asked question: what holiday is next?

If it is warm where you live, these Twirling Lovebugs also look adorable outside. They swirl and twirl in the wind, making them a cute and frugal decoration for your patio, garden, or porch. I also think they would be a super cute decoration for a classroom Valentine’s Day party. How much sweeter can this Valentine’s Day craft get?

RELATED: If you like bug crafts, check out these fun Pinecone Lovebugs and our Plastic Spoon Bugs.

Pink Twirling Lovebug

To Make This Craft You Will Need

  • card stock (variety of colors and black)
  • medium heart paper punch
  • 8 adhesive wiggly eyes
  • Glue Dots or double-sided tape
  • pencil
  • salad plate (or another medium-sized circular item—about 7 inches across)
  • yarn
  • scissors


Supplies needed to make twirling lovebugs

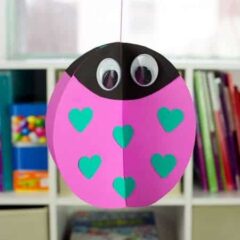
First, you will need to cut 2 circles from the card stock.

Cut out your circle using your card stock and a plate.

Place the salad plate on 2 stapled pieces of paper, then trace it. Use the scissors to cut around the circle, cutting both pieces of card stock at the same time.

Measuring twirling lovebug body on paper

Hold the stacked pieces of card stock together, then cut a slit from one side of the circle all the way up to the center. Slide the slits into each other to create the illusion of 1 flat circle. Make sure the slits are lined up in a straight line. Set the circle aside for a moment while you work on the next step.

Next, use your medium paper punch to punch out 24 hearts from another color. Fold 8 of those hearts in half.

Measuring out twirling lovebug with paper

After the hearts are prepped, grab the salad plate and a piece of black card stock. Starting at the bottom of the paper, trace 1/4 of the black salad plate. Cut out the shape and place it on top of your larger circle. Position the black paper with the rounded end facing down, and carefully use the scissors to trim the excess.

Staple 2 pieces of black card stock together, then trace the shape you just cut out twice. You will need 4 of those rounded “leaf” shapes to be the lovebug’s face. Fold the shapes in half…then grab your double-sided tape or Glue Dots.

Using cardstock to create twirling lovebug

With the circle laying flat, tape down one of the black “leaf” shapes for the love bug’s face. Tape 2 hearts down the center, and 2 on each side of the circle. These center hearts and the love bug’s face will prevent your little lovebug from sliding apart when you hang it up.

Green Twirling Lovebug

Fold the circle a different way and glue down the face and 6 hearts. Repeat two more times. When you are working on the last face, stick a long piece of string to the tape or Glue Dot, then press the lovebug’s face over it. The tape or Glue Dot should hold the string firmly in place.

Last, add 2 wiggly eyes to each of the black leaf shapes. Now the lovebug is complete!

Teal Twirling Lovebug

Make several more love bugs in a variety of colors!

Pink Twirling Lovebug

This is what they look like hanging outside. (I didn’t grab many pictures of this, because it’s 20 degrees here!) They twirl, spin, and swirl in the wind. I also think it would be fun to tie one onto the end of a short dowel rod for kids to run with, similar to running with a pinwheel or streamer.

Blue twirling lovebug outside

My kids really enjoyed these Twirling Lovebugs, and now our house is perfectly decorated for Valentine’s Day. Looking for more Valentine’s Day crafts? Check out these fun Scratch off Valentine Gift Certificates, adorable Valentine’s Day Treat Buckets and my DIY Realistic Duct Tape Roses!

Print Project
5 from 4 votes

Twirling Lovebugs

Author: Melissa Lennig, Fireflies and Mud Pies

Supplies

  • card stock variety of colors and black
  • medium heart paper punch
  • 8 adhesive wiggly eyes
  • Glue Dots or double-sided tape
  • pencil
  • salad plate or another medium sized circular item—about 7 inches across
  • yarn
  • scissors

Instructions

  • Place the salad plate on 2 stapled pieces of paper, then trace it. Use the scissors to cut around the circle, cutting both pieces of card stock at the same time.
  • Hold the stacked pieces of card stock together, then cut a slit from one side of the circle all the way up to the center. Slide the slits into each other to create the illusion of 1 flat circle. Make sure the slits are lined up in a straight line. Set the circle aside for a moment while you work on the next step.
  • Next, use your medium paper punch to punch out 24 hearts from another color. Fold 8 of those hearts in half.
  • After the hearts are prepped, grab the salad plate and a piece of black card stock. Starting at the bottom of the paper, trace 1/4 of the black salad plate. Cut out the shape and place it on top of your larger circle. Position the black paper with the rounded end facing down, and carefully use the scissors to trim the excess.
  • Staple 2 pieces of black card stock together, then trace the shape you just cut out twice. You will need 4 of those rounded “leaf” shapes to be the lovebug’s face. Fold the shapes in half…then grab your double-sided tape or Glue Dots.
  • With the circle laying flat, tape down one of the black “leaf” shapes for the love bug’s face. Tape 2 hearts down the center, and 2 on each side of the circle. These center hearts and the love bug’s face will prevent your little lovebug from sliding apart when you hang it up.
  • Fold the circle a different way and glue down the face and 6 hearts. Repeat two more times. When you are working on the last face, stick a long piece of string to the tape or Glue Dot, then press the lovebug’s face over it. The tape or Glue Dot should hold the string firmly in place.
  • Make several more love bugs in a variety of colors!
  • Hang and enjoy.

This post was originally published on this blog on Feb 8, 2017.

  • Author
  • Recent Posts
Melissa Lennig
Blogger at Fireflies and Mud Pies
Melissa is a published photographer, writer, former School Counselor, and mother to two boys. She shares her passions for nature, crafts, and family on her blog, Fireflies and Mud Pies. Her work has been featured in magazines and on hundreds of websites, including Humpty Dumpty, Jack and Jill, Better Homes and Gardens, Today, Newsday, Craft Gawker, and Food Gawker.
Latest posts by Melissa Lennig (see all)
  • Footprint Penguin - February 14, 2025
  • Twirling Lovebugs - February 11, 2019
  • Cardboard Tube Spiderman - June 7, 2017
995 shares
  • Share
  • Tweet
  • Flipboard
  • Email

Filed Under: Animal Crafts for Kids, Spring Crafts, Summer Crafts, Valentine's Day Crafts Tagged With: holiday craft, holidays, kid's crafts, love, paper craft, valentine, valentines, valentines day, valentines day craft

Reader Interactions

Free CraftsBy email every week

Latest crafts straight to your inbox!

Comments

  1. Mia Alexandra Quiroz Delgado says

    November 26, 2020 at 8:19 am

    This is the best ladygug craft ever!

    Reply
5 from 4 votes (4 ratings without comment)

Leave a Reply Cancel reply

Your email address will not be published. Required fields are marked *

Rate This Project


The maximum upload file size: 640 MB. You can upload: image, video. Links to YouTube, Facebook, Twitter and other services inserted in the comment text will be automatically embedded. Drop files here

Primary Sidebar

Hi! I’m Amanda and I’m the founder and head designer of Crafts by Amanda. I have spent over 25 years creating projects to share, but it’s not just me anymore! It’s turned into a complete family affair. Come and meet the Creative Team!

Free CraftsBy email every week

Latest crafts straight to your inbox!

All Time Favorites

Learn to make these adorable ladybug painted rocks. use special outdoor paint for this adorable garden craft so you can keep garden ladybugs all summer!

Ladybug Painted Rocks…

These colorful little ladybug painted rocks are the ... Go To project

snowy pinecone candle jar luminaries

Winter Luminaries: Snowy Pinecone…

Make pretty winter luminaries that appear to be covered ... Go To project

Make this wonderful deco mesh pumpkin wreath to hang on your door this fall!

Deco Mesh Pumpkin Wreath…

Adorn your door this fall with a pretty deco mesh ... Go To project

Reuse those empty prescription pill bottles in all sorts of ways. From organizing to making cookies. Yes, cookies! See how to use your empty pill bottles!

20 Uses for Prescription Pill…

You've been collecting prescription pill bottles for ... Go To project

Meet the Family

Amanda

Founder and Designer

Kristen

Editorial Manager

Lindsay

Social Media Manager

As seen on:

Footer

Favorites

  • Jar Photo Frames
  • No-Sew Roman Shade
  • Paper Flowers
  • How to Make a Scrunchie
  • Mermaid Slime

About

  • Home
  • Meet the Creative Team
  • Work with Us
  • Privacy Policy
  • Accessibility
  • Contact Us

Images/text copyright Amanda Formaro 2020. To feature a post from Crafts by Amanda, you may use one photo credited and linked back directly to the project post.

Free CraftsBy email every week

Latest crafts straight to your inbox!

Copyright ©2025, Crafts by Amanda. All Rights Reserved.
Design by Pixel Me Designs

Rate This Tutorial

Your vote:


To share a photo with your comment click here!

A rating is required
A name is required
An email is required

Recipe Ratings without Comment

Something went wrong. Please try again.