• Home
  • About
    • About Crafts by Amanda
    • Visit Our Recipe Site
  • Work With Us
  • Join
    • Free Newsletters
    • Join our Facebook craft group
↑
  • Tutorials
    • Tutorial Index
    • Adult Crafts
    • Crafts for Kids
    • Crafts for Seniors
    • Recycled Crafts
    • Seasonal Crafts
    • Holiday Crafts
    • Free Printables
    • Craft Collections
  • Adult Crafts
    • Bath & Body
    • Beach Crafts
    • Clay Pot Crafts
    • Crafts for Seniors
    • Decoupage Crafts for Adults
    • DIY Gift ideas
    • Garden Crafts
    • Home Decor Projects
    • Kitchen Crafts
    • Light Bulb Crafts
    • Luminary Crafts
    • Mason Jar Crafts
    • Needlework
    • Photo Display Ideas
    • Recycled Crafts for Adults
    • Wearable Crafts for Adults
  • Crafts for Kids
    • Animal Crafts for Kids
    • Back to School Crafts
    • Beach Crafts for Kids
    • Camp Crafts
    • Cardboard Tube Crafts for Kids
    • Decoupage Crafts for Kids
    • Easy Crafts for Kids
    • Nature Crafts for Kids
    • Other Kid’s Crafts
    • Paper Plate Crafts for Kids
    • Recycled Crafts for Kids
    • Slimes, Doughs, & Clay
    • Wearable Crafts for Kids
  • Holiday Crafts
    • 4th of July Crafts
    • Christmas Crafts
    • DIY Gift ideas
    • Earth Day Crafts
    • Easter Crafts
    • Father’s Day Crafts
    • Halloween Crafts
    • Memorial Day Crafts
    • Mother’s Day Crafts
    • New Year’s
    • Other Holidays
    • Patriot Day Crafts
    • St. Patrick’s Day Crafts
    • Thanksgiving Crafts
    • Valentine’s Day Crafts
  • Seasonal Crafts
    • Winter Crafts
    • Spring Crafts
    • Summer Crafts
    • Fall Crafts
  • Home
  • About
    • About Crafts by Amanda
    • Visit Our Recipe Site
  • Work With Us
  • Join
    • Free Newsletters
    • Join our Facebook craft group
  • Skip to primary navigation
  • Skip to main content
  • Skip to primary sidebar
  • Skip to footer

Crafts by Amanda

crafts for adults and kid's crafts

  • Tutorials
    • Tutorial Index
    • Adult Crafts
    • Crafts for Kids
    • Crafts for Seniors
    • Recycled Crafts
    • Seasonal Crafts
    • Holiday Crafts
    • Free Printables
    • Craft Collections
  • Adult Crafts
    • Bath & Body
    • Beach Crafts
    • Clay Pot Crafts
    • Crafts for Seniors
    • Decoupage Crafts for Adults
    • DIY Gift ideas
    • Garden Crafts
    • Home Decor Projects
    • Kitchen Crafts
    • Light Bulb Crafts
    • Luminary Crafts
    • Mason Jar Crafts
    • Needlework
    • Photo Display Ideas
    • Recycled Crafts for Adults
    • Wearable Crafts for Adults
  • Crafts for Kids
    • Animal Crafts for Kids
    • Back to School Crafts
    • Beach Crafts for Kids
    • Camp Crafts
    • Cardboard Tube Crafts for Kids
    • Decoupage Crafts for Kids
    • Easy Crafts for Kids
    • Nature Crafts for Kids
    • Other Kid’s Crafts
    • Paper Plate Crafts for Kids
    • Recycled Crafts for Kids
    • Slimes, Doughs, & Clay
    • Wearable Crafts for Kids
  • Holiday Crafts
    • 4th of July Crafts
    • Christmas Crafts
    • DIY Gift ideas
    • Earth Day Crafts
    • Easter Crafts
    • Father’s Day Crafts
    • Halloween Crafts
    • Memorial Day Crafts
    • Mother’s Day Crafts
    • New Year’s
    • Other Holidays
    • Patriot Day Crafts
    • St. Patrick’s Day Crafts
    • Thanksgiving Crafts
    • Valentine’s Day Crafts
  • Seasonal Crafts
    • Winter Crafts
    • Spring Crafts
    • Summer Crafts
    • Fall Crafts
Craft Tutorials | Adult Crafts | Beach Crafts | Weathered Beach Signs
Beach Crafts

Weathered Beach Signs

Author by Amanda Davis on February 21, 2019 Updated on December 6, 2020

4.73 from 11 votes
Bring a little of that beach feeling into your home by making some rustic looking beach signs. 
Jump to Project
5065 shares
  • Share
  • Tweet
  • Flipboard
  • Email

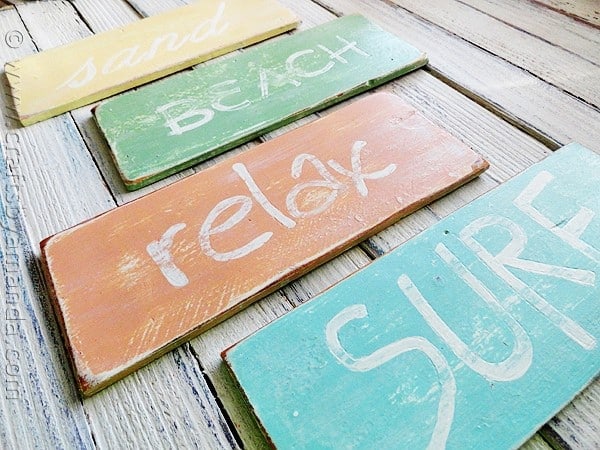
Bring a little of that beach feeling into your home by making some rustic looking beach signs. We will show you how to turn regular wood into weathered looking beachy signs perfect for your coastal themed home.

Ideal for bathroom decor or any part of your home that boasts that beautiful coastal decor look!

Weathered beach signs in pastel coastal colors


Weathered Beach Signs

Spring break has come and gone and many people hit the beach during this time of year. We come back home with a bag of seashells, a collection of sea glass, the sound of the ocean waves crashing in our ears, and the smell of warm, summery air in our nostrils.

RELATED: See how you can use your collection of sea glass to make this beautiful sea glass planter for your summer flowers or potted plants!

Weathered Beach Signs horizontal

These beach signs are just simple slats of wood you can buy at the craft store. Mine actually started out with the distressed primitive look, I made them when I still had my craft store back in 2003. They definitely needed updating, so I sanded them down as much as I could before getting started.

What You’ll Need to Make Weathered Beach Signs

I originally made this beach signs project for JoAnn Fabrics via DecoArt. I used the following supplies:

Supplies:

  • stylus
  • liner brush
  • wash brush
  • sandpaper or palm sander
  • acrylic sealer spray, matte finish

Americana acrylic paints

  • Buttermilk
  • Warm Beige
  • Spa Blue
  • Mint Julep
  • Cool White


Americana actually has quite a few new colors that are very beach-worthy as well, so I’ll be using some of those in the future.

Weathered Beach Signs base coat

First I gave them all a coat of Cool White and let them dry.

Weathered Beach Signs painted

Then I painted each one with the different colors noted above.

Weathered Beach Signs templates

I used Word to create the words surf, relax, beach and sand. If you don’t like the fonts that I chose, you can certainly make your own! If you like them, the Word pattern file is in the printable instructions below. Trim the words and place them on the slats.

Weathered Beach Signs etching

Use a ballpoint pen, or a stylus if you have one, to trace around the words, pressing firmly to create indentations in the wood below.

Weathered Beach Signs

This makes it a lot easier to paint your letters!

Weathered Beach Signs

Use a liner brush to fill in the letters with Cool White. Note: You could probably use a white painter’s pen to do this too!

Weathered Beach Signs

Dry brush some streaks across the surface with a wash brush.

Weathered Beach Signs

Then do some sanding to create that weathered look. Sand lightly in some areas and harder in others.

Weathered Beach Signs

You can see that I have sanded through some of the lettering as well as exposing the wood in the corners and on the edges.

Weathered Beach Signs

It’s totally up to you how much you expose.

Weathered Beach Signs

When you’re done sanding, brush them off really well so there’s no sanding dust left on them. Spray them with acrylic sealer in a matte finish.

Weathered beach signs hanging

I used wall putty to hang mine, but you could certainly attach a picture hanger to the back.

Here are some close-ups at different angles:

Weathered beach sign SAND yellow

Beige RELAX beach sign

Weathered beach sign GREEN

Blue SURF beach sign

These would also be fun attached to a spike and placed in the yard or on the porch!

Weathered Beach Signs

If you like these signs, you will love this coastal themed Clay Pot Lighthouse project, this Twig Coastal Wreath, our DIY Driftwood Signs, or this fun Coastal Striped Fish Decor.

Print Project
4.73 from 11 votes

Weathered Beach Signs

Bring a little of that beach feeling into your home by making some rustic looking beach signs. 
Author: Amanda Formaro

Supplies

  • 4 – 7” x 3” wood slats
  • Flat paintbrush
  • liner paintbrush
  • Toothpick
  • Pattern for fonts
  • Sandpaper preferably a handheld power sander

Americana Paints:

  • Buttermilk
  • Warm Beige
  • Spa Blue
  • Mint Julep Green
  • Cool White
  • font pattern

Instructions

  • Paint wooden slats with Cool White paint.
  • Paint each slat with a different color (Flesh Ton, Spa Blue, Mint Julep Green and Buttermilk).
  • Use Word to create the words beach, surf, relax and sand or print out the pattern.
  • Place each word onto a slat and trace the words using a ball point pen or a stylus, pressing firmly so as to create indents in the wood slat underneath.
  • Use Cool White to paint the words.
  • Dip flat paintbrush into Cool White and wipe off all of the excess paint onto a paper towel. You want to create a dry brushed looked, so lightly paint streaks across the surface of the slat.
  • Sand the edges and lightly across the top of the slats to create a weathered look.
  • Spray with an acrylic matte sealer.

Weathered Beach Signs Tutorial


This post was originally published on this blog on May 5, 2012.

  • Author
  • Recent Posts
Amanda Davis
Amanda Davis is the crafty, entrepreneurial mother of four children. She loves to bake, cook, make kid's crafts and create decorative items for her home. She is a crafting expert and guru in the kitchen and has appeared online and in print publications many times over the years.
Latest posts by Amanda Davis (see all)
  • How to Make Lavender Soap - April 28, 2026
  • Plastic Spoon Bugs on a Branch - April 24, 2026
  • Field of Lime Flowers - April 22, 2026
5065 shares
  • Share
  • Tweet
  • Flipboard
  • Email

Filed Under: Beach Crafts, Crafts for Seniors, DIY Gift ideas, Home Decor Projects, Summer Crafts Tagged With: adult, adult craft ideas, adult crafts, adults, beach, crafts for adults, distressed, paint, rustic, summer, wall art, weathered

Reader Interactions

Free CraftsBy email every week

Latest crafts straight to your inbox!

Comments

  1. Cheryl Atkinson says

    July 10, 2022 at 11:11 am

    Hi Amanda! I just found your blog thru Andrea’s blog from The Cottage Market and i am so happy! I live in a Coastal city so i am a big fan of Coastal decor. I have a booth that i sell my projects so I am always looking for new ideas. Thank you for your inspiration. I am Pinning quite a few.

    Reply
  2. No Thanks says

    July 1, 2020 at 9:50 am

    I love this project but where can I get the fonts?

    Reply
    • Amanda Formaro says

      July 3, 2020 at 7:51 am

      Hi there :) The font pattern link is in the printable instructions at the end of the post. But here’s the direct link for you https://craftsbyamanda.com/wp-content/uploads/2012/05/Beach-sign-fonts.pdf

      Reply
  3. Pat O. says

    July 11, 2018 at 10:09 am

    Love these! I would never have thought to print out the lettering and trace around them onto the wood for the pattern; I would just have free-handed it–great idea!

    Reply
    • Amanda Formaro says

      July 15, 2018 at 9:01 am

      So much easier!

      Reply
  4. Julie says

    December 30, 2017 at 7:14 pm

    Hi! I love these but was just wondering what you mean by “do some streaks with a dry brush…”
    Thanks!

    Reply
    • Amanda Formaro says

      January 7, 2018 at 12:23 pm

      Hi Julie ) Dry brushing is a technique that allows you to add a weathered look to something. Dip your paint brush in the paint, wipe off excess on rim of paint jar. The idea is to pounce the brush on a dry cloth to remove most of the excess paint so that when you brush across your surface you get streaks and lines instead of solid wet paint. Hope that helps!

      Reply
  5. Shelleen bowman says

    December 17, 2015 at 8:02 pm

    I was wondering where you purchased your wood planks. The signs look great !

    Reply
    • Amanda Formaro says

      January 1, 2016 at 12:26 pm

      Oh my goodness, those are from soooo many years ago. I believe I got them from Michaels, but it was well over ten years ago. All craft supply stores have a section with wood and I believe they all have similar slats to these :)

      Reply
  6. Nan McDonald says

    July 29, 2014 at 10:49 am

    Love this!!

    Reply
    • Amanda Formaro says

      August 4, 2014 at 8:47 am

      Thank you Nan!

      Reply
  7. Marcia Karnopp says

    May 5, 2014 at 4:41 pm

    These are great! I love the idea but might change the words
    to create a sign in my yard for:
    welcome
    cookies made by Grandma
    garden
    patio

    Reply
    • Amanda Formaro says

      May 7, 2014 at 6:01 am

      Those would be fun Marcia!

      Reply
  8. Amanda Wulf says

    May 5, 2014 at 1:24 pm

    This is so awesome! I live in the USVI right now so these are perfect for my decor!!!! Thank you for sharing these with us!

    Reply
    • Amanda Formaro says

      May 7, 2014 at 6:02 am

      Thanks Amanda! I hope you have fun making them :)

      Reply
  9. Ana says

    May 1, 2014 at 5:07 pm

    Where are the instructions?

    Reply
    • Amanda Formaro says

      May 3, 2014 at 5:07 pm

      Hi Ana. I’m confused by your comment. The blog post IS the instructions and there’s a printable version of the instructions at the end as well…

      Reply
  10. lesley kim says

    April 20, 2014 at 3:43 pm

    what an amazing idea!! i cant wait to try this! =)

    Reply
    • Amanda Formaro says

      April 23, 2014 at 6:34 am

      Thanks Lesley!

      Reply
  11. Mabel Watson says

    February 18, 2014 at 4:03 pm

    Love this!!!! P

    Reply
    • Amanda Formaro says

      February 21, 2014 at 7:15 am

      Thank you Mabel!

      Reply
  12. Penny Johnson says

    May 7, 2013 at 11:52 pm

    LOVE LOVE LOVE!!! Thank you. I see where you listed the site to find the fonts, but when I “copy and paste”,I get an error message that the address is not valid. What am I doing wrong? Thanx so much…

    Reply
    • Amanda Formaro says

      May 8, 2013 at 7:24 am

      Hi Penny! It should work fine now, sorry about that. If you still have trouble, email me [email protected] I just moved my blogs to a private server and it may not be completely updated in your neck of the woods!

      Reply
  13. Georgia says

    April 25, 2013 at 3:01 pm

    wow thanks a lot amanda! i’ve been looking for something like this for ages, but all the other methods were too hard! I’m wanting to transform my bedroom into a beach/nautical themed bedroom, so these are perfect. Thank you!

    Reply
    • Amanda Formaro says

      April 29, 2013 at 7:23 am

      Glad you like them Georgia!

      Reply
  14. Ashton says

    March 18, 2013 at 6:49 pm

    HI Amanda,

    where did you get your wooden slats?

    Also I cannot find the link to the fonts above that you mention. Can you tell me which ones you used?

    How long do you let each layer dry?
    Would sandpaper work alright, I don’t have a power sander?

    Thanks!

    Reply
    • Amanda Formaro says

      May 8, 2013 at 7:41 am

      Ashton, I am so sorry for the delay on replying to this! The wooden slats I bought at Michaels. The font link should now be fixed. I would allow for an hour between coats. Yes, sand paper is fine!

      Reply
  15. Peggy says

    March 11, 2013 at 11:33 pm

    Wondering where the buttermilk comes in?

    Reply
    • Amanda Formaro says

      March 19, 2013 at 5:27 pm

      Hi Peggy! The buttermilk is the light color that looks like a pale yellow :) Hope that helps!

      Reply
  16. Jan says

    January 31, 2013 at 3:24 pm

    Could I purchase the 4 signs I would pay for sipping as we’ll. thanks

    Reply
    • Amanda says

      February 1, 2013 at 5:10 pm

      I’m sorry Jan. I was contracted to make those through DecoArt. Anything they contract me for, I ship the finished craft straight to them.

      Reply
  17. brittany says

    November 30, 2012 at 11:28 am

    i loove this and im in the process of doing it but i realized the lettering isnt big enough and i tried editing the fonts and making them bigger but it wont let me is there anyway you can make it bigger and send me the link?? id appreciate it !

    Reply
    • Amanda says

      December 1, 2012 at 5:51 pm

      Hi Brittany. Just use the enlarge feature on your copier :) or printer.

      Reply
  18. Kim says

    September 23, 2012 at 3:42 pm

    Love the signs and thanks so much for directions. Have been looking for a way to transfer! Just love your site and blog.

    Reply
    • Amanda says

      September 27, 2012 at 1:18 am

      Thanks Kim!

      Reply
  19. julie says

    July 7, 2012 at 6:46 pm

    genius idea on how to trasfer the letters! why have i never thought of that over the yrs!! love the signs and the fonts too!

    Reply
    • Amanda says

      July 16, 2012 at 3:31 pm

      Thanks Julie! Yes i’ve been using that method for years. Used to transfer whole patterns that way for tole painting :) but I used carbon paper to transfer it, so the indents just made sense!

      Reply
  20. ATasteOfMadness says

    June 12, 2012 at 5:07 pm

    Wow, so creative! I love it!

    Reply
  21. Christine says

    June 11, 2012 at 12:33 pm

    I love these! Can you tell me what fonts you used? I love the ones you picked but I need to use different words. Thanks!

    Reply
    • Amanda says

      June 12, 2012 at 12:32 pm

      Hi Christine! Here are the fonts in order of how they are listed on the PDF pattern :)

      Baby Potato (MUST BE TYPED IN CAPS to render font)
      Hecubus
      harrison
      English

      Reply
      • Christine says

        June 24, 2012 at 2:09 pm

        Thank you thank you!

        Reply
  22. Ramya says

    June 11, 2012 at 10:17 am

    Wow! This is such an awesome project…. The signs look so cool!!luv it..

    Reply
    • Amanda says

      June 12, 2012 at 12:33 pm

      Thanks Ramya!

      Reply
  23. Debra says

    June 6, 2012 at 1:37 am

    These signs are GREAT! I’m a sign person and a beach person and wish I was crafty.lol

    Reply
  24. Marie Vickers says

    May 18, 2012 at 7:57 am

    Hi came across this tutorial via Stumble – I love it! They look great – thanks for sharing this :)

    Reply
  25. Lauren @ The Well Crafted Home says

    May 16, 2012 at 8:55 pm

    These are so cute! I love your blog! I am off to pin your wonderful project!

    Reply
  26. Maria says

    May 9, 2012 at 1:06 am

    What beautiful signs! Love the colors and the summery look! Reminds me of a beach house, just beautiful!!

    Reply
  27. Suzanne says

    May 8, 2012 at 7:04 pm

    Exactly what I was looking for. Thanks for sharing your super cute signs and tutorial!

    Reply
  28. Brenda @ a farmgirl's dabbles says

    May 7, 2012 at 10:18 pm

    I’ve always wanted a beach house with beach signs!! Yours look great (and fun to do!).

    Reply
  29. Cookie 17 says

    May 7, 2012 at 12:20 am

    These are great Amanda look so easy ,thank’s for great project as usual,,Fantastic Job!!!,,,

    Reply
  30. Shelly says

    May 6, 2012 at 10:05 pm

    What a surprise to find one of my very favorite pastimes.. making signs in my inbox. I never knew the trick w/ the ballpoint pen and the fonts on paper. I always did it free hand and ended up waisting as many signs as I made:) Happy! Happy Happy! Thank you Amanda!

    Reply
  31. Terri Betz says

    May 6, 2012 at 5:15 pm

    These are stunning n expensive looking! Will be making these as soon as I can score some paints! TY Amanda!

    Reply
  32. carol says

    May 6, 2012 at 4:28 pm

    Very very nice. Tute was done so well even I could follow without once stopping and saying “What”. Nice job just like everything you do. Thanks so much.

    Reply
  33. gail says

    May 6, 2012 at 3:03 am

    love your weathered beach signs amanda! :) they are great. Super tute too.
    hope you’re having a great weekend!
    gail

    Reply
  34. Amanda M. says

    May 6, 2012 at 2:47 am

    WOW! LOVE these so much!!

    Reply
    • becky says

      January 8, 2013 at 1:39 pm

      love these so very much!

      Reply
      • Amanda says

        January 8, 2013 at 2:52 pm

        Thank you Becky! :)

        Reply
4.73 from 11 votes (1 rating without comment)

Leave a Reply Cancel reply

Your email address will not be published. Required fields are marked *

Rate This Project


The maximum upload file size: 640 MB. You can upload: image, video. Links to YouTube, Facebook, Twitter and other services inserted in the comment text will be automatically embedded. Drop files here


Primary Sidebar

Hi! I’m Amanda and I’m the founder and head designer of Crafts by Amanda. I have spent over 30 years creating projects to share, but it’s not just me anymore! It’s turned into a complete family affair. Come and meet the Creative Team!

Free CraftsBy email every week

Latest crafts straight to your inbox!

All Time Favorites

snowy pinecone candle jar luminaries

Winter Luminaries: Snowy Pinecone…

Make pretty winter luminaries that appear to be covered ... Go To project

Make this wonderful deco mesh pumpkin wreath to hang on your door this fall!

Deco Mesh Pumpkin Wreath…

Adorn your door this fall with a pretty deco mesh ... Go To project

Learn to make these adorable ladybug painted rocks. use special outdoor paint for this adorable garden craft so you can keep garden ladybugs all summer!

Ladybug Painted Rocks…

These colorful little ladybug painted rocks are the ... Go To project

Reuse those empty prescription pill bottles in all sorts of ways. From organizing to making cookies. Yes, cookies! See how to use your empty pill bottles!

20 Uses for Prescription Pill…

You've been collecting prescription pill bottles for ... Go To project

Meet the Family

Amanda

Founder and Designer

Kristen

Editorial Manager

Lindsay

Social Media Manager

As seen on:

Footer

Favorites

  • Jar Photo Frames
  • No-Sew Roman Shade
  • Paper Flowers
  • How to Make a Scrunchie
  • Mermaid Slime

About

  • Home
  • Meet the Creative Team
  • Work with Us
  • Privacy Policy
  • Accessibility
  • Contact Us

Images/text copyright Amanda Davis 2025. To feature a post from Crafts by Amanda, you may use one photo credited and linked back directly to the project post.

Free CraftsBy email every week

Latest crafts straight to your inbox!

Copyright ©2026, Crafts by Amanda. All Rights Reserved.
Design by Pixel Me Designs

Rate This Tutorial

Your vote:


To share a photo with your comment click here!

A rating is required
A name is required
An email is required

Recipe Ratings without Comment

Something went wrong. Please try again.