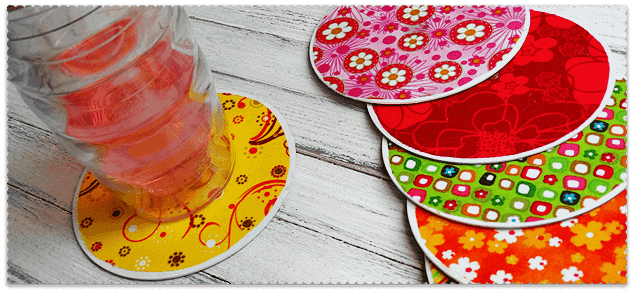
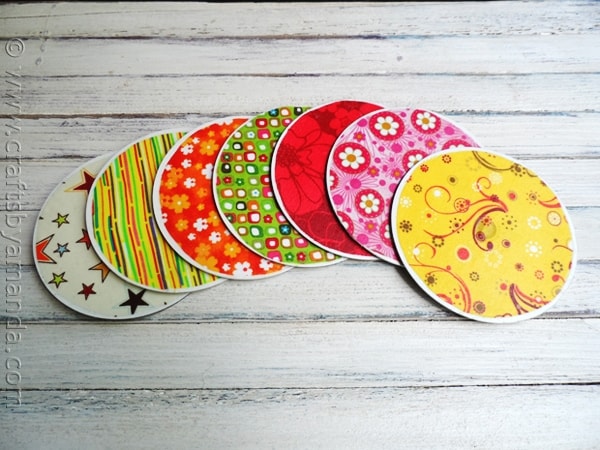
There are tons of fun recycled projects that you can do to reuse, repurpose and bring life back to things you no longer have interest in using! As computer systems are continually upgraded, CDs become obsolete. Games, music, promotional DVDs, all are great projects in the making! Recycled CD Coasters are turned into a chic set of coasters that are beautiful and useful.
Recycled CD Coasters
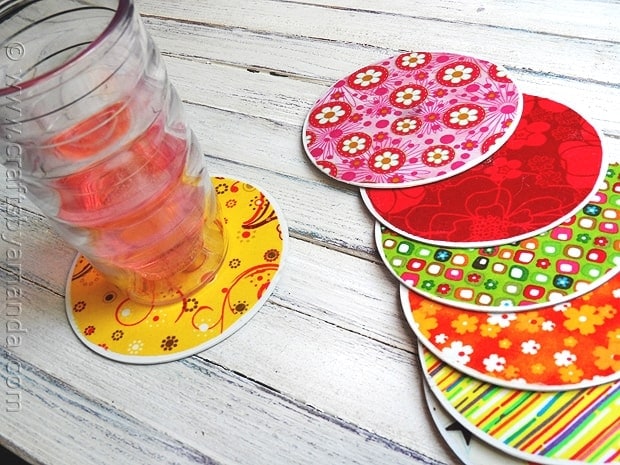
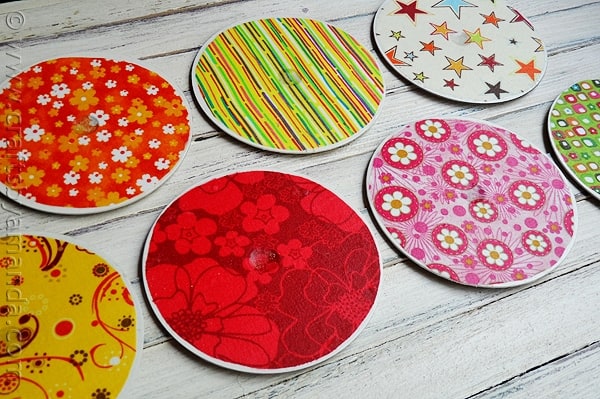
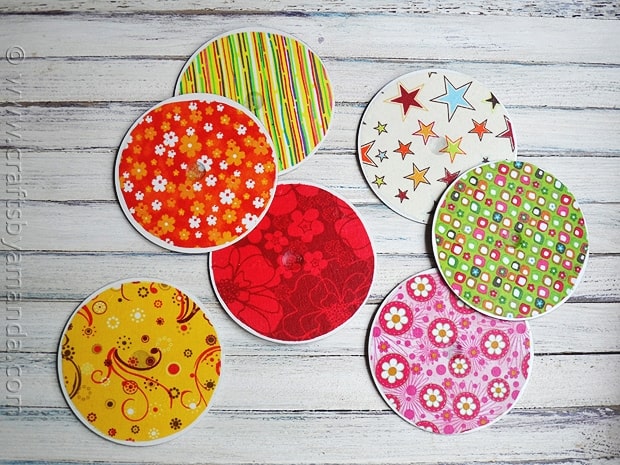
Aren’t they pretty looking? What’s fun is that you can customize these to your taste. Mismatch fabrics to suit your personal style. The possibilities are endless to how you can decorate these. Play them off the colors of your kitchen, living room, bedroom or office. There’s something satisfying about being able to repurpose something old, into something new. Don’t you agree?
Spread these out on your coffee table, your kitchen table or on a nightstand to display your recycled project! Next thing you know, people will be asking how you made them.
I have a drawer in my craft room dedicated to old DVDs and CDs that I refuse to throw in the garbage. I made these coasters a few months ago and they are still holding up beautifully. In fact, I have one sitting right next to me as I type this with a coffee cup atop it!
These were really easy to make and I think the results are fabulous.
Looking for a great gift for the holidays?
Guarantee these recycled CD coasters will be a unique and appreciated gift. :) If you liked this be sure to try our crocheted pizza coasters.
I’m a big fan of reusing things that no longer serve their purpose or that I no longer need. What are some ways you’ve reused or repurposed something?
Check out some of these great ideas we’ve compiled over the years to revive things and bring them back to life with a new meaning!
- Flower T-shirt Rings
- Lightbulb Snowman Ornament
- Barbie Zombies!
- Fairy House Nightlights
- Recycled Jar Lid Owls

Recycle Craft: CD Coasters
Supplies
- Recycled CDs or DVDs
- Colorful fabric
- Sand paper
- White spray primer
- Felt
- Hot glue gun
- Sharp scissors
- Mod Podge Hard Surface
Instructions
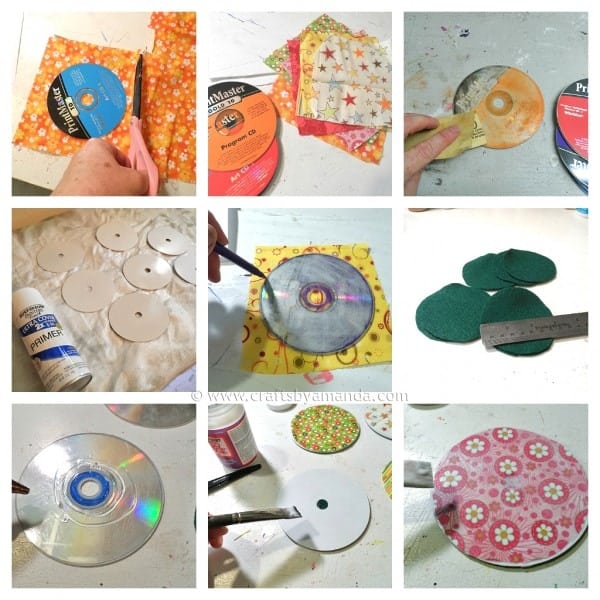
- Trace a CD onto your fabric. Repeat for as many different fabrics you want to use.
- Lightly sand off the side of the CD that has a design or writing on it. You don't have to sand everything off, just take the gloss coat off.
- Spray 2 coats of primer onto the CDs, allowing for proper dry time in between coats.
- Cut the circles out of the fabric, cutting them a little smaller than the traced circle to allow for some "border" around your coasters.
- For each coaster, cut a 3-inch circle from the felt.
- When primer is dry, hot glue the felt circles to the bottom of the Cds.
- To the top of the CD add a coat of Mod Podge. Gently press the fabric circle onto the coated CD and press out any wrinkles or creases. Allow to dry for 20 minutes before continuing.
- Apply two coats of Mod Podge to the top of the CD over the fabric, allow 2 hours dry time in between coats.
- Clay Pot Toadstools - June 2, 2026
- Spring Activity Sheets and Coloring Pages - May 29, 2026
- Paper Plate Ladybugs Craft - May 19, 2026


Rosemary Hunt says
How do you deal with the hole in the middle of the CD? Doesn’t it leave am indentation?
Amanda Formaro says
It wasn’t noticable
Iris says
Hi Amanda! This is a great project! I’m planning to do this with students and wonder why we can’t simply use the underside as the top? That way we would cover the darker printed top side with felt and nothing would show. Have you tried that way? I wonder if the slight little rim in the center would show under the fabric…
Thanks!
Amanda Formaro says
I haven’t tried that but it’s a great idea!
RAMONA MARIE HALL says
Does it matter which mod podge you use? In my search I have seen the mod podge plaid hard coat but I’ve also seen the mod podge sealer glue, acrylic sealer, and paper sealer. Some are gloss luster, matte mat and satin satine. Would only the hard coat mod podge work best?
Amanda Formaro says
Any of these will work fine. And the finish is up to you. I wouldn’t suggest gloss necessarily, because I would be worried about it dulling after repeated use.
RAMONA MARIE HALL says
Amanda,
Thanks so much for your response and advice. If (and I hope they do) turn out okay, I’ll share my photos of the coasters I’m working on.
Rosette Mifsud says
Hi Amanda
Just a suggestion to your website…. ask people to send you photos of things they have done in the way of recycling and in the way of re purposing stuff. I would be very happy to send you some photos of things I have made.
Love you website. especially this part about recycling. But it’s all very interesting.
May says
I’ve got a stack of old CDs and DVDs I just couldn’t bring myself to toss – this not only looks practical, but fun, too. Thanks! Happy fall!
Amanda Formaro says
Hope you enjoy making them!
Deborah Johnson says
I love these. I have made them for Christmas presents. I used cardstock. I didn’t sand them. I just mod podged them on. The tops I mod podged 2 times, each time letting them dry. I had cut them smaller leaving a border. I put glitter around the border and then mod podged the whole thing and finished by spraying with a sealer. I put felt on the back. They turned out beautifully!!!!
Amanda Formaro says
That’s awesome – so glad you enjoyed the project. I bet they were beautiful!
Marian says
Hi, I have a bag full of old cds and wanted to make coasters using pictures of my family and new grandbaby, but don’t want to ruin pictures, what can I put on top that would seal picture and keep it from getting ruin
Amanda Formaro says
You can use Mod Podge sealer over the photos :)
Mary Jo Overman says
Hi Amanda Love the cd, with my grandchilden pictures on, only thing is Im78 and cant remember how to do it
Ifound the instructions on you tube many many years a go I look fordward to your e-mails always I am such a fan of yours Mary Jo
[email protected]
Amanda Formaro says
Hi Mary Jo! There are a few different kinds on YouTube, I’m not sure which ones you are looking for but maybe this will help> https://www.google.com/search?q=youtube+cd+children+pictures+photos&oq=youtube+cd+children+pictures+photos&aqs=chrome..69i57j69i64.7260j0j4&sourceid=chrome&ie=UTF-8
parvati says
beautiful craft..will try makin one for myself..hope its okay ☺️
daisy says
Can I do them without primer I am in a facility it is not allowed
Amanda Formaro says
Absolutely! I would recommend using a white paint instead. You may need a couple coats of white paint but that should do it. The primer is basically just so you don’t see the CD through the fabric. Hope this helps!
Harriet says
Hi Amanda
I have a bunch of cds. I have tried to make with fabric, but i dont know what i can do with adges. Thank
Amanda Formaro says
Hi Harriet, could you please clarify? I’m unsure what you meant, but I would be happy to help!
Tulika says
Wow! This is so amazing! ? But sadly I have just finished making the coasters from cds by sticking onto them scrapbook papers and printed thin cardboards. Came across your blog once I was done making it. Sigh! But I guess that’s not gonna last long, so I’ll b recycling it again and follow your instructions to make a set of long lasting coasters. ?
Amanda Formaro says
Oh great idea! Once they wear out you could easily soak the glue off of your existing ones to start again :)
Gary says
I’ve got a bunch of those mini sized ones that I just couldn’t bear to throw away, no idea why!
Now though, you’ve given me something to do with them.
Thank you, should keep me busy until Christmas.
Angel says
Hi, did you spray primer on both sides? Is the fabric attached only on the top side and felt is on the bottom side? If yes, why didn’t you use fabric on both sides? Thanks!
Amanda Formaro says
Hi Angel. Primer is only on the side where the fabric goes (top) and felt on the bottom to keep the coasters from moving around on the table :)
Paula A Tulkens says
I just love these. I have only one question. Do you do both sides with material?? Just beautiful craft.
Amanda Formaro says
Hi paula! No just the one side with material, there’s felt on the back side :)
Musicoguia says
Hi Amanda, I love your crafts! This idea is really cool!
SJ Valdez says
Now I know what to do with our old CDs! Thanks for sharing this cool idea!
Phyllis Pelletier says
i just made these. however, this am my coffee cup kept sticking to the coaster. only when the coffee cooled did it not stick. DID I DO SOMETHING WRONG?? then this pm with my glass of tea, the condensation of the glass left a white ring on the coaster………SO NO I AM NOT TOO HAPPY. JUST WONDERING DID I DO SOMETHING WRONG. I DID IT EXACTLY LIKE THE DIRECTIONS. PLEASE COMMENT
Amanda Formaro says
Hi Phyllis. My coffee cup sticks to mine too and my cold drinks will sometimes leave a ring. You did nothing wrong. :) Once the ring dries they are just as good as new. I have been using mine for two years and they are still going strong!
UNNATI SINGH says
goddddddddddddd and fantasticcccccc idea!!!!!!
theresa says
love this idea.. thankx a lot, there are others I also plan to look at
Amanda Formaro says
Thank you Theresa!
Tracy says
Love this idea and have tons of cds! However, we drink a lot of ices drinks in the summer which equals a lot of sweat. Would it work if you covered the top in felt then wrapped with fabric with more felt on bottom to cover fabric lines? Or would they just eventually mildew?
Amanda Formaro says
Hi Tracy. I’m afraid I’m not able to visual what you are suggesting with the felt and the fabric. However, I CAN tell you that I made these coasters in September of 2012 and I have used tons of iced, sweaty cups and glasses on them. They sometimes stick to the cup when you go to pick them up, and while wet there will be a ring visible on the coaster. However, when it dries the ring is gone and they are as good as new. I have not had any problems with them.
alka says
Very beautiful….i think this can also be given as gift to some one.
Amanda Formaro says
They would make great gifts alka!
Victoria says
Does anyone know what would happen if I skipped the white spray primer part?
Amanda Formaro says
Hi Victoria. You could use white paint instead. If you go without completely, then the edges beneath the fabric that are showing will be whatever color your CDs are. Plus the white adds a coat over the CD covering the color beneath, otherwise it would show through the fabric.
Nereida says
would this work with cardstock designed paper? i dont have any fabric.
Amanda Formaro says
Yes, you can use paper. Paper tends to bubble if not decoupaged properly, so take these steps when you do them:
1) Paint a layer of decoupage onto the CD and allow it to dry for 20 minutes
2) Paint a layer of decoupage onto the back of the paper and apply it to the CD like you were gluing something. Be sure to press out any air bubbles. Let it dry for 2 hours.
3) Add decoupage over the top after drying time is complete.
The reason that decoupage tends to bubble up on paper is because you are applying a wet substance to both sides. Allow one side to dry first ensures that it is completely stuck to the surface. Therefore when the top coat goes on it won’t lift the paper causing any bubbles.
Ligia says
Hi i live in Brasil anda i dont now what is •Mod Podge Hard Surface
…can you explain to me please….
Amanda Formaro says
Hi there, Mod Podge is a decoupage medium. If you can’t purchase it there, another sealer with a protective surface will work too.
Yolanda Crisostomo says
This is such a great idea! We have tons of old CD’s and DVD’s! Thanks for sharing :) A group member of our CafeMom group Holiday and Party Crafts shared this with us members with a link back here to your blog for the tutorial. I’m glad she did! ~Yolanda~
Amanda Formaro says
Thanks Yolanda! So glad you like it. I’m glad to hear they linked back instead of copying the tutorial, I’m afraid that happens far too often over there :-(
jan morgan says
I made sets of coasters with old tee shirt backs and microfiber cloth on the fronts. We live in the tropics, and any glass with ice just drips onto ‘traditional’coasters. These soak up the condensation and my tables stay dry! I also add an edge of braided thin rope around the edges. No priming, sanding or gloss required! I can post pictures if you’d like..
Amanda says
Great idea!
drobin says
hi! please send your idea for cd coasters. I am interested!
Debbie says
Yes, Please post photos of your coasters, I’d like to have them to obsorb any moisture to protect furniture
Thanks Great idea and a good project to do with my 8 year old daughter.
ana beatriz coelho says
Very beautifull, show!!!!!:)
GISELLE says
gostaria de receber mensagens.
Syb says
I did some with paper napkins and old images and to cover the little hole in the middle I simple cover it with a circle sticker or a piece of tape.
Nice tutorial.
Shelly says
What a fun idea!! I think it can be addicting too… :)
jan morgan says
Does the fabric actually absorb any condensation from the glass or cup, especially with the glaze atop, or are they just to protect furniture from hot/cold items? Great idea!
Amanda says
I have been using these for four months and they do not absorb any condensation at all. They work great!
Lucia says
Bellissima idea!
Amanda says
Thanks Lucia!
Feveline says
j’aime beaucoup !! très astucieux et coloré, ça donne envie d’inviter plein d’amis…. histoire de frimer un peur ah!ah!
merci bizzz
Colleen says
I love this idea and will definitely be making some to give as gifts. I was wondering if you could make this an easy post to Pinterest as I know several other crafters who would repin it.
Amanda Padgett says
These are TOO DARN CUTE!!! Seriously, this is fantastic!!! I will quit throwing away old, scratched DVDs and start giving them to my daughter so she can make these.
Thank you!
Amanda says
Thanks Amanda! These are totally durable too, I made these a few months ago and they are still going strong. I have one on my desk I use everyday! :)
Rebekah Speciale says
I love these. I have so much fabric pieces and old CDs. I am so excited to try this new craft!!
Pam Chambers says
You’re right…these would make cute stocking stuffers!
gail says
cute Amanda! I know I have outdated computer cd’s all around the house…
happy tuesday!
gail