I’ve been watching The Walking Dead ever since it first started. We are huge fans and never miss an episode. I also love Halloween and wanted to do something new and different. The season premiere is always in October, just in time for Halloween. I had this idea for Barbie zombies in my head for a while, all I needed were the unsuspecting Barbies (insert evil laugh)! I loved displaying these at my Pumpkin Painting Party!

Barbie Zombies
Note: This project was originally created and published September 14, 2014.
My kids are older now, my youngest is 20 and my oldest is 27. So gone are the days of worrying about scaring the bejeezus out of them and making them cry. (But if you do have younger kids, these zombie mason jars might be more their speed!)
I can decorate however I want and usually, they think it’s pretty cool. However, because I used to specialize in kid’s crafts, I often don’t have time to make things for the older kids, so this was really my chance.
For more fun Halloween decoration ideas, check out my round-up of 40+ homemade Halloween decorations for adults!

Almost every time an idea pops into my head and I think I’ve nailed the creative jackpot, I do an online search and find either that same idea or something similar. Similar story with these Barbie zombies. There are other Barbie zombies out there, but not many. So I just went with the original idea I had in my head.

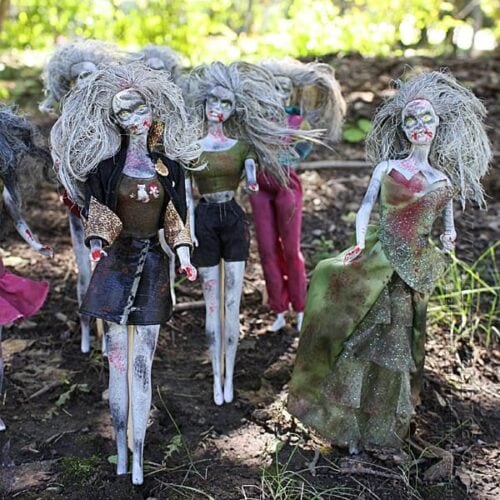
My favorite Barbie is the one wearing the gown. When you watch The Walking Dead you can see that the zombies were at one time human beings. You can see the clothes that they were wearing and even maybe imagine what their life was like before they were transformed into the undead.
I even made a Barbie-sized replica of the “Don’t Open, Dead Inside” door from the first season and first episode of the show.

Zombies walk alone or in packs, doesn’t seem to matter. Their only goal is to eat. Flesh. So look out! They can’t really run though, so be sure to walk fast because if you’re bitten it’s all over, my friend.
So if you see a line of Barbie zombies, chances are you’re safe. And they’re a fun conversation piece, whether they are outside your door or standing on your coffee table.

If you have those Barbie stands use them, perfect for standing them on the mantle or coffee table. I actually used dowels. I just ran them up through the back of the clothing and into their nappy hair. Then I poked the other end into the ground. Easy.
Making Barbie Zombies
I found my Barbies at a thrift store. I grabbed the yucky ones and left the nice ones for some little girl to find. I looked for dolls that were pretty worn out with ratted, messy hair. Garage sales are another great place to find these.
To make Barbie Zombies you will need:
- Yucky Barbies
- Gray
 and white spray paint
 - Dye (powdered or liquid): brown if you have it, or a mixture of colors
- Craft paint: brown, black, white, red, reddish brown
- Paint pens: yellow and gray
- Dowels (for standing them up)

In fact, if I had been patient and looked at garage sales then I probably would have paid a lot less. For the lot pictured here, I paid around $12 and some change. I’m willing to bet I could have found these for around $2.00 total at a garage sale. But, I didn’t want to wait. I just wanted to make them!
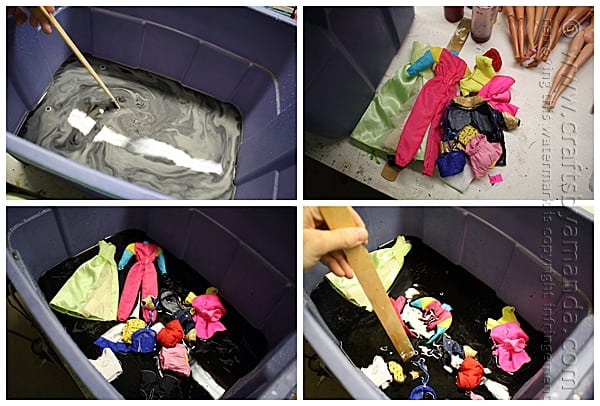
You’ll need a large tub with enough water to cover all the clothes from the dolls. I used some leftover Rit dye in orange and blue. That gave me an army green, so I squirted in some red dye leftover from a tie-dye project. That turned it brown and I thought it would be enough so I dumped in the clothes and stirred with a paint stick.

The color was okay, but I wanted them darker and dirtier looking. So I squirted in what was left of my “walnut” gel stain, but brown paint would have been fine too. After stirring that around I added some black and some white paint. Now I was getting somewhere! The color was good and muddy!
After stirring the clothes around some more, I dipped each of the dolls’ heads into the dye mixture and placed them on a towel to drain.
Next, I removed all the clothes to a separate towel and drained the dye tub.

Because these are teeny tiny Barbie clothes they don’t take long to dry. Mine weren’t completely dry when I started painting. I used a mixture of black and brown, and red and brown, and whatever looked good. I dabbed my brush into the paint and dabbed off the excess onto a paper towel. Then I dabbed and rubbed the clothes to make them look dirty and bloodstained. I did a little blood splatter too using a paintbrush dipped in watered-down red paint and flicked it with my finger against the bristles.

Now I was ready to work on the dolls, so I gave their hair a little squeeze with the towel to get any excess water out then I took them all outside. I sprayed each one with gray primer (gray spray paint will work too, doesn’t matter), including their hair. After the gray, I sprayed with white and dabbed with a piece of paper towel. I just kept doing that here and there to make the skin look nasty. :)

Just like I did with the clothes, I decorated the dolls using red and black, and I used a yellow and gray paint pen to do the eyes. I finished the eyes using a small paintbrush with black, removing the excess on a paper towel first. I also used a toothpick to add red paint to the mouths.

All that was left to do was get them all dressed! I am really, really pleased with how they turned out. It was a super fun project for me to work on and I couldn’t wait to share it. I hope that you all have a fun Halloween. Don’t forget, The Walking Dead![]() comes back on October 11th!
comes back on October 11th!
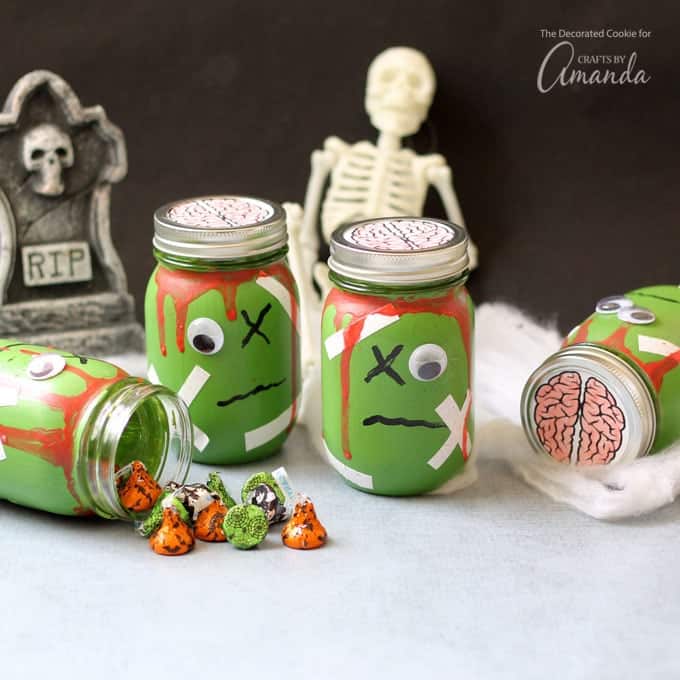
Don’t miss our fun zombie mason jars! Fill them with candy for a fun party favor, or put a tealight inside of them without the tops and you have zombie luminaries! Remember to paint a lighter coat of paint if you’re wanting to use them as luminaries!
Looking for some edible zombie fun? Check out these deliciously spooky zombie pretzels!
More Halloween Crafts
- Halloween Ribbon Wreath
- Mason Jar Lid Pumpkins
- Fall Napkin Luminaries
- Barbie Zombies
- Clay Halloween Village
- Halloween Terrarium
Barbie Zombies: Inspired by The Walking Dead
Supplies
- Yucky Barbies
- Gray and white spray paint
- Dye powdered or liquid: brown if you have it, or a mixture of colors
- Craft paint: brown black, white, red, reddish brown
- Paint pens: yellow and gray
Instructions
- You’ll need a large tub with enough water to cover all the clothes from the dolls. I used some leftover Rit dye in orange and blue. That gave me an army green, so I squirted in some red dye leftover from a tie dye project. That turned it brown and I thought it would be enough so I dumped in the clothes and stirred with a paint stick.
- The color was okay, but I wanted them darker and dirtier looking. So I squirted in what was left of my “walnut” gel stain, but brown paint would have been fine too. After stirring that around I added some black and some white paint. Now I was getting somewhere! The color was good and muddy!
- After stirring the clothes around some more, I dipped each of the dolls’ heads into the dye mixture and placed them on a towel to drain.
- Next I removed all the clothes to a separate towel and drained the dye tub.
- Because these are teeny tiny Barbie clothes they don’t take long to dry. Mine weren’t completely dry when I started painting. I used a mixture of black and brown, and red and brown, and whatever looked good. I dabbed my brush into the paint and dabbed off the excess onto a paper towel. Then I dabbed and rubbed the clothes to make them look dirty and blood stained. I did a little blood splatter too using a paint brush dipped in watered down red paint and flicked it with my finger against the bristles.
- Now I was ready to work on the dolls, so I gave their hair a little squeeze with the towel to get any excess water out then I took them all outside. I sprayed each one with gray primer (gray spray paint will work too, doesn’t matter), including their hair. After the gray I sprayed with white and dabbed with a piece of paper towel. I just kept doing that here and there to make the skin look nasty. :)
- Just like I did with the clothes, I decorated the dolls using red and black, and I used a yellow and gray paint pen to do the eyes. I finished the eyes using a small paintbrush with black, removing the excess on a paper towel first. I also used a toothpick to add red paint to the mouths.
- All that was left to do was get them all dressed!
- Patriotic Pinwheels - June 23, 2026
- Fingerprint Daddy & Me Coffee Mug - June 12, 2026
- Patriotic Bandana Wreath - June 9, 2026


Pamela Bastian says
Julie Be’gin, you could paint some Styrofoam stands. I am going to put mine in a small bale of craft straw to stand on a table outside. We are also decorating our real pine tree with Halloween decorations, (the same one that is our Christmas Giving Tree), in our front yard.
Julie Bégin says
how did you get the barbies to stand? i do want to make a display outside trying to figure out the ways to make them stand. i would have a wood surface to put them on so they can be more at sight level.
Amanda Formaro says
I used wood dowels for mine and pushed the wood dowels into the dirt. They do make Barbie stands you can use if you will be using a flat surface like wood. here’s some! http://amzn.to/2zTP1PU
Abby says
Hi Amanda! Thank you so much for sharing how to create these lovelies! Your directions were extremely helpful. My aunt and I had a blast making 14 zombies this weekend. We went a bit dark on a few of them…some arms and hands got chopped off :)
Amanda Formaro says
Abby, that’s so awesome! I’m glad you two had a good time creating your barbie zombies!
Sue says
Hey Amanda. I’m a huge Halloween fan, too and my Sister tagged me in on your brilliant Barbie Zombies on Facebook. I LOVE them! I have a couple underway that I’m making into creepy co-joined twins and I love the hair on yours. I may have to give that a go! Thanks so much for sharing. I’ve hit the follow button on Instagram – it’s always great to connect with a fellow crafter. Hope to see you there. Sue @SuzyHomemakerUK
Amanda Formaro says
Thanks Sue! I will be sure to check you out on Instagram, looking forward to seeing your twin zombies!
Jill says
Adorbs! Thanks so much for the step-by-step instructions. Love it when people are willing to share their work with others.
Amanda Formaro says
Thanks, Jill! They were too fun not to share :)
Emily says
Have you seen “Barbie Beach” in Senoia, GA (Coweta County, Newnan Area) where TWD is filmed? There’s a couple who have a beach in their front yard that is constantly updated with barbies in different outfits and themes. Super funny and eccentric, but they need these!
Amanda Formaro says
Oh, how neat! I haven’t heard of that before. That sounds really cool!
alyssa says
These are sooo awesome! Next Halloween I’ll see if I can snag a few from the good will and make some for my halloween decorations.
walking dead says
great creative ^^
eager to see the season 7 of the walking dead, the terrible Negan see in action, more than a month until the end of
Sarah - Craft Invaders says
These are brilliant – love them. Now to persuade my daughter to give up her dolls for a project!
Michelle says
Now that’s my kinda Barbie ;-) I love what you did and we’re a HUGE Walking dead fan!!
Tracey says
Very creative and a bit twisted…the best combination :) I love it!
swapna says
This is the coolest halloween idea i’ve seen this year!! Pinning!
Amanda Formaro says
Thanks I appreciate that!
Christina @There's Just One Mommy says
I can just picture these in the flower bed on Halloween night!
These turned out awesome! What a fun idea.
Marlene Brady says
Oh my gosh…..made me laugh. Love these. Thanks for sharing!
Amanda Formaro says
Thanks Marlene!
John Hrcka says
I am about to try this. Did you try to color the dolls bodies using the same dye as the clothing? Wonder if that would work? I’m ok with using spray paint, but as long as the clothes are in the goo…….
But, I’m guessing you already had tried that, given you only dipped their hair. Right?
Amanda Formaro says
Yep tried that :) I assume it’s because the plastic is non-porous and most likely is coated with something, so the dye can’t soak in. Glad you’re making some, sounds fun!
L. Smith says
I found this post and loved it so much I decided to make my own…. Have a look…
Amanda Formaro says
I love how they came out, they are awesome!!
Phil says
Thats an awesome idea, my daughter is 6 and loves The Walking Dead zombies.
Amanda Formaro says
Thanks Phil!
[email protected] says
Loving the Barbie Zombies! Pinned!
Amanda Formaro says
Thank you Amy! They were so fun to make :)
Toni Pardoe Ellsworth says
While I have never watched Walking Dead and Zombies aren’t my thing, I LOVE these BARBIE ZOMBIES!!! Some of my friend’s daughters Barbies already look a lot like these. I am going to have to pin and the like this!!! Thank you for sharing this!!!
Amanda Formaro says
Thanks so much Toni, I really appreciate that!
Felicia Plastini says
Great job Amanda on the Zombie Barbies!!!! They look creepy. And it makes them that much creepier that they are still smiling, LOL~
Amanda Formaro says
Thank you Felicia! I love how they turned out :) And they’ve survived to heavy rain days!
Tamy Ottomeyer says
Amanda
Your awesome post and Walking Dead barbies were the primary inspiration for my Zombie Barbie Bridal Party. I haven’t ‘played with dolls’ for years. Thank you…’Real’ Barbie dolls, and their clothes I think would have been much easier to work with and were hard to find when thrifting, but the 99 cent store dolls ended up working well enough..thank goodness I had cheesecloth on hand!!
http://prettieparties.com/2014/10/06/zombie-barbie-bridal-party/
Happy Holiday season to you and your family…
Tamy :)
Amanda Formaro says
So awesome Tamy! I love how yours turned out, thank you so much for the link!!
Julia Rodriguez says
That is pretty cool..THe walking dead is one of my favorite shows. YOur ideas are pretty cool….Awesome JOb!
Amanda Formaro says
Thank you Julia!!
Amy@A Cup Full of Sass says
Oh my this is so clever! I am a huge Walking Dead fan and I’m loving this! Great job!!
Amanda Formaro says
Thanks so much Amy!
Jenny Hostetler says
Oh my, these are creeeeepy! I love them. Thank you for sharing, what a great idea!
Amanda Formaro says
Thank you Jenny!
Dawn says
Omigosh, these are AMAZING!! I don’t think my girls will notice if I “borrow” a few! Pinned and shared on FB! :)
Amanda Formaro says
Haha thanks Dawn!
Carol says
I absolutely adore these!! You did an amazing job <3
Amanda Formaro says
Thank you so much Carol!
Ida says
They look awesome-great idea!
Amanda Formaro says
Thank you Ida!
jacksonlee says
My 5 yr old daughter got pretty mad when I told her we couldn’t make these today. She’s NEVER watched Walking Dead, but both my girls (5&11) love scary, gruesome and gory on a kid friendly level. We, as avid Barbie and zombie lovers, love everything about these.The dollar tree sales barbie knockoffs, clothes and all. But I think we just may weed out our barbie collection. I think the one missing her legs will work wonderfully!!
jacksonlee says
Yeah, I don’t have an 11 yr old… She’s 9. Think my brain is becoming zombie-fied
Amanda Formaro says
I was thinking that too, about the Barbies with missing limbs ;-D
ann says
My grand daughters (5 & 4) have been making barbie zombies for a couple of years now using sharpies, whiteout in the eyes, red fingernail polish for blood, and the hot glue gun to make the guts(we’d paint them with craft paint). I like the idea of getting the whole body grayish and the clothes uglier… thanks for the ideas!
Amanda Formaro says
You’re welcome, thank you Ann!
BarbieFan says
Your GDs have vivid imagination for sure, but hopefully it is with very badly worn dolls.
Cheryl says
These look great! Sometimes, you can get Barbies that have been dog chewed for dirt cheap at garage sales or thrift stores, and those might make even better zombies!
Amanda Formaro says
Haha I agree Cheryl, those would be great!
Andrea says
Fantastic! I love the idea of using not-so-nice Barbies found a the thrift store and the results are AMAZING.
Amanda Formaro says
Thanks so much Andrea, they were tons of fun!
kathy says
I made some too–used yuck-green spray paint. Should have used primer; took days to dry and some spots came out wrinkly and peely, but I just put blood in those places : ) Mine didn’t have clothes when I bought them, so I made some, but didn’t have the heart to dirty and distress them! So my Zombarbies just came from a tea party…………….
Amanda Formaro says
LOL!! Kathy that’s hilarious about the tea party, haha. That peeling effect is actually called orange peel. It usually happens when there’s some sort of oily substance on the surface, can even be oil from a person’s hands. But I love how you improvised, I bet the peeling looked like rotting zombie skin, haha!
Ana says
Awesome, just plain awesome!
Amanda Formaro says
Thank you so much Ana!
Jessa says
Wow Amanda, these are soo, sooo, soooo awesome! I just send my friends the link and maybe will make some of these for Halloween.
Great Job! This is really amazing!
– Jessa
Amanda Formaro says
Thank you Jessa, they were so much fun I couldn’t wait to share them. Thanks for sharing the link!
BarbieFan says
Cannot believe you defaced those vintage Barbies. If you had no use for them, why not have found a child who would have loved some gently used dolls.
I recall as a child not being able to own a Barbie due to affordability. Would have loved to have received something like those as a child. In fact the one and only one that I had was used and given to me, and I loved having it as much as a new one.
As an adult, I have a small collection of Holiday and special occasion Barbies. I plan to either sell them or pass tem along to another Barbie admirer, maybe a child who has never owned one of these elegant icons of my childhood.
Sorry but I do not see the originality of your “craft”? I also do not see the usefulness of these dolls outside of use on Halloween night. Why frighten someone elses child with these hideous likenesses of a Barbie. I would not appreciate my young daughter or grandaughter viewing these monster images of their own beloved toys.
Did you ever think to save them for your GDs one day?? I think the whole task was morbid and trust me, I am a huge fan of WD.
Amanda Formaro says
Everyone is entitled to their opinion. I just don’t agree with yours. Have a nice day.
Amanda Formaro says
ALSO – if I put these Barbies to use, just like some child would have put them to use, then why do you care what I did with them? It’s not like I bought them from the thrift store and then drove over to the landfill and chucked them in so they couldn’t be used anymore. Just because you don’t like that I turned them into zombies doesn’t mean that you are right. Self righteous maybe, but not right.
Yousef says
such amazing work
Laura / Pet Scribbles says
Best. Halloween. Craft. Ever. And hilariously fun too!
Amanda Formaro says
Haha thanks Laura!
Kamryn Spedding says
These are really cool,I’m going to do these for Halloween :)
Amanda Formaro says
Thank you Kamryn! Hope you have as much fun as I did!
Theresa says
I never really got into walking dead but now appreciate the look for what its worth…old barbies have been in basement for years…time to create a ZOMBIE..LOVE IT..
Amanda Formaro says
Haha Thanks Theresa! They were one of the funnest projects I’ve created in a while :)
Cookie17 says
Oh my gosh I’m 70 yrs. young & love love Walking Dead watched since first came on to.this summer been to long waiting for it to return gonna be scary.. ,maybe walkers eat these doll”s & leave people alone,lolAmanda things you come up with are amazing….ha,ha, thanks’
Amanda Formaro says
Haha thanks Cookie! Can’t wait for the season premiere :)
Erlene says
OMG….I love Walking Dead and can’t wait till it starts up again next month. Having a barbie zombie army is too funny.
Amanda Formaro says
Thank you Erlene! I can’t wait either :)
jet says
awesome!!!! well done;-D
Amanda Formaro says
Thank you Jet!
Morena says
This is so awesome! I would love to have a Barbie zombie horde if my kids weren’t so young. This is hilarious!
Amanda Formaro says
Thanks Morena! A totally fun project! :)