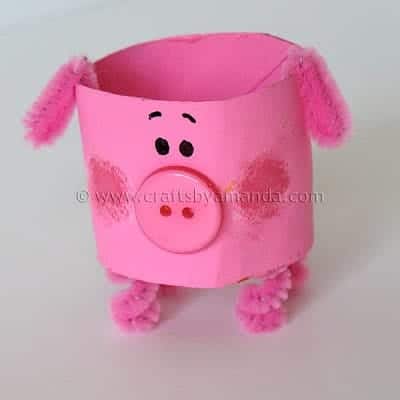
Last week I showed you the first in the farm series, this cute cardboard tube chicken. Before that you met her cardboard tube chicks. There are more friends from the farm; such as these cardboard tube lambs and these cardboard tube bunnies. Today I’ll show you how to make this totally adorable cardboard tube pig! Don’t you just want to hug him? :)
Pigs are one of the best animals to make into a craft. They are simple, adorable, and don’t require a lot of details. This makes them perfect for kids. So let’s make him shall we?
Cardboard Tube Pig
Cardboard tube, cut to about 2″
Acrylic paint: pink and darker pink
Pink button
2 pink chenille stems
1 skinny pink chenille stem
Scissors
White craft glue or glue gun
Black Sharpie marker
Paint the cardboard tube inside and out with pink paint and set aside to dry.
Glue pink button to the cardboard tube for the nose.
From both regular pink chenille stems, first cut off 1 1/2″ from each. Set the small pieces aside and cut the longer pieces in half. Wrap each of the long halves around the handle end of a small paintbrush to make a coil. Slide off the handle. You should have four coiled pig’s legs.
Cut the skinny chenille stem in half, coil one half around the handle end of a paintbrush to create the curly tail. Save the other half for another project.
Finally, take the remaining two small pieces and bend them into thirds. Fold one third of the chenille over the side of the cardboard tube to create the ear. Add some glue to hold them in place.
Glue each of the legs to the inside of the cardboard tube and poke the curly tail through the back. Secure everything with some glue.
Using a scruffy paintbrush or a Q-tip, dip into dark pink paint and dab off all the excess. Dab on cheeks. Use a Sharpie to add the eyes and eyebrows.
Stay tunes for more cardboard tube farm animals! See all of the cardboard tube crafts on this blog.
Cardboard Tube Pig: The Farm Series
Supplies
- Cardboard tube cut to about 2"
- Acrylic paint: pink and darker pink
- Pink button
- 2 pink chenille stems
- 1 skinny pink chenille stem
- Scissors
- White craft glue or glue gun
- Black Sharpie marker
Instructions
- Paint the cardboard tube inside and out with pink paint and set aside to dry.
- Glue pink button to the cardboard tube for the nose.
- From both regular pink chenille stems, first cut off 1 1/2" from each. Set the small pieces aside and cut the longer pieces in half. Wrap each of the long halves around the handle end of a small paintbrush to make a coil. Slide off the handle. You should have four coiled pig's legs.
- Cut the skinny chenille stem in half, coil one half around the handle end of a paintbrush to create the curly tail. Save the other half for another project.
- Finally, take the remaining two small pieces and bend them into thirds. Fold one third of the chenille over the side of the cardboard tube to create the ear. Add some glue to hold them in place.
- Glue each of the legs to the inside of the cardboard tube and poke the curly tail through the back. Secure everything with some glue.
- Using a scruffy paintbrush or a Q-tip, dip into dark pink paint and dab off all the excess. Dab on cheeks. Use a Sharpie to add the eyes and eyebrows.
Did you enjoy this post? Why not subscribe to my feed, or better yet, to my free newsletter – Foodie in the Craftroom, which provides not only crafts but recipes from my other blog, Amanda’s Cookin’ as well!
- Deco Mesh Poinsettia Flower - November 22, 2024
- Winter Luminaries: Snowy Pinecone Candle Jars - November 19, 2024
- Pinecone Owls - November 12, 2024


Maryann says
Our twins are 2 years old. They live 18k miles away, but each weekend we make one of your crafts with them via skype. Thankyou from happy grandparents.
Amanda Formaro says
How fun, thanks for sharing that Maryann!
Salein says
Wow~So cute..I like it.
Amanda Formaro says
Thanks Salein!
Karen Howard says
I Love Piggies! This one’s cute.
sofie says
Really nice, the things you make from cardboard tubes.
Veronica says
I Love them they´re sooo cute!!. I have a blog in spanish mamifashion.blogspot.com , Would it be ok with you if I translated the instructions linking back to your blog? ´cause that´s a really cute Idea!!! Thanks!!!
[email protected]
RedTedArt says
Love the little button! Very cute!
Maggy
Megan says
this is so whimsical and cute. I love it.
megan
craftycpa.blogspot.com
Tonya says
how cute! my son would love to make this! stopping by from tatertots & jello! thanks for sharing!
Happier Than a Pig in Mud says
Aw, thanks for the smile:@)
Katrina says
Cute as a button! ;)