• Home
  • About
    • About Crafts by Amanda
    • Visit Our Recipe Site
  • Work With Us
  • Join
    • Free Newsletters
    • Join our Facebook craft group
↑
  • Tutorials
    • Tutorial Index
    • Adult Crafts
    • Crafts for Kids
    • Crafts for Seniors
    • Recycled Crafts
    • Seasonal Crafts
    • Holiday Crafts
    • Free Printables
    • Craft Collections
  • Adult Crafts
    • Bath & Body
    • Beach Crafts
    • Clay Pot Crafts
    • Crafts for Seniors
    • Decoupage Crafts for Adults
    • DIY Gift ideas
    • Garden Crafts
    • Home Decor Projects
    • Kitchen Crafts
    • Light Bulb Crafts
    • Luminary Crafts
    • Mason Jar Crafts
    • Needlework
    • Photo Display Ideas
    • Recycled Crafts for Adults
    • Wearable Crafts for Adults
  • Crafts for Kids
    • Animal Crafts for Kids
    • Back to School Crafts
    • Beach Crafts for Kids
    • Camp Crafts
    • Cardboard Tube Crafts for Kids
    • Decoupage Crafts for Kids
    • Easy Crafts for Kids
    • Nature Crafts for Kids
    • Other Kid’s Crafts
    • Paper Plate Crafts for Kids
    • Recycled Crafts for Kids
    • Slimes, Doughs, & Clay
    • Wearable Crafts for Kids
  • Holiday Crafts
    • 4th of July Crafts
    • Christmas Crafts
    • DIY Gift ideas
    • Earth Day Crafts
    • Easter Crafts
    • Father’s Day Crafts
    • Halloween Crafts
    • Memorial Day Crafts
    • Mother’s Day Crafts
    • New Year’s
    • Other Holidays
    • Patriot Day Crafts
    • St. Patrick’s Day Crafts
    • Thanksgiving Crafts
    • Valentine’s Day Crafts
  • Seasonal Crafts
    • Winter Crafts
    • Spring Crafts
    • Summer Crafts
    • Fall Crafts
  • Skip to primary navigation
  • Skip to main content
  • Skip to primary sidebar
  • Skip to footer

Crafts by Amanda

crafts for adults and kid's crafts

  • Tutorials
    • Tutorial Index
    • Adult Crafts
    • Crafts for Kids
    • Crafts for Seniors
    • Recycled Crafts
    • Seasonal Crafts
    • Holiday Crafts
    • Free Printables
    • Craft Collections
  • Adult Crafts
    • Bath & Body
    • Beach Crafts
    • Clay Pot Crafts
    • Crafts for Seniors
    • Decoupage Crafts for Adults
    • DIY Gift ideas
    • Garden Crafts
    • Home Decor Projects
    • Kitchen Crafts
    • Light Bulb Crafts
    • Luminary Crafts
    • Mason Jar Crafts
    • Needlework
    • Photo Display Ideas
    • Recycled Crafts for Adults
    • Wearable Crafts for Adults
  • Crafts for Kids
    • Animal Crafts for Kids
    • Back to School Crafts
    • Beach Crafts for Kids
    • Camp Crafts
    • Cardboard Tube Crafts for Kids
    • Decoupage Crafts for Kids
    • Easy Crafts for Kids
    • Nature Crafts for Kids
    • Other Kid’s Crafts
    • Paper Plate Crafts for Kids
    • Recycled Crafts for Kids
    • Slimes, Doughs, & Clay
    • Wearable Crafts for Kids
  • Holiday Crafts
    • 4th of July Crafts
    • Christmas Crafts
    • DIY Gift ideas
    • Earth Day Crafts
    • Easter Crafts
    • Father’s Day Crafts
    • Halloween Crafts
    • Memorial Day Crafts
    • Mother’s Day Crafts
    • New Year’s
    • Other Holidays
    • Patriot Day Crafts
    • St. Patrick’s Day Crafts
    • Thanksgiving Crafts
    • Valentine’s Day Crafts
  • Seasonal Crafts
    • Winter Crafts
    • Spring Crafts
    • Summer Crafts
    • Fall Crafts
Craft Tutorials | Crafts for Kids | Easy Crafts for Kids | Bug Village

Bug Village

Author by Amanda Davis on August 27, 2011 Updated on May 29, 2020

5 from 1 vote
Jump to Project
224 shares
  • Share
  • Tweet
  • Flipboard
  • Email
Bug Village

 
This is a fun nature craft made from rocks or stones, acorns and sticks or twigs. It’s a fun way to get outdoors with your kids where you’ll collect all the items that you need. I created this little bug village several years ago, there is a natural version and a colorful painted version as well. A great craft for fall!

You should be able to find most of your supplies in the park or in your backyard. if you don’t have a scrap piece of wood, you can use the top of a shoe box or a flap from any cardboard shipping box. Styrofoam works too!

A note about glue gun safety: Parents should handle the glue gun as temperatures can get very hot and cause uncomfortable burns. Allowing older children to use the glue gun is entirely up to the parent, but child should always be supervised!

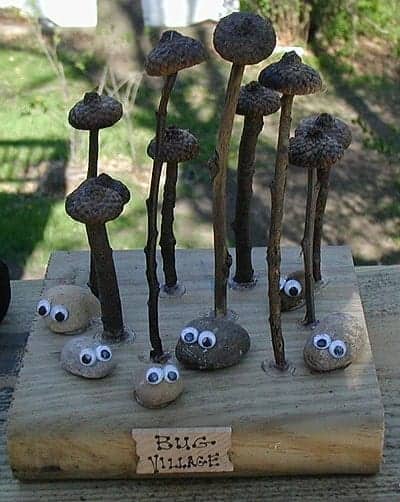
The natural Bug Village is perfect for a boy’s room while girls will adore the colorful bugs!
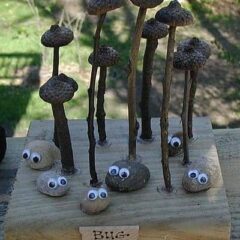
Print Project
5 from 1 vote

Bug Village

Author: Amanda Formaro

Supplies

  • sticks in various sizes
  • acorn tops
  • smooth rocks in different sizes
  • hot glue gun parents must do this!
  • square or rectangular scrap of wood
  • matte acrylic spray sealer
  • small woodsie sign
  • black fine tip craft pen

For Natural

  • wiggle eyes

For Colorful

  • toothpick
  • paintbrush
  • household sponge
  • acrylic paint in forest green, olive green, light brown, cream, light blue, light green, red, blue, orange, yellow, pink, purple, black, and white

Instructions

Natural

  • Begin by making sure the ends of the sticks are fairly flat. You can do this by simply pushing the ends against the sidewalk. Use hot glue gun to attach the sticks to the block of wood, then glue the acorn tops to the top of each stick. Wash all the rocks and be sure they are dry before gluing on wiggle eyes. Glue the rocks to the wood in various places. Write the words “Bug Village” on a small woodsie sign (recycle cereal box cardboard works great too!) and glue to the front of the piece of wood as shown in photo.

Colorful

  • Paint the block of wood with forest green paint. When dry, sponge on some olive green paint to the forest green. Paint the sticks with light brown paint. Paint some of the acorn tops with light blue and the rest with light green. Glue the sticks to the wood, then glue the acorn tops to the sticks.
  • Wash all the rocks and be sure they are dry before you paint them. use various colors to paint the rocks: blue, red, purple, pink, green, etc. Use the stylus or toothpick to dot on spots and/or lines to your bugs. Dot on white spots for eyes, and a smaller black dot onto the white spot. Glue rocks in place when they are dry.
  • Create a sign by painting a small woodsie sign with cream paint, then shade the edges with light brown. Use black fine tip craft pen to write “Welcome to Bug Village” in the center.


Did you enjoy this post? Why not subscribe to my feed, or better yet, to my free newsletter – Foodie in the Craftroom, which provides not only crafts but recipes from my other blog, Amanda’s Cookin’ as well!


  • Author
  • Recent Posts
Amanda Davis
Amanda Davis is the crafty, entrepreneurial mother of four children. She loves to bake, cook, make kid's crafts and create decorative items for her home. She is a crafting expert and guru in the kitchen and has appeared online and in print publications many times over the years.
Latest posts by Amanda Davis (see all)
  • Patriotic Pinwheels - June 20, 2025
  • Paper Plate Aquarium Craft - June 17, 2025
  • Patriotic Bandana Wreath - June 13, 2025
224 shares
  • Share
  • Tweet
  • Flipboard
  • Email

Filed Under: Easy Crafts for Kids, Fall Crafts, Nature Crafts for Kids Tagged With: kid's crafts, nature crafts

Reader Interactions

Free CraftsBy email every week

Latest crafts straight to your inbox!

Comments

  1. Emilia says

    August 2, 2014 at 4:23 pm

    I’m absolutely in love with your website and all your craft ideas. I’m looking through all of them and trying to find something suitable for my 2 year old son.

    Reply
    • Amanda Formaro says

      August 4, 2014 at 8:51 am

      Thanks so much for the compliments Emilia! I hope you were able to find something. I also own Fun Family Crafts, you could try there as well.

      Reply
  2. er says

    May 17, 2014 at 12:56 pm

    SUCH A WONDERFUL IDEA. CAN’T WAIT TO GET THE KIDS ON IT.

    Reply
  3. Mod Podge Amy says

    September 4, 2011 at 6:03 pm

    This is so cute I can hardly stand it! Stumbling!! xo

    Reply
  4. Wiola says

    September 4, 2011 at 3:25 pm

    (Oops not depression, but burnout.)

    Reply
  5. Wiola says

    September 4, 2011 at 3:20 pm

    Aaaaw this looks so cute that if I didn't know better I would want to eat them all (poor teeth). I found some "stone art" a while ago. Perhaps you would like this as well. Here's the link: http://www.styleroom.se/album/26982
    (The woman who decorated these stones did so as a way for her to overcome her depression.)

    Reply
  6. Cathy @ NurtureStore says

    September 3, 2011 at 5:41 pm

    I love this project – and my girls will too. Thanks for the idea. (Visiting via Craft Schooling Sunday)

    Reply
  7. maggy, red ted art says

    September 2, 2011 at 7:11 am

    Oh my! Once again ADORABLE!! Love this "nature craft" and bug village. Simply perfect :-)

    Thanks for joining Kids Get Crafty – always fab to have you there!

    Maggy

    Reply
  8. creativejewishmom/sara says

    September 1, 2011 at 7:22 pm

    love this one Amanda, and two versions are great! Thanks so much for sharing on craft schooling Sunday! Sorry I haven't been by your site lately but will try to stop by with some Rosh HaShana crafts! all the best!

    Reply
  9. Katrina says

    September 1, 2011 at 5:01 am

    Fun. Looks like something a couple boys here would like!

    Reply
  10. betweenarockandahobby says

    August 28, 2011 at 9:04 pm

    They're so cute!! What a fun idea for a kids craft!

    Reply
  11. Cheryl @ Sew Can Do says

    August 28, 2011 at 4:29 am

    Really cute – this will be fun to do with the kids:)

    Reply
  12. Melony Bradley says

    August 27, 2011 at 7:58 pm

    This is a super cute end of Summer craft. I love crafts where kids can enjoy the outdoors and creativity at the same time

    http://mel-designs.typepad.com/my-blog/2010/06/camp-roasting-sticks.html

    Reply
  13. Cecilia says

    August 27, 2011 at 4:21 pm

    I love both of them!! Very cute! :)
    Cecilia

    Reply
5 from 1 vote (1 rating without comment)

Leave a Reply Cancel reply

Your email address will not be published. Required fields are marked *

Rate This Project


The maximum upload file size: 640 MB. You can upload: image, video. Links to YouTube, Facebook, Twitter and other services inserted in the comment text will be automatically embedded. Drop files here

Primary Sidebar

Hi! I’m Amanda and I’m the founder and head designer of Crafts by Amanda. I have spent over 25 years creating projects to share, but it’s not just me anymore! It’s turned into a complete family affair. Come and meet the Creative Team!

Free CraftsBy email every week

Latest crafts straight to your inbox!

All Time Favorites

Learn to make these adorable ladybug painted rocks. use special outdoor paint for this adorable garden craft so you can keep garden ladybugs all summer!

Ladybug Painted Rocks…

These colorful little ladybug painted rocks are the ... Go To project

snowy pinecone candle jar luminaries

Winter Luminaries: Snowy Pinecone…

Make pretty winter luminaries that appear to be covered ... Go To project

Make this wonderful deco mesh pumpkin wreath to hang on your door this fall!

Deco Mesh Pumpkin Wreath…

Adorn your door this fall with a pretty deco mesh ... Go To project

Reuse those empty prescription pill bottles in all sorts of ways. From organizing to making cookies. Yes, cookies! See how to use your empty pill bottles!

20 Uses for Prescription Pill…

You've been collecting prescription pill bottles for ... Go To project

Meet the Family

Amanda

Founder and Designer

Kristen

Editorial Manager

Lindsay

Social Media Manager

As seen on:

Footer

Favorites

  • Jar Photo Frames
  • No-Sew Roman Shade
  • Paper Flowers
  • How to Make a Scrunchie
  • Mermaid Slime

About

  • Home
  • Meet the Creative Team
  • Work with Us
  • Privacy Policy
  • Accessibility
  • Contact Us

Images/text copyright Amanda Formaro 2020. To feature a post from Crafts by Amanda, you may use one photo credited and linked back directly to the project post.

Free CraftsBy email every week

Latest crafts straight to your inbox!

Copyright ©2025, Crafts by Amanda. All Rights Reserved.
Design by Pixel Me Designs

Rate This Tutorial

Your vote:


To share a photo with your comment click here!

A rating is required
A name is required
An email is required

Recipe Ratings without Comment

Something went wrong. Please try again.