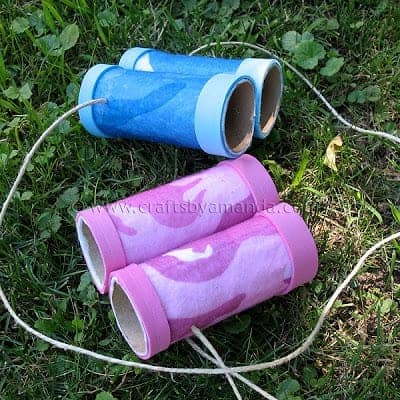
Are your little rugrats experiencing cabin fever? Pull this idea out of your hat and they’ll love you for it. This cardboard tube binoculars craft is a fun way to get excited for spring and summer. What’s even better is that they can still use their binoculars while stuck inside – similar to our DIY Kaleidoscope for kids!

Cardboard Tube Binoculars
This is such a fun and easy craft for kids, so let’s get started! You can most certainly substitute the camouflage felt with another pattern or solid color for your cardboard tube binoculars.
These binoculars make a great camp craft or something fun for the kiddos to do on a rainy day. They are great for bird watching or a fun indoor adventure game too!
Looking for more fun spring crafts for kids? Try these Cardboard Tube Birds! Bursting with pretty spring colors, these cardboard tube birds go hand in hand with your kid’s binoculars.

What you need
Tip: If you like the idea of the camouflage felt but can’t find it, you can make your own by gluing different shades of the same color onto a like piece of felt or construction paper.
- 2 cardboard bathroom tissue tubes
- 1 sheet camouflage felt
- scissors
- white craft glue
- craft foam to match your felt
- 6 rubber bands
- 40″ piece of twine or yarn
- pen
These step by step photos and instructions are here to help you visualize how to make this project. Please scroll down to simply print out the instructions!
How to make Cardboard Tube Binoculars
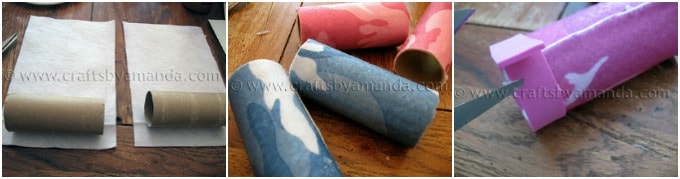
- Lay felt, design side down, on the work surface and cut felt in half.
- Roll up the cardboard tube inside the felt, gluing as you go. Trim off excess. Repeat for the other tube.
- Cut a strip of craft foam long enough to go around the end of the tube, about 3/4” wide. Glue the strip around the end of the cardboard tube, lining up the felt seam with the craft foam strip seam.
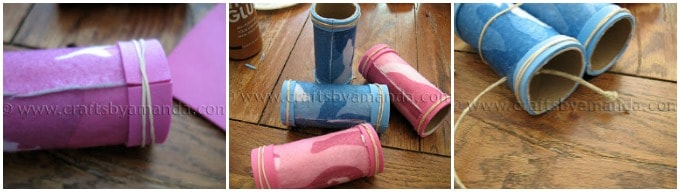
- Secure with a rubber band. Repeat for the other tube.
- Cut another strip long enough to go around the opposite end of the tube, only this time cut it 1/2” wide. Glue as above and secure with a rubber band.
- Place the tubes side by sides with the seams facing each other. Put a rubber band around both tubes to hold them in place.
- Use a pen to poke a hole in the side of the tube, about 1/2” below the 1/2” wide craft foam strip. Insert the end of your twine into the hole from the outside of the tube. Bring it through the tube and tie a double knot. Trim off excess and gently pull the twine taut. The knot will keep the twine from coming back out through the hole. Repeat on the other side.
- Pipe a generous amount of white craft glue in between the two tubes, lip over and do the other side as well. Let them dry completely, several hours or overnight, before removing the rubber bands and using your binoculars.

I hope you enjoy the fun experience of creating your very own pair of binoculars. Let your children use their imagination, while teaching them the importance of recycling and reusing. Make this awesome recycled craft, and you can use them as a fun Earth Day craft for kids!
You can find tons more cardboard tube crafts for kids like these Cardboard Tube Coiled Snakes, these Cardboard Tube Farm Animals, or this Cardboard Tube Batman.
I love to create and share my projects with you! I know it’s hard to remember to come back and search, so I’ve made it easy for you with my weekly newsletter! You can subscribe for free and I’ll send you fun crafts and delicious recipes every week right to your email.

Cardboard Tube Binoculars
Supplies
- 2 cardboard tubes
- 1 sheet camouflage felt
- Scissors
- White craft glue
- Craft foam to match your felt
- 6 rubber bands
- 40 ” piece of twine or yarn
- Pen
Instructions
- Lay felt, design side down, on the work surface and cut felt in half.
- Roll up the cardboard tube inside the felt, gluing as you go. Trim off excess. Repeat for the other tube.
- Cut a strip of craft foam long enough to go around the end of the tube, about 3/4” wide. Glue the strip around the end of the cardboard tube, lining up the felt seam with the craft foam strip seam.
- Secure with a rubber band. Repeat for the other tube.
- Cut another strip long enough to go around the opposite end of the tube, only this time cut it 1/2” wide. Glue as above and secure with a rubber band.
- Place the tubes side by sides with the seams facing each other. Put a rubber band around both tubes to hold them in place.
- Use a pen to poke a hole in the side of the tube, about 1/2” below the 1/2” wide craft foam strip. Insert the end of your twine into the hole from the outside of the tube. Bring it through the tube and tie a double knot. Trim off excess and gently pull the twine taut. The knot will keep the twine from coming back out through the hole. Repeat on the other side.
- Pipe a generous amount of white craft glue in between the two tubes, lip over and do the other side as well. Let them dry completely, several hours or overnight, before removing the rubber bands and using your binoculars.
This post was originally published on this blog on Feb. 21, 2011.
- Mini Coastal Clay Houses - July 14, 2026
- DIY Mosquito Repellent Candles - July 10, 2026
- Mason Jar Solar Lights - July 3, 2026


Scarlet says
My kids made these too when they were littler but yours look prettier. They loved playing with them!
stephanie says
You saved my life! I’ve had my church saving TP rolls for Vacation Bible School,not knowing what I was going to do with them.
Thanks a million!
Amanda Formaro says
That’s great Stephanie, so glad this helped!
Carolyn says
This is an excellent activity for younger children. So easy to make and look fantastic.
Kristin @ Preschool Universe says
I love these – possibly the best use of cardboard tubes I've seen. I'm definitely linking to this in my post on cardboard tubes. thanks for sharing!
Becky says
I just made these with my son last night. They are fabulous!! Of course I linked back to you. I love your site! http://vermontwhitneys.blogspot.com/2011/03/i-spy-with-my-little-eye.html
suzannah {so much shouting, so much laughter} says
how cute! i've been saving tp rolls and wondering what to make of them. my little explorers would love this.
Stephanie says
This is great! My kids will love this.
Laura says
Thanks for this idea! I'm going to try it!
RedTedArt says
(Spring Get Crafty is now out!!! I featured you: http://www.redtedart.com/2011/03/01/spring-get-crafty/ thanks for a lovely craft to include!)
lauren@warmandfuzzy says
I'm stopping by from TT&J to say "I love these." I am a preschool teacher as well as a blogger and will so be doing this with my son and in my classroom. This is the cutest idea. It will be great in for our insect unit for bug hunts and even for Letter Scavenger Hunts. Again I love it!
Stop by my blog if ya get a chance.
http://www.warmfuzzypurpleandgold.blogspot.com
Kim @ KimsKandyKreations says
What a GREAT idea. These would be such a fun idea for a jungle themed party or a backyard campout. Thanks for sharing the tutorial!
I'd love it if you would like this project on our new Party themed blog link party here: http://kimskandykreations.blogspot.com/2011/02/shindig-saturday-party-blog-hop.html
Michelle says
This is so cute! I might give this a go this weekend!
Sawdust and Paperscraps says
These are awesome!
Richie says
Will be flying kites later in he afternoon. These binoculars will surely come in handy! I'll be adding colored celophane paper to make he visual more 3D!
Mel says
This is great. I have been collecting our toilet paper rolls to do binoculars for my little preschool and wasn't quite sure how I was going to do this…this post was perfect timing and saves me some hassle.
RedTedArt says
Thank you for linking up! Will also feature it in "Spring Get Crafty" next week (after all, as Spring comes along you need your binoculars for finding all those lovely birds!)
Maggy
Amanda says
Thank you so much for the feature Becky! I really appreciate it – so glad you joined your sister and will be featuring fun things for the kiddos :) Hope you'll stop by more often
Becky says
You've been featured!! I featured your fabulous tutorial at Kids Create with UCreate.
Becky
http://ucreatewithkids.blogspot.com/
Amanda says
Thanks everyone! :) Looking forward to spring :)
marla says
Love how you wrapped these binoculars in that paper! At school the kids make these – gotta tell them about the wrapping :)
claudia lamascolo says
Wish I had the creativity you have, little ones again and this kind of imagination you are truly gifted!
Sara says
What a cool idea! This is one of those items I wish I had thought of!
Little Treasures says
Fantastic idea!
MessyMissy says
I adore these. I host a craft time at my local library and this would be the perfect craft for the kiddos!! Thanks for the idea!! I would love it if you link up to my party, A Marvelous Mess. I will be picking one project to feature on the sidebar of my blog for a week!! Here is the link:
http://marvelouslymessy.blogspot.com/2011/02/marvelous-mess_20.html
Kristin says
LOVE this idea! Very clever and I definitely will be trying this out for my little boys … and link back to you of course. Thanks for a great tutorial!
RedTedArt says
Oh! These really are fun! Love them!! Will have to make some ASAP!
Do come and link up again at Kids Get Crafty? Current linky: http://www.redtedart.com/2011/02/16/kids-get-crafty-robot-cards-the-robot-the-blue-bird/ But new one out on Wednesday!
Maggy
Becca says
What a fabulous idea !! My 4 year old son would love these. Thanks for sharing !! *Becca*
Gośka says
What a fantastic idea. Just great for summer play:)
creativejewishmom/sara says
These are great Amanda! Thanks so much for sharing on Craft Schooling Sunday!
Binocular Man says
I use to make binoculars from recycled toilet paper tubes and bright colors of cellophane in my younger day’s