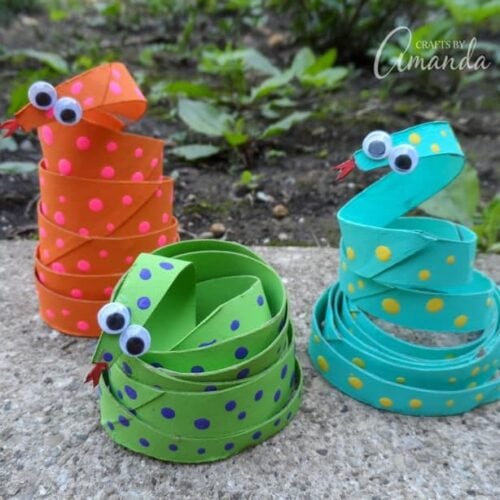
Slithery sneaky cardboard tube coiled snakes are a fun way to recycle and reuse those unwanted tubes. Great for a kids camp craft or an afternoon project in the summer!

Why we love this project
This cardboard tube coiled snakes craft is a great way to teach kids the importance of recycling all while feeding their creative minds. This would make a great camp craft or activity for boys and girls alike. Or you can teach them about snakes in the classroom while they create recycled cardboard tube coiled snakes of their own!
You can use any colors you like. I chose bright colors for these just for the fun of it!

What you’ll need
You can find the full printable instructions and materials list at the end of this post.
- 3 cardboard tubes
- tube from wrapping paper or similar tubular item
- 6 googly eyes
- Toothpick
- White craft glue
- Scissors
- Acrylic craft paint in colors of your choice
How to Make Cardboard Tube Coiled Snakes
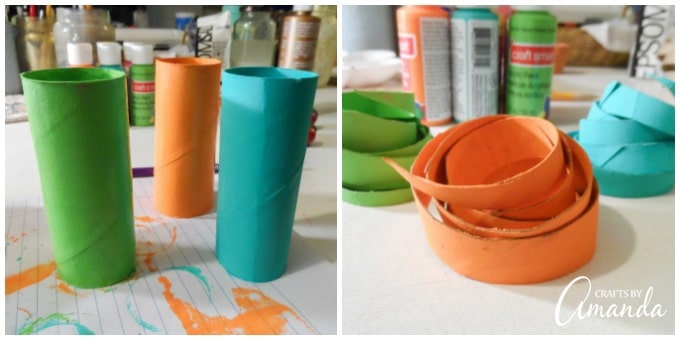
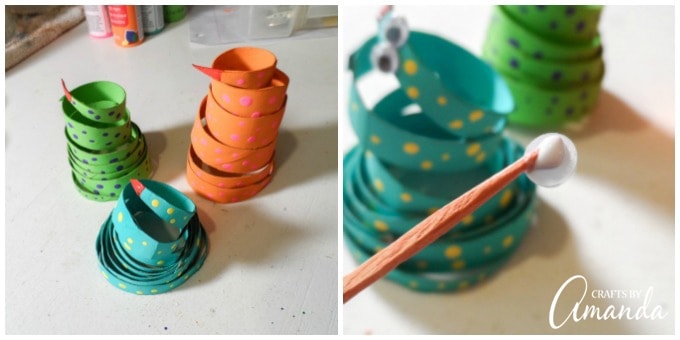
- Paint the inside and outside of the cardboard tubes. You might need a second coat, just depends on the brand of paint you use and the color. Cut the tubes into coils, but if your cardboard is still a little damp it might not hold it’s round shape while you cut. Don’t panic! I’ve got you covered…

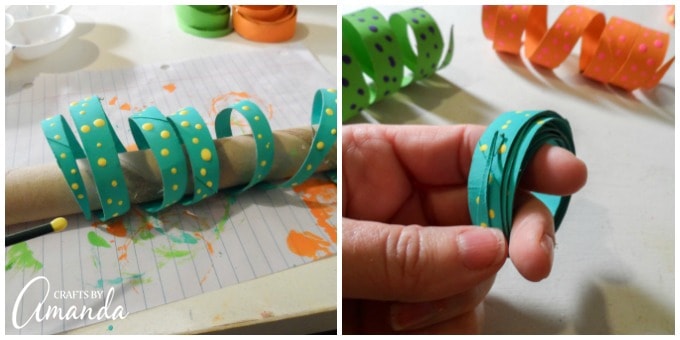
- Take a tube from wrapping paper, or something similar, and wrap the cut cardboard around the tube loosely. Use the handle end of a paintbrush to add polka dots with a contrasting color of paint. LET DRY. Flip over to the other side and finish your polka dots.
- Remove from the tube and wrap the painted cardboard in coil fashion around your fingers. Here’s where you can play with it a bit and position it the way you want to. Paint the end with red and let it dry.
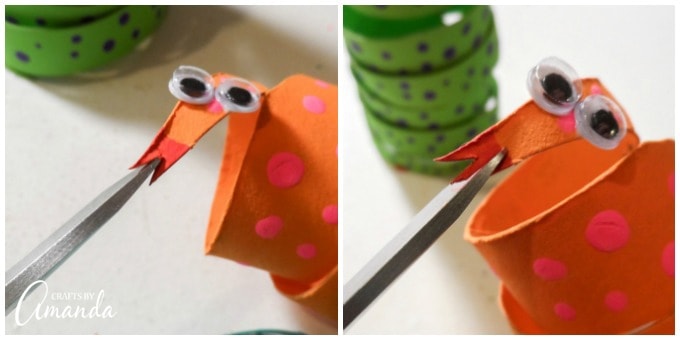
- Meanwhile, glue on googly eyes, I find it easiest to add the glue with a toothpick since they are small.
- Now that the red paint is dry, use some small scissors to snip the red end into a forked tongue. An easier option, if your kids are smaller, is to cut a forked tongue from red construction paper, snip the end of the cardboard to cut off the point, and glue that paper tongue in place instead.
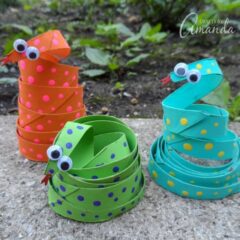
When the tubes are completely dry they are a lot easier to manipulate and shape.

Stretch them out for a coiled snake on the ground, or coil them up with their head popping out! Have fun!

More Cardboard Tube Crafts
There’s no shortage of cardboard tube crafts here on the blog. If you’re looking for more fun ideas to do with the kids check out the list below!
- Cardboard Tube Farm Animals
- How to Make a Kaleidoscope
- Cardboard Tube Coiled Christmas Tree
- Coiled Cardboard Tube Rainbow Mobile
- Cardboard Tube Binoculars
Cardboard Tube Coiled Snakes
Supplies
- 3 cardboard tubes
- Tube from wrapping paper or similar tubular item
- 6 googly eyes
- Toothpick
- White craft glue
- Scissors
- Acrylic craft paint in colors of your choice
Instructions
- Paint the inside and outside of the cardboard tubes. Apply a second coat if needed.
- Cut the tubes into coils, but if your cardboard is still a little damp it might not hold it’s round shape. Using a tube from wrapping paper, or something similar, and wrap the cut cardboard around the tube loosely. Use the handle end of a paintbrush to add polka dots with a contrasting color of paint. Let dry completely then flip over to the other side and finish your polka dots.
- Remove from the tube and wrap the painted cardboard in coil fashion around your fingers. Place coiled cardboard on the table. Paint the end with red and let it dry. Meanwhile, glue on googly eyes, adding the glue with a toothpick since they are small.
- Now that the red paint is dry, use some small scissors to snip the red end into a forked tongue. An easier option, if your kids are smaller, is to cut a forked tongue from red construction paper, snip the end of the cardboard to cut off the point, and glue that paper tongue in place instead.
This post was originally published on this blog on May 8, 2012.
- Tie Dye Beach Towels - July 24, 2026
- Swirling Twirling Ladybugs - July 21, 2026
- Drip Tie Dye Backpack - July 17, 2026


Paul Sanderson says
Love the snake, my wife and kids made their own version using Yogurt Pots – We would love for you to have a go and let us know what you think http://www.diythought.com/yogurt-pot-snake/
Amanda Formaro says
Hi Paul,
They are really cute, keep crafting!
kathrine says
but it was VERY hard cuting it.. it looks weird now.. i have no eyes on it thou XP
Amanda Formaro says
I’m sorry you had trouble with it. A good sharp pair of scissors is best and if you cut before they are completely dry and hardened it’s easier :)
kathrine says
this looks awesome!!
ncba says
i an sooooo excited about doing this. [it is actually pathetic how excited i am. my excitement is inversely proportional to how pathetically dull my life is.] i am going to try this to make twirlies outside my sliding glass doors to keep birds from flying inside. they dont fly in often, but chaos breaks out when they do. my dog barks furiously and tries to get them and i run around flapping my arms and yelling to try to get them out before she does. i’ll try marine varnishing them so they won’t self destruct at the 1st rain. i dont expect them to last long, but then i will get to make more which is even more exciting!!
Amanda Formaro says
Haha that is SOOO fun!
Kim says
I really like your crafts for my preschool kids but I wish you had a print option. I am having to copy and paste the crafts I like so I can print them and put them in my project book.
Amanda Formaro says
Thank you for pointing that out Kim. Some of my older projects didn’t have the printable version like the rest of them do and this was one of them. I’ve gone ahead and updated it so it has it now. :)
jennifer says
So cute!!!! Could you do the dots before you cut? That would be much easier…or wouldn’t that work?
Amanda Formaro says
I don’t see why not! :)
The Educational Tourist says
Love this fun craft! If you use markers instead of paint (just because of the mess) it would be a great road trip activity or one before a trip to see snake charmers in Morocco!
Thanks for sharing your creative idea!
Natalie, The Educational Tourist
Amanda Formaro says
Hi natalie :) Markers would be fun, but the coils wouldn’t hold their shape. The paint is the secret weapon. Painting cardboard gets the cardboard wet, then you can shape it and it will dry to that shape and remain stiff.
Daulva says
Simple yet creative. The kids will enjoy doing this.
Amanda Formaro says
Thank you Daulva!
En casa con Mamá says
Hola! Me encanta tu blog! He enlazado esta idea en mi blog, para poder compartirla con mis seguidores. Espero que te guste mi blog! http://www.encasaconmama.blogspot.com Y si prefieres que quite el enlace me avisas. Gracias!! Saludos desde Argentina!
Sweets says
I’ll be honest, I really do not like snakes. BUT! These are so cute. we may just have to make a few. Thanks
Amanda Formaro says
Thanks Sweets! They are definitely cuter than the real thing LOL!
pat says
great idea. thinking of having a snake painting party. thanks!
Amanda Formaro says
Oh how fun!
Rebecca R. says
So I really want to make these for my childcare kids, but I definitely don’t have access to 40 something toilet paper rolls. Any other way or material I could use instead?
Thanks!
Amanda Formaro says
Hi Rebecca. Cardboard tubes are your best bet. Why not ask parents to drop some off, and once your collection is large enough then make them?
Pegge Fleener says
My friends and I made 40 of these and took them to a nursing home. The residents loved them.
Amanda Formaro says
How fun Pegge, so glad you enjoyed the project and they did too! :) :)
Anna says
Very Very great idea! Thank you! I started to collect ideas using tissue paper rolls and your’s one of the best
jet says
cute. I think when you use old plastic containers and cut them like you did in a coil then you will have outside garden/balcony snakes.XD
like this, thank you for the tute and the sharing;XD
Alejandra Gonzalez says
Hi I am from Costa Rica, I love your crafts!
Amanda says
Thanks so much Alejandra!
Les Créateliers says
Loved this project! I featured it on my website for the Chinese New Year, here’s the link: http://www.lescreateliers.com/Les_Createliers/Idees_Ideas/Entries/2013/2/10_Annee_du_serpentYear_of_the_snake.html
Cheers!
Marie-Eve
Amanda says
Thank so much for the feature!
Amandalishous says
We are so doing this for Chinese New Year, this is the year of the snake….thinking reds and golds with glitter!!!
Amanda says
Sounds like a great project!
Mo says
Ingenius! We’re definitely going to make these at my preschool!
Ali says
Oh my goodness, they are so good. My girls are going to love making them and playing with them.
Amanda says
Thanks Ali! Hope you have fun!
Shirley says
CUTE! My boys are going to love doing this, thank you!
Kelly Showalter says
Thank you so much for sharing such a cute craft! I tried this with my 2nd grade 21st Century Summer School students today, during Arts & Crafts. They totally loved it! The K/1st graders were looking at the snakes and can’t wait until they make it tomorrow! Such a winning craft with our school! Keep posting the great ideas! :-)
Amanda says
How awesome, thanks Kelly!
Amy | Amy's Cooking Adventures says
What a fun craft, Amanda! My boys will love this!
Amanda says
Thanks Amy!
Jennifer Green says
I just love these! I was searching for a snake craft for my Sunday School class for the story about Moses and the rebellious Israelites in the wilderness when God sent fiery serpents among the people and many of them died. The Israelites cried out to God to forgive them and God told Moses to make a serpent of brass and put it on a stick and lift it up. All the people had to do was look at it and they would be saved. Kind of a rough story for kids so I was looking for something cute. This is perfect! Thanks for the great idea!
Amanda says
That’s great Jennifer, thanks!
Pysselbolaget says
They are adorable! Have to try this!
Debbie says
dumb question…how did you paint the inside of the tube?
Amanda says
Hi Debbie! Paint the outside and the inside of the tube first, before you do any cutting :)
Karen Howard says
These are so cute-you could even wrap them around your wrist & wear as a bracelet! Adorable!
Terri says
These are so cute! My girls and I are big fans of cardboard tube crafts. This is definitely going on the list of craft projects we want to do!
dacraftylady says
cute….
Joanne - Craft Passion says
They are the snakiest cute snakes I have ever seen…. My kids will love to make some of them to put in the garden :) Thanks!!!
Katrina says
Well, you got me with snakes. I NEVER would have guessed snakes. And I wouldn’t have thought maybe you were going to cut the tubes. ;)
Amanda says
Haha stumped you! :)
Amazing_Grace says
Cute craft and fun to do! Great craft for the Bible story Adam & Eve. :)
Amanda says
Oh good idea!
Virginia says
i love this craft!!!!!!!!!!!!!!!!!!!!!!!!!
kathrine says
i love these crafting ideas!!
Carolyn says
Awesome craft to go with our camouflage unit!