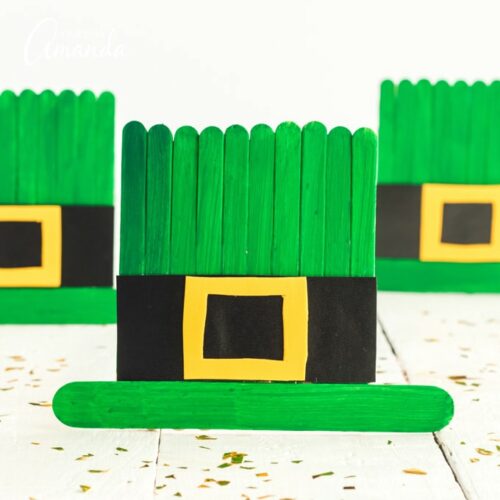
St. Patrick’s Day is a fun holiday to brighten up the long month of March. Leprechauns are a traditional part of the folklore of St. Patrick’s Day and this decorative craft stick leprechaun hat is a fun and easy project for kids to make.

Craft Stick Leprechaun Hat Tutorial
Finish the craft stick leprechaun hat by adding a magnet or a display easel to help it stand upright. Adding a magnet turns it into a functional project that kids can give as a gift to someone special.
The simple easel-back makes the hat stand up and can be easily displayed on your fireplace mantel or bookshelf (maybe near a pot of gold or next to this Cereal Box Leprechaun Trap!)

Craft supplies you will need for each hat

- 10 regular size craft sticks (popsicle sticks)
- 1 jumbo craft stick
- yellow self-adhesive craft foam sheets – cut into 4 strips about 3/8″ x 1 1/4″
- 1 black self-adhesive craft foam sheet – cut into strip 4″ x 1 1/4″
- Green tempera paint
- Thin cardboard (can be from your recycle bin) 4″ x 1″
- Optional: Glitter glue
- Optional: 2 self-adhesive button magnets

Craft Details
- Age Level: 5-10 years old. Can be modified for kids age 3-4 with steps 1-4 and 6 being prepped ahead of time, and kids start on step 5.
- Mess Factor: Moderate: there are steps of painting and gluing
- Time to Complete: 30 minutes plus 10 minutes for drying time during the project. NOTE: if adding glitter glue accents, then add on another hour at least for drying at the end of the project.
- Cost estimate: price-per-project ranges between 29-49 cents, depending on the supplies you have on hand.

Crafting Tips
- If you prefer, you can use water-based green markers to color the craft sticks. Once the kids have colored the craft sticks with the markers, have then “paint” over the marker with water which will help blend the marker and soften the marker lines.
- If you are prepping steps ahead of time, give yourself 20+ minutes depending on the number of projects you are prepping (see notes below).
- To speed drying of paint, use a hairdryer.
- If you don’t have craft foam, you can use black and yellow construction paper.
- I used light green paint. If you don’t have light green, you can mix a little yellow into your green paint or mix your own green by adding yellow and blue paints together until you get the color you want.

Prepping the project for a larger group
If you are prepping steps 1-4 and step 6 for a larger group, I would suggest you do it assembly style. It is much faster. For example, if you are prepping for 5 kids, you would sort and layout 5 sets of 10 sticks, then cut 5 cardboard pieces and glue them down, 1 on each set. Then glue the jumbo stick on for all 5. This really saves time instead of prepping 1 project at a time. Plus they all dry at about the same speed. Cut and assemble the pieces for step 6 and then the kids can peel/stick down the black foam piece onto the craft sticks.
Sort the 10 craft sticks. Because the sticks are being painted with kid-friendly watercolor or tempera paint, you want to make sure all 10 sticks are close to each other in color. Also check to make sure the sticks are not warped, so they lie nice and flat next to each other.
How to Make a Craft Stick Leprechaun Hat
- Arrange the 10 craft sticks vertically next to each other.
- Take your cardboard piece and apply glue to one side of it. Flip this onto the craft sticks. Use a ruler or the jumbo stick as a level to make sure all 10 sticks are nice and tight to each other and straight. It will take just a couple minutes for the glue to set.
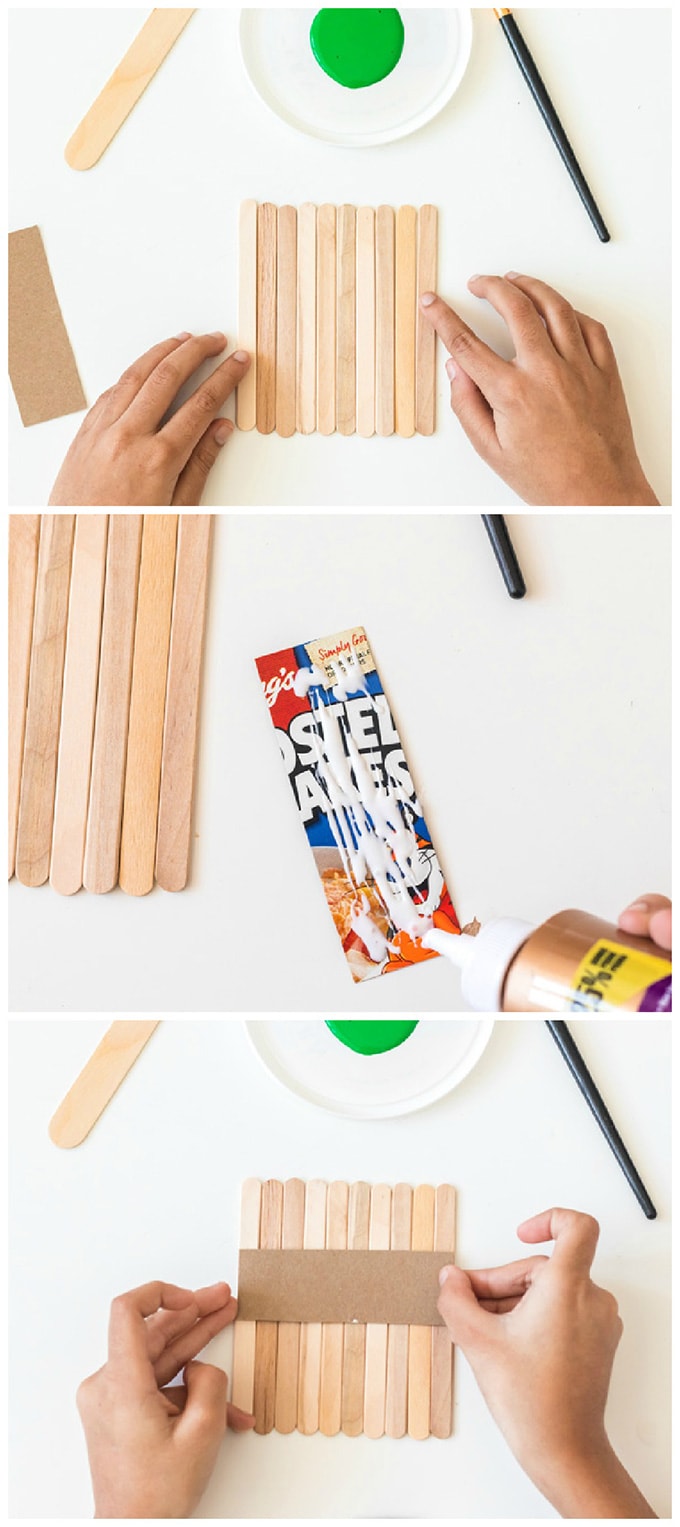
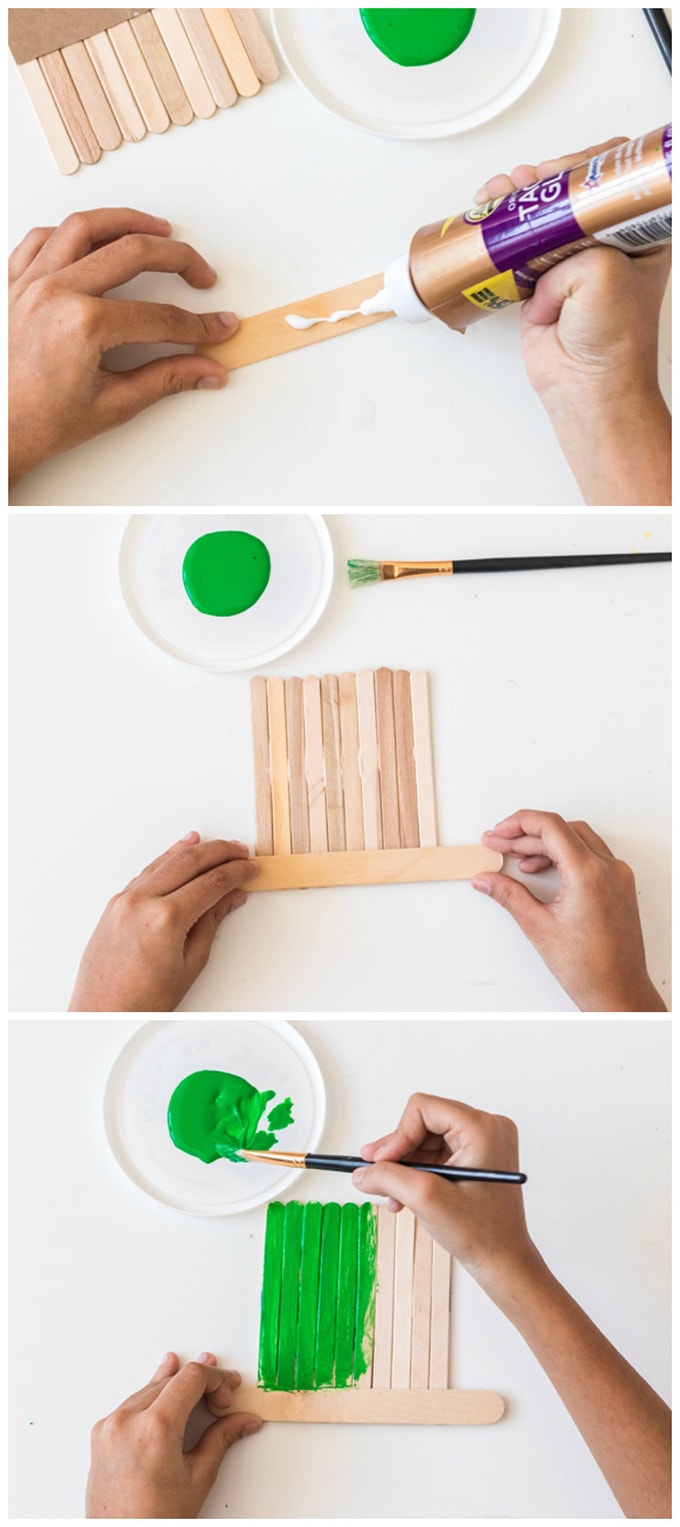
- Flip the glued-together craft sticks over. Brush glue onto the jumbo craft stick, leaving about 1/2” of each end with no glue. Flip this stick over and position across the bottom part of the glued-together craft sticks. It will take a couple minutes for the glue to set.
- Paint the entire hat green. If you prefer, you can have kids use green markers but the effect will be a little streaky. I recommend paint if possible. The paint will sink into the sticks pretty quickly and you can add a second coat. Let dry (or speed dry with a hairdryer).
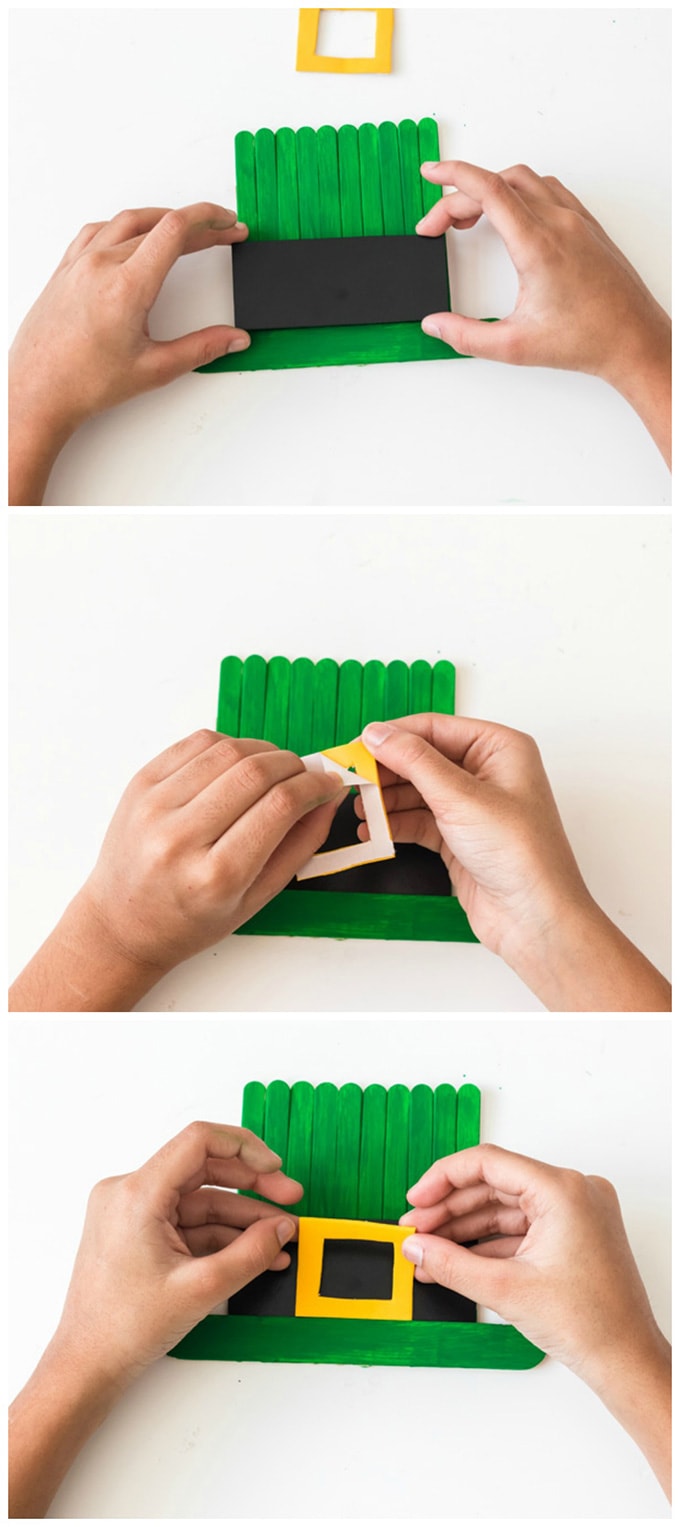
- While the paint is drying, cut your 4×1 1/4” black foam strips for the hat band. Make the yellow buckle by creating a square out of the strips of yellow foam in the center of the black foam strip. Peel/stick the yellow pieces down, then peel/stick the black foam strip down onto the craft sticks, right above the jumbo stick.
- Add glitter glue accents if you want! If adding these, be sure to add on an hour more for drying. Do not try to dry with a hairdryer as it will cause the glitter glue to run.
Display ideas:
Standing Hat Decoration:
- Make a cardboard easel: Cut a 5x 3/12” shape out of thin cardboard.
- Make 2 folds so the cardboard is divided into 3 sections: 1 3/4”, 1 1/4”, 1 3/4.”
- Burnish the folds down with the edge of a pencil so they are as flat as possible.
- Apply a thin layer of glue to the center (1 1/4”) section and press this into the center of the back of the hat, lining up with the bottom edge.
- You now have a standing Leprechaun hat! Let dry.

Magnet: Add 1-2 strong 1” self-adhesive magnets to the back of each hat.

As we head towards Spring, these hats are a great way to add some green around your house and with a little luck, warmer weather will be on its way soon!
More St. Patrick’s Day Crafts for Kids
- 3D Tissue Paper Shamrock
- End of the Rainbow Loot Buckets
- Printable St. Patricks Day Bingo
- Paper Plate Leprechaun
- St. Patricks Day Activity Sheets
- Cereal Box Leprechaun Trap

Craft Stick Leprechaun Hat
Supplies
- 10 regular size craft sticks
- 1 jumbo craft stick
- 1 sheet yellow self-adhesive craft foam cut into 4 strips about 3/8” x 1 1/4”
- 1 sheet black self-adhesive craft foam cut a strip 4" x 1 1/4"
- Green tempera paint
- Thin cardboard can be from your recycle bin 4" x 1”
- Glitter glue optional
- 2 self adhesive button magnets optional
Craft tools
- Ruler
- Pencil
- Cups for water
- Paint brush
- Tacky white glue
- A covered work surface
Instructions
- Sort the 10 craft sticks. Because the sticks are being painted with kid-friendly watercolor or tempera paint, you want to make sure all 10 sticks are close to each other in color. Also check to make sure the sticks are not warped, so they lie nice and flat next to each other.
- Arrange the 10 craft sticks vertically next to each other.
- Take your cardboard piece and apply glue to one side of it. Flip this onto the craft sticks. Use a ruler or the jumbo stick as a level to make sure all 10 sticks are nice and tight to each other and straight. It will take just a couple minutes for the glue to set.
- Flip the glued-together craft sticks over. brush glue onto the jumbo craft stick, leaving about 1/2” of each end with no glue. Flip this stick over and position across the bottom part of the glued-together craft sticks. It will take a couple minutes for the glue to set.
- Paint the entire hat green. If you prefer, you can have kids use green markers but the effect will be a little streaky. I recommend paint if possible. The paint will sink into the sticks pretty quickly and you can add a second coat. Let dry (or speed dry with a hair dryer).
- While the paint is drying, cut your 4×1 1/4” black foam strips for the hat band. Make the yellow buckle by creating a square out of the strips of yellow foam in the center of the black foam strip. Peel/stick the yellow pieces down, then peel/stick the black foam strip down onto the craft sticks, right above the jumbo stick.
- Add glitter glue accents if you want! If adding these, be sure to add on a hour more for drying. Do not try to dry with a hair dryer as it will cause the glitter glue to run.
Expert Tips & FAQs
- If you are prepping steps ahead of time, give yourself 20+ minutes depending on the number of projects you are prepping (see notes below).
- To speed drying of paint, use a hairdryer.
- If you don’t have craft foam, you can use black and yellow construction paper
- If you prefer, you can use water base green markers to color the craft sticks. Once the kids have colored the craft sticks with the markers, have then “paint” over the marker with water which will help blend the marker and soften the marker lines.
- I used light green paint. If you don’t have light green, you can mix a little yellow into your green paint or mix your own green by adding yellow and blue paints together until you get the color you want.
- Add 1-2 strong 1”self adhesive magnets to the back of each hat.
- Cut a 5x 3/12” shape out of thin cardboard.
- Make 2 folds so the cardboard is divided into 3 sections: 1 3/4”, 1 1/4”, 1 3/4.” Burnish the folds down with the edge of a pencil so they are as flat as possible.
- Apply a thin layer of glue to the center (1 1/4”) section and press this into the center of the back of the hat, lining up with the bottom edge.
- Let dry. You now have a standing Leprechaun hat!
This post originally appeared here on Feb 14, 2020.
- Star Suncatchers - June 19, 2026
- DIY Garden Stepping Stones - May 22, 2026
- How to Make Bath Bombs - May 5, 2026


Sharon says
I as a Scot chuckle at this every year as St Patrick was from Dumbarton, Scotland. The hat should be royal blue with a buckle that is of the St Andrews cross. He was captured by the Irish and taken to Ireland to be a laborer and a shepherd. The article and history is in the Irish News. LOL Happy St Paddy’s Day.