• Home
  • About
    • About Crafts by Amanda
    • Visit Our Recipe Site
  • Work With Us
  • Join
    • Free Newsletters
    • Join our Facebook craft group
↑
  • Tutorials
    • Tutorial Index
    • Adult Crafts
    • Crafts for Kids
    • Crafts for Seniors
    • Recycled Crafts
    • Seasonal Crafts
    • Holiday Crafts
    • Free Printables
    • Craft Collections
  • Adult Crafts
    • Bath & Body
    • Beach Crafts
    • Clay Pot Crafts
    • Crafts for Seniors
    • Decoupage Crafts for Adults
    • DIY Gift ideas
    • Garden Crafts
    • Home Decor Projects
    • Kitchen Crafts
    • Light Bulb Crafts
    • Luminary Crafts
    • Mason Jar Crafts
    • Needlework
    • Photo Display Ideas
    • Recycled Crafts for Adults
    • Wearable Crafts for Adults
  • Crafts for Kids
    • Animal Crafts for Kids
    • Back to School Crafts
    • Beach Crafts for Kids
    • Camp Crafts
    • Cardboard Tube Crafts for Kids
    • Decoupage Crafts for Kids
    • Easy Crafts for Kids
    • Nature Crafts for Kids
    • Other Kid’s Crafts
    • Paper Plate Crafts for Kids
    • Recycled Crafts for Kids
    • Slimes, Doughs, & Clay
    • Wearable Crafts for Kids
  • Holiday Crafts
    • 4th of July Crafts
    • Christmas Crafts
    • DIY Gift ideas
    • Earth Day Crafts
    • Easter Crafts
    • Father’s Day Crafts
    • Halloween Crafts
    • Memorial Day Crafts
    • Mother’s Day Crafts
    • New Year’s
    • Other Holidays
    • Patriot Day Crafts
    • St. Patrick’s Day Crafts
    • Thanksgiving Crafts
    • Valentine’s Day Crafts
  • Seasonal Crafts
    • Winter Crafts
    • Spring Crafts
    • Summer Crafts
    • Fall Crafts
  • Skip to primary navigation
  • Skip to main content
  • Skip to primary sidebar
  • Skip to footer

Crafts by Amanda

crafts for adults and kid's crafts

  • Tutorials
    • Tutorial Index
    • Adult Crafts
    • Crafts for Kids
    • Crafts for Seniors
    • Recycled Crafts
    • Seasonal Crafts
    • Holiday Crafts
    • Free Printables
    • Craft Collections
  • Adult Crafts
    • Bath & Body
    • Beach Crafts
    • Clay Pot Crafts
    • Crafts for Seniors
    • Decoupage Crafts for Adults
    • DIY Gift ideas
    • Garden Crafts
    • Home Decor Projects
    • Kitchen Crafts
    • Light Bulb Crafts
    • Luminary Crafts
    • Mason Jar Crafts
    • Needlework
    • Photo Display Ideas
    • Recycled Crafts for Adults
    • Wearable Crafts for Adults
  • Crafts for Kids
    • Animal Crafts for Kids
    • Back to School Crafts
    • Beach Crafts for Kids
    • Camp Crafts
    • Cardboard Tube Crafts for Kids
    • Decoupage Crafts for Kids
    • Easy Crafts for Kids
    • Nature Crafts for Kids
    • Other Kid’s Crafts
    • Paper Plate Crafts for Kids
    • Recycled Crafts for Kids
    • Slimes, Doughs, & Clay
    • Wearable Crafts for Kids
  • Holiday Crafts
    • 4th of July Crafts
    • Christmas Crafts
    • DIY Gift ideas
    • Earth Day Crafts
    • Easter Crafts
    • Father’s Day Crafts
    • Halloween Crafts
    • Memorial Day Crafts
    • Mother’s Day Crafts
    • New Year’s
    • Other Holidays
    • Patriot Day Crafts
    • St. Patrick’s Day Crafts
    • Thanksgiving Crafts
    • Valentine’s Day Crafts
  • Seasonal Crafts
    • Winter Crafts
    • Spring Crafts
    • Summer Crafts
    • Fall Crafts
Craft Tutorials | Holiday Crafts | Christmas Crafts | Snowman Garland

Snowman Garland

Author by Amanda Davis on December 18, 2011 Updated on December 6, 2020

128 shares
  • Share
  • Tweet
  • Flipboard
  • Email

Snowman Garland


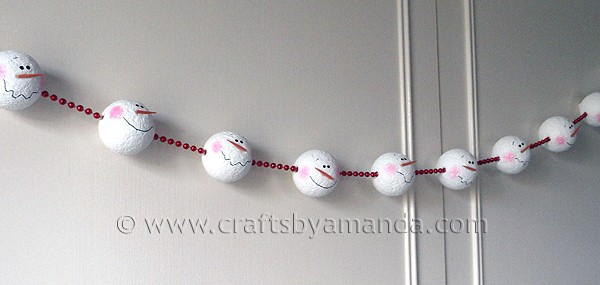
I actually started this snowman garland several weeks ago and kept getting sidetracked. I finally got back to the crafting table so I could finish this project and share it with you! I adore snowmen and seems like every year once I get in the groove, it’s time to start making Valentine’s Day crafts. Ha ha.
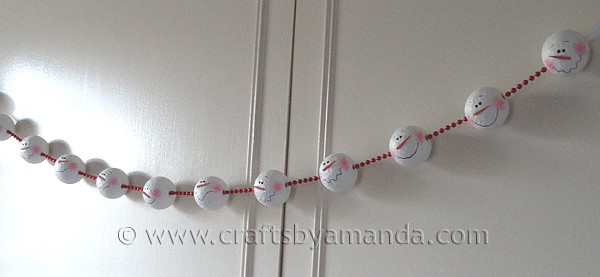
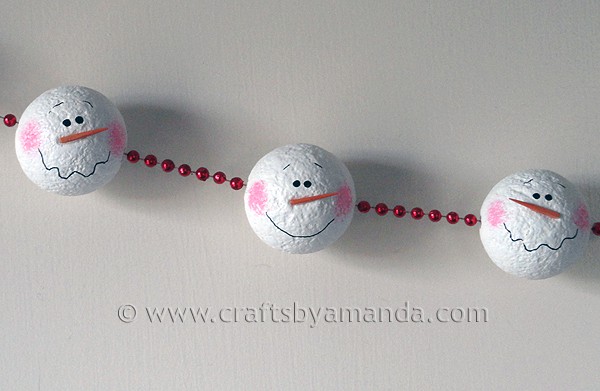
Snowman GarlandI am actually really happy with how they turned out. My original idea included hats and ear muffs, but I ended up liking them plain.

Snowman GarlandFor this garland I used a bag of 2 inch [amazon_link id=”B001685PEQ” target=”_blank” container=”” container_class=”” ]Styrofoam balls[/amazon_link] and some [amazon_link id=”B004VD41FW” target=”_blank” container=”” container_class=”” ]Magikote[/amazon_link]. In case you haven’t heard of Magikote yet, it’s a product developed by Decoart that gives Styrofoam a paintable, sandable surface. I love working with these two items. The possibilities are endless and they make for really lightweight projects. If you would like to see some other projects I have made using Magikote and Styrofoam check these out:
Numbered Decorative Orbs | Egg Monster | Sports Ball Ornaments | Giant Sand Dollar

Snowman GarlandFor this project, I gave each ball a good coat of Magikote. Now Magikote requires a solid 2-3 hours of drying time, so plan ahead. After the first coat I added a second. When they were dry, I sanded the balls to get rid of the rough edges. Then I inserted a toothpick into each ball (which goes right into the Magikote without cracking or anything, just like corkboard) and placed them in floral foam blocks. And that’s where they sat for about 3 weeks!

Snowman GarlandThe other day, after hubby finished making my craft table (yay!), I sat down to finally finish this craft. I used some red Mardi Gras beads I had sitting around. I measured them first and figured out how many sections I would need. After cutting the beads into sections, I used my thumb to press the end bead into the hole that the toothpick had been in. To coax that bugger in there more, I applied firm but gentle pressure with the eraser of a pencil. Once it was firmly inside the ball, I removed it and added some hot glue.

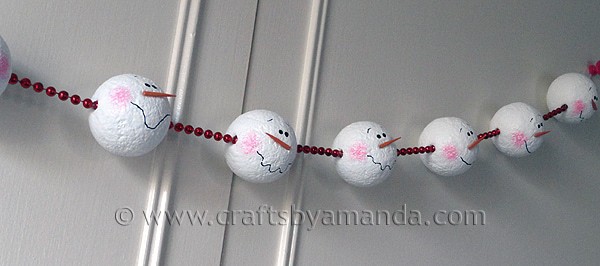
Snowman GarlandThen I was able to easily press the end bead back into the hole. I did this for all of the balls. When done with each individual ball, I connected them all to each other using the same method. Then I looped some ribbon and inserted them into the end heads to create the hangers. To make sure that the faces were all facing the same way, I hung the garland up temporarily.

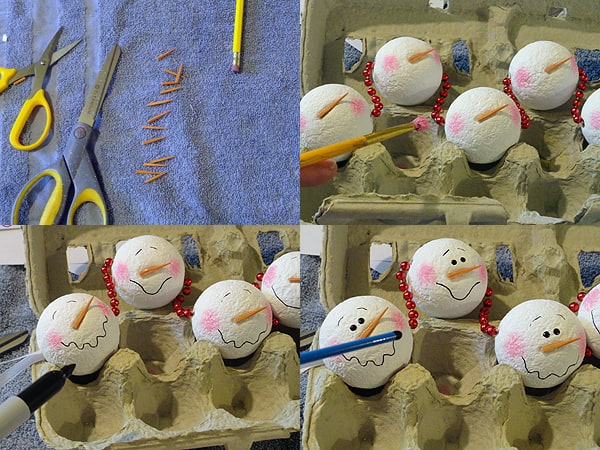
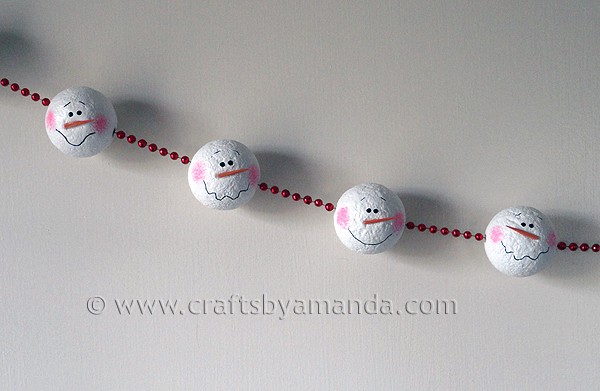
Snowman GarlandNext I cut orange toothpicks in half (I have several boxes of colored toothpicks, not sure if you can get them anymore, but you could always paint plain ones.) then trimmed them down a bit to get them to the size that I wanted. While the garland was hanging up I hot glued the noses on. Then I took the garland down to finish decorating. I applied pressure to the noses to create an indent and sink them into the ball a bit. Then I used a scruffy brush and [amazon_link id=”B001B2TXOA” target=”_blank” container=”” container_class=”” ]Americana Pink Bubblegum[/amazon_link] paint to add the cheeks. I used a fine point Sharpie to add the mouths and eyebrows and the handle end of a paintbrush dipped in black paint for the eyes.

Snowman GarlandThat’s it. Once they were dry I hung it up again and sprayed two coats (dried in between) of acrylic matte sealer.

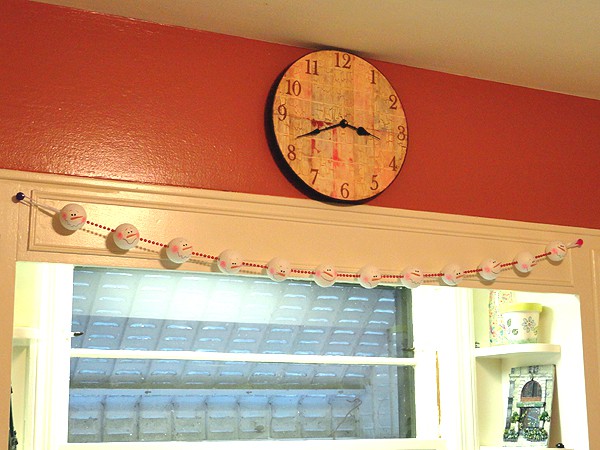
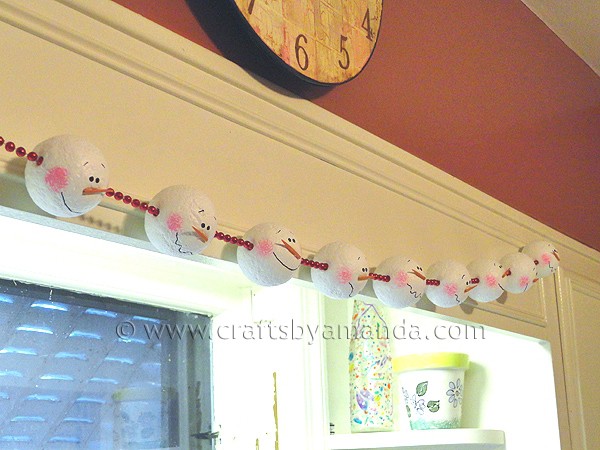
Snowman GarlandAfter hanging them up they still ended up with some faces pointing down and some pointing up. I just used a little wall putty on the back of the heads to stick them to the wall to keep them all even. :)

Snowman GarlandI don’t actually have a mantel, and my walls are made of plaster (which means no thumbtacks!) so the kitchen is where they ende up.

Snowman GarlandThese were not easy to get pictures of either, ha!

Snowman GarlandFun!


  • Author
  • Recent Posts
Amanda Davis
Amanda Davis is the crafty, entrepreneurial mother of four children. She loves to bake, cook, make kid's crafts and create decorative items for her home. She is a crafting expert and guru in the kitchen and has appeared online and in print publications many times over the years.
Latest posts by Amanda Davis (see all)
  • Mason Jar Aquarium - May 23, 2025
  • Make Bracelets from Recycled T-shirts - May 20, 2025
  • Spring Scavenger Hunt - May 9, 2025
128 shares
  • Share
  • Tweet
  • Flipboard
  • Email

Filed Under: Christmas Crafts, Crafts for Seniors, DIY Gift ideas, Home Decor Projects, Winter Crafts Tagged With: adult, adult craft ideas, adult crafts, adults, christmas, crafts for adults, garland, holidays, magikote, snowmen, styrofoam, winter

Reader Interactions

Free CraftsBy email every week

Latest crafts straight to your inbox!

Comments

  1. Jen says

    November 27, 2015 at 9:21 pm

    These are adorable and look super easy to make. I think we just found a craft my kids can do for their Christmas class gifts to hand out. I think we’ll do individual ornaments and put the kid’s name on the back to personalize instead of doing a garland. Thanks for the idea!!

    Reply
    • Amanda Formaro says

      December 7, 2015 at 1:50 pm

      So glad you like it, have fun!!

      Reply
  2. Rita says

    November 19, 2014 at 11:38 am

    Amanda, I just love your little snowmen! I hope to find the 2″ balls to make them…..

    Reply
  3. monique says

    November 17, 2013 at 6:22 pm

    Love these , will be making some variation of them for sure.
    And as for hanging stuff ……COMMAND HOOKS (I use them everywhere as my hubby won’t let me put nails into our mantel) or other odd spots I hang stuff from (I use the see-thru ones and leave them up (no one complains…YET) :)

    Reply
    • Amanda Formaro says

      November 18, 2013 at 2:14 pm

      Great idea, thanks for sharing Monique!

      Reply
  4. Dawn says

    August 29, 2013 at 2:24 am

    I, like you, also Love snowmen. I think you did an awesome job. I was thinking at first that you had used ping pong balls before reading on and saw you used Styrofoam balls.

    Reply
    • Amanda Formaro says

      August 29, 2013 at 6:34 am

      Thanks Dawn! They do kinda look like ping pong balls though! ;)

      Reply
  5. Lulu says

    January 17, 2012 at 10:09 pm

    Oh my GOSH, these are awesome! I’ve just found your website and somehow it’s sucked up almost 2 hours of an already busy day for me.

    Thanks for sharing this idea and all of the steps. My two year old will absolutely love this. It’s plenty hands on for her and not too dangerous!

    Thanks – now if we could only get some snow down here in Tennessee!!

    Reply
  6. Gina Marie says

    January 14, 2012 at 2:17 am

    I love anything snowman! These are great!

    Reply
  7. Susan says

    January 11, 2012 at 8:58 am

    You are a genius! Thank you for the snowmen ;)

    Reply
  8. maggy,red ted art says

    December 21, 2011 at 9:11 pm

    That is so adorable!!!

    Thank you for sharing on Kids Get Crafty!

    Maggy

    Reply
  9. RubyJeans says

    December 20, 2011 at 7:57 pm

    Oh My!!! these are just ADORABLE!!!! Our children would LOVE LOVE LOVE to make these… :) Thank you for sharing it with us… I would love it if you could stop in and share it here http://shoprubyjean.com/2011/12/sew-crafty-tuesday-linky-2-and-highlights/

    Reply
    • Amanda Formaro says

      December 21, 2011 at 1:44 pm

      Thank you Ruby!

      Reply
  10. April K says

    December 20, 2011 at 6:30 pm

    So cute. I wish I could find the time to do all of the great craft ideas I find online!

    Reply
  11. Ruth Hill says

    December 18, 2011 at 9:39 pm

    Loved these, and I pinned them on pinterest! So cute and easy to do! Thanks for sharing.

    Reply
    • Amanda Formaro says

      December 19, 2011 at 7:45 pm

      Thank you Ruth!

      Reply
  12. Holly says

    December 18, 2011 at 9:15 pm

    Hello Amanda….just had to tell you,these snowmen are too adorable!I am also a snowman person,I love them! Also,congrats on your new table built in time for Christmas by your honeypie!How awesome is that ! ! !
    All the best to you and yours for a most wonderful Christmas and a Healthy and Happy New Year!

    Reply
  13. Barbara "Cookie" says

    December 18, 2011 at 6:25 pm

    Love these I love the faces you do on them …Merry Christmas,,Cookie

    Reply
    • Amanda Formaro says

      December 19, 2011 at 7:45 pm

      Thanks Cookie!

      Reply
  14. tina says

    December 18, 2011 at 12:57 am

    These are REALLY CUTE Amanda!! Love them! Think I’m going to check out the sand dollars you mentioned too!.. Hope you’re enjoying your weekend! ~tina

    Reply

Leave a Reply Cancel reply

Your email address will not be published. Required fields are marked *

Rate This Project


The maximum upload file size: 640 MB. You can upload: image, video. Links to YouTube, Facebook, Twitter and other services inserted in the comment text will be automatically embedded. Drop files here

Primary Sidebar

Hi! I’m Amanda and I’m the founder and head designer of Crafts by Amanda. I have spent over 25 years creating projects to share, but it’s not just me anymore! It’s turned into a complete family affair. Come and meet the Creative Team!

Free CraftsBy email every week

Latest crafts straight to your inbox!

All Time Favorites

snowy pinecone candle jar luminaries

Winter Luminaries: Snowy Pinecone…

Make pretty winter luminaries that appear to be covered ... Go To project

Make this wonderful deco mesh pumpkin wreath to hang on your door this fall!

Deco Mesh Pumpkin Wreath…

Adorn your door this fall with a pretty deco mesh ... Go To project

Learn to make these adorable ladybug painted rocks. use special outdoor paint for this adorable garden craft so you can keep garden ladybugs all summer!

Ladybug Painted Rocks…

I'm going to show you how to make these adorable ... Go To project

Reuse those empty prescription pill bottles in all sorts of ways. From organizing to making cookies. Yes, cookies! See how to use your empty pill bottles!

20 Uses for Prescription Pill…

You've been collecting prescription pill bottles for ... Go To project

Meet the Family

Amanda

Founder and Designer

Kristen

Editorial Manager

Lindsay

Social Media Manager

As seen on:

Footer

Favorites

  • Jar Photo Frames
  • No-Sew Roman Shade
  • Paper Flowers
  • How to Make a Scrunchie
  • Mermaid Slime

About

  • Home
  • Meet the Creative Team
  • Work with Us
  • Privacy Policy
  • Accessibility
  • Contact Us

Images/text copyright Amanda Formaro 2020. To feature a post from Crafts by Amanda, you may use one photo credited and linked back directly to the project post.

Free CraftsBy email every week

Latest crafts straight to your inbox!

Copyright ©2025, Crafts by Amanda. All Rights Reserved.
Design by Pixel Me Designs