• Home
  • About
    • About Crafts by Amanda
    • Visit Our Recipe Site
  • Work With Us
  • Join
    • Free Newsletters
    • Join our Facebook craft group
↑
  • Tutorials
    • Tutorial Index
    • Adult Crafts
    • Crafts for Kids
    • Crafts for Seniors
    • Recycled Crafts
    • Seasonal Crafts
    • Holiday Crafts
    • Free Printables
    • Craft Collections
  • Adult Crafts
    • Bath & Body
    • Beach Crafts
    • Clay Pot Crafts
    • Crafts for Seniors
    • Decoupage Crafts for Adults
    • DIY Gift ideas
    • Garden Crafts
    • Home Decor Projects
    • Kitchen Crafts
    • Light Bulb Crafts
    • Luminary Crafts
    • Mason Jar Crafts
    • Needlework
    • Photo Display Ideas
    • Recycled Crafts for Adults
    • Wearable Crafts for Adults
  • Crafts for Kids
    • Animal Crafts for Kids
    • Back to School Crafts
    • Beach Crafts for Kids
    • Camp Crafts
    • Cardboard Tube Crafts for Kids
    • Decoupage Crafts for Kids
    • Easy Crafts for Kids
    • Nature Crafts for Kids
    • Other Kid’s Crafts
    • Paper Plate Crafts for Kids
    • Recycled Crafts for Kids
    • Slimes, Doughs, & Clay
    • Wearable Crafts for Kids
  • Holiday Crafts
    • 4th of July Crafts
    • Christmas Crafts
    • DIY Gift ideas
    • Earth Day Crafts
    • Easter Crafts
    • Father’s Day Crafts
    • Halloween Crafts
    • Memorial Day Crafts
    • Mother’s Day Crafts
    • New Year’s
    • Other Holidays
    • Patriot Day Crafts
    • St. Patrick’s Day Crafts
    • Thanksgiving Crafts
    • Valentine’s Day Crafts
  • Seasonal Crafts
    • Winter Crafts
    • Spring Crafts
    • Summer Crafts
    • Fall Crafts
  • Home
  • About
    • About Crafts by Amanda
    • Visit Our Recipe Site
  • Work With Us
  • Join
    • Free Newsletters
    • Join our Facebook craft group
  • Skip to primary navigation
  • Skip to main content
  • Skip to primary sidebar
  • Skip to footer

Crafts by Amanda

crafts for adults and kid's crafts

  • Tutorials
    • Tutorial Index
    • Adult Crafts
    • Crafts for Kids
    • Crafts for Seniors
    • Recycled Crafts
    • Seasonal Crafts
    • Holiday Crafts
    • Free Printables
    • Craft Collections
  • Adult Crafts
    • Bath & Body
    • Beach Crafts
    • Clay Pot Crafts
    • Crafts for Seniors
    • Decoupage Crafts for Adults
    • DIY Gift ideas
    • Garden Crafts
    • Home Decor Projects
    • Kitchen Crafts
    • Light Bulb Crafts
    • Luminary Crafts
    • Mason Jar Crafts
    • Needlework
    • Photo Display Ideas
    • Recycled Crafts for Adults
    • Wearable Crafts for Adults
  • Crafts for Kids
    • Animal Crafts for Kids
    • Back to School Crafts
    • Beach Crafts for Kids
    • Camp Crafts
    • Cardboard Tube Crafts for Kids
    • Decoupage Crafts for Kids
    • Easy Crafts for Kids
    • Nature Crafts for Kids
    • Other Kid’s Crafts
    • Paper Plate Crafts for Kids
    • Recycled Crafts for Kids
    • Slimes, Doughs, & Clay
    • Wearable Crafts for Kids
  • Holiday Crafts
    • 4th of July Crafts
    • Christmas Crafts
    • DIY Gift ideas
    • Earth Day Crafts
    • Easter Crafts
    • Father’s Day Crafts
    • Halloween Crafts
    • Memorial Day Crafts
    • Mother’s Day Crafts
    • New Year’s
    • Other Holidays
    • Patriot Day Crafts
    • St. Patrick’s Day Crafts
    • Thanksgiving Crafts
    • Valentine’s Day Crafts
  • Seasonal Crafts
    • Winter Crafts
    • Spring Crafts
    • Summer Crafts
    • Fall Crafts
Craft Tutorials | Holiday Crafts | Thanksgiving Crafts | Wood Slice Pumpkin Chalkboard
Thanksgiving Crafts

Wood Slice Pumpkin Chalkboard

Author by Jane and Sonja on September 11, 2019 Updated on August 10, 2020

5 from 1 vote
Wood slices add the perfect rustic touch to fall decorating. See how to give one wood slice two distinct looks including as a wood slice pumpkin chalkboard.
Jump to Project
reversible wood slice pumpkin chalkboard
2518 shares
  • Share
  • Tweet
  • Flipboard
  • Email

Wood slices add the perfect rustic touch to fall decorating and make wonderful canvases for a little painting project. You may remember our wood slice Christmas ornaments from last year. See how to give one wood slice two distinct looks including as a wood slice pumpkin chalkboard.

chalkboard that looks like pumpkin made from wood slice


RELATED – Our wood slice pumpkin project is reversible, just like our reversible scarecrow snowman sign for your front porch, and our reversible wood pumpkins and snowmen!

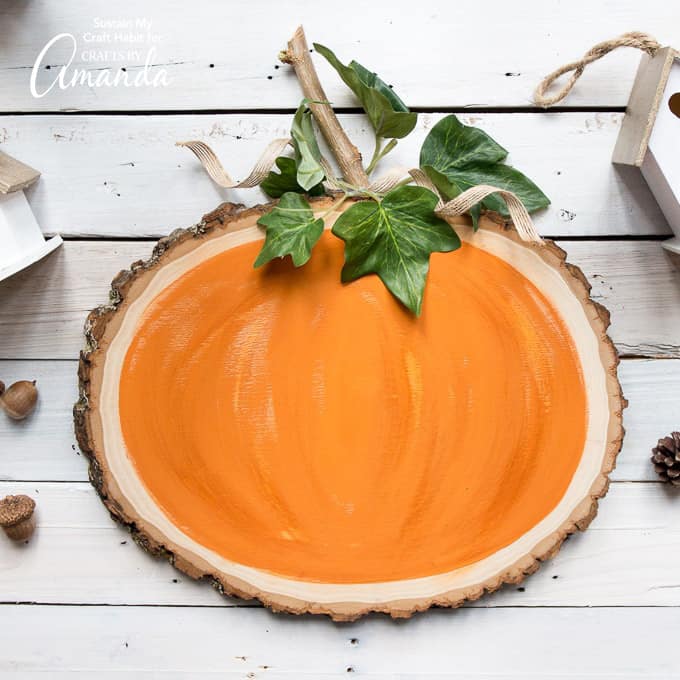
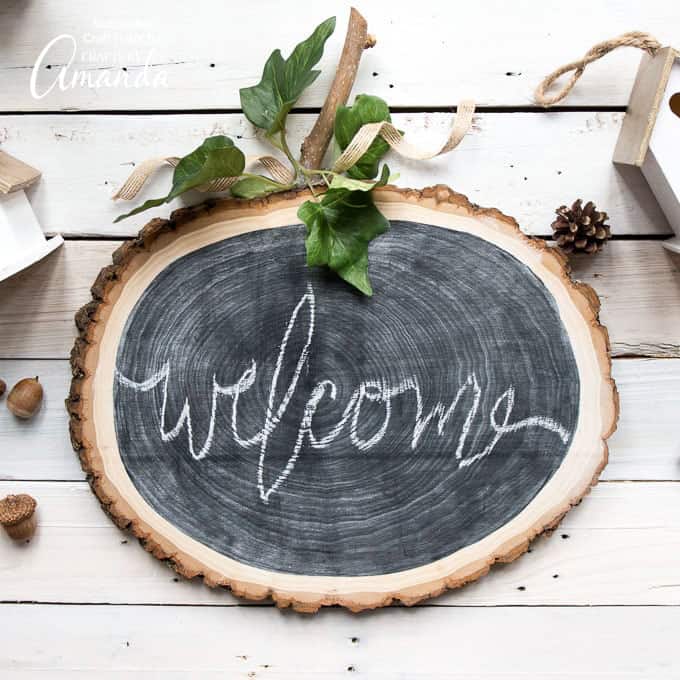
Reversible Wood Slice Pumpkin Chalkboard

Hi crafty friends! This is Jane from Sustain My Craft Habit, a nature-inspired DIY, craft and home decor blog I write with my sister Sonja. Fall is one of our favorite times of year for decorating!

We are drawn to natural textures and materials and there’s nothing like displaying found and foraged objects such as acorns, pinecones, and wood. Last year we shared Sonja’s rustic chic fall home tour which included a whole woodland inspired Thanksgiving tablescape.

This reversible wood slice craft would have been perfect to display last year, but we’re happy to have it now! One side is perfectly rustic with an orange chalky finish, whereas the other side is more modern and functional as a mini chalkboard.

wood slice pumpkin
chalkboard pumpkin

Do you have a favorite fall quote you would write on your DIY wood slice pumpkin chalkboard?

Materials needed to make this Reversible Wood Slice Pumpkin

  • Walnut Hollow Large Basswood Country Round (9-11” wide)
  • DecoArt Americana Decor Chalky Finish paint in Heritage
  • CraftSmart DecoArt Americana Decor Chalky Finish
  • Medium paint brush
  • Fine grit sandpaper
  • Clean, dry cloth
  • Small stem (twig or branch)
  • Burlap ribbon or twine
  • Artificial green foliage
  • Hot glue gun with clear craft glue


supplies needed for wood slice pumpkin chalkboard

How to make a Reversible Wood Slice Pumpkin

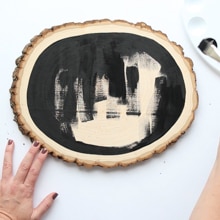
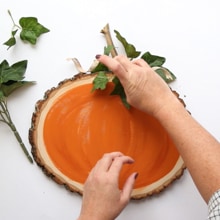
Rustic Orange Pumpkin

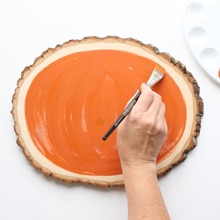
Decide whether your pumpkins will be tall or wide (as ours is) and place the wood slice on a flat surface in front of you. Start by painting a large oval using the Heritage color paint, leaving about ¼-inch of the wood slice exposed between the bark and the paint line.


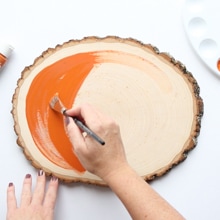
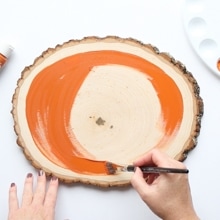
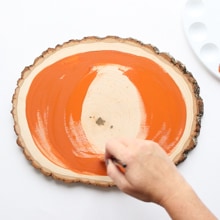
Continue from one side of the wood slice to the other, working in curved wedge sections (like the sections on a pumpkin). Leave some sections very lightly painted, or even unpainted for the truly worn, rustic look. Once painted, let dry completely (at least one hour).


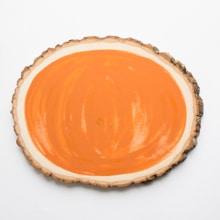
Once dry, lightly sand sections of the “pumpkin” to accentuate the wedges you painted. Gently wipe away any paint dust with a clean cloth.

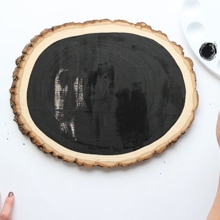
Black Chalkboard Pumpkin

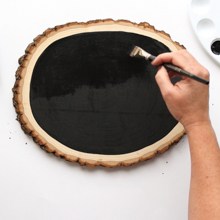
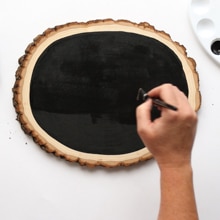
Turn the wood slice over. Again, paint an oval onto the wood slice surface, leaving a ¼-inch border of exposed wood all around. Paint the first coat with vertical strokes and then let dry for at least one hour.


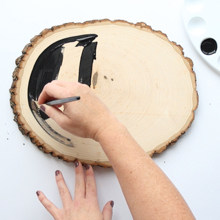
Paint a second coat of chalkboard paint, this time with horizontal strokes. Let dry completely.


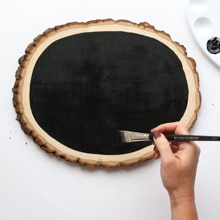
Note: Prior to using the chalkboard, you may want to “prime” it by lightly running a piece of chalk in all directions over the surface and then wiping it off with a damp cloth. This will help to keep your writing from imprinting onto the chalkboard surface.

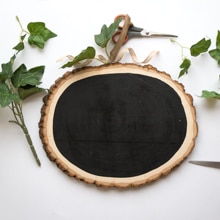
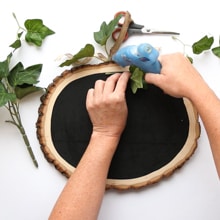
Attaching the Stem and Leaves

I cut a 4-inch long stem from my mulberry tree out front of my house. Use any type of branch you have or even a wine cork instead.

Glue a curled piece of ribbon to the top of the wood slice using the hot glue gun. Glue the stem on top of the ribbon. Add several leaves hanging over one side of the wood slice pumpkin and then turn over and glue a few to the other side.


That’s it! You now have a beautiful, multi-purpose piece of decor that you can just flip around to get a completely different look. I particularly like the message board which can also be changed up with all kinds of different colored chalks. I’m just waiting for my kids to notice it!

wood slice pumpkin chalkboard

For more creative fall crafts you may like Jane and Sonja’s glittering Silent Night wood slice ornaments, as well as this burlap wreath, these mason jar lid pumpkins, and this burlap pumpkin wreath! And most recently, check out this beautiful pumpkin grapevine wreath!

reversible wood slice pumpkin chalkboard
Print Project
5 from 1 vote

DIY Wood Slice Pumpkin Chalkboard

Wood slices add the perfect rustic touch to fall decorating. See how to give one wood slice two distinct looks including as a wood slice pumpkin chalkboard.
Age Group: Adult Crafts
Author: Jane & Sonja

Supplies

  • Walnut Hollow Large Basswood Country Round 9-11” wide
  • DecoArt Americana Decor Chalky Finish paint in Heritage
  • CraftSmart Black Chalkboard Paint
  • Medium paint brush
  • Fine grit sandpaper
  • Clean dry cloth
  • Small stem
  • Burlap ribbon or twine
  • Artificial green foliage
  • Hot glue gun with clear craft glue

Instructions

  • Paint a large orange oval leaving about ¼” of the wood slice exposed between the bark and the paint line.
  • Continue from one side of the wood slice to the other, leaving some sections very lightly painted, or even unpainted for the truly worn, rustic look. Let dry completely (at least one hour).
  • Lightly sand sections of the “pumpkin” to accentuate the wedges you painted.
  • Turn the wood slice over. Again, paint an oval onto the wood slice surface, leaving a ¼” border of exposed wood all around. Paint the first coat with vertical strokes and then a second coat with horizontal strokes. Let dry completely.
  • Glue a curled piece of ribbon to the top of the wood slice using the hot glue gun.
  • Glue the stem on top of the ribbon.
  • Add several leaves hanging over one side of the wood slice pumpkin and then turn over and glue a few to the other side.

This post originally appeared here on Sep 19, 2018.

  • Author
  • Recent Posts
Follow Along
Jane and Sonja
Bloggers at Sustain My Craft Habit
Jane and Sonja are sisters, moms and lifelong craft addicts both living near Toronto, Canada with their families. They share their love of creativity, nature and coastal craft and DIY ideas on their blog Sustain My Craft Habit.
Follow Along
Latest posts by Jane and Sonja (see all)
  • Sea Glass Christmas Tree - November 18, 2025
  • Halloween Ribbon Wreath - October 3, 2025
  • Vacation Photo Jar - July 25, 2025
2518 shares
  • Share
  • Tweet
  • Flipboard
  • Email

Filed Under: Fall Crafts, Home Decor Projects, Thanksgiving Crafts Tagged With: autumn, chalkboard, fall, nature, pumpkin, rustic, thanksgiving, wood slice

Reader Interactions

Free CraftsBy email every week

Latest crafts straight to your inbox!

5 from 1 vote (1 rating without comment)

Leave a Reply Cancel reply

Your email address will not be published. Required fields are marked *

Rate This Project


The maximum upload file size: 640 MB. You can upload: image, video. Links to YouTube, Facebook, Twitter and other services inserted in the comment text will be automatically embedded. Drop files here

Primary Sidebar

Hi! I’m Amanda and I’m the founder and head designer of Crafts by Amanda. I have spent over 25 years creating projects to share, but it’s not just me anymore! It’s turned into a complete family affair. Come and meet the Creative Team!

Free CraftsBy email every week

Latest crafts straight to your inbox!

All Time Favorites

snowy pinecone candle jar luminaries

Winter Luminaries: Snowy Pinecone…

Make pretty winter luminaries that appear to be covered ... Go To project

Make this wonderful deco mesh pumpkin wreath to hang on your door this fall!

Deco Mesh Pumpkin Wreath…

Adorn your door this fall with a pretty deco mesh ... Go To project

Learn to make these adorable ladybug painted rocks. use special outdoor paint for this adorable garden craft so you can keep garden ladybugs all summer!

Ladybug Painted Rocks…

These colorful little ladybug painted rocks are the ... Go To project

Reuse those empty prescription pill bottles in all sorts of ways. From organizing to making cookies. Yes, cookies! See how to use your empty pill bottles!

20 Uses for Prescription Pill…

You've been collecting prescription pill bottles for ... Go To project

Meet the Family

Amanda

Founder and Designer

Kristen

Editorial Manager

Lindsay

Social Media Manager

As seen on:

Footer

Favorites

  • Jar Photo Frames
  • No-Sew Roman Shade
  • Paper Flowers
  • How to Make a Scrunchie
  • Mermaid Slime

About

  • Home
  • Meet the Creative Team
  • Work with Us
  • Privacy Policy
  • Accessibility
  • Contact Us

Images/text copyright Amanda Davis 2025. To feature a post from Crafts by Amanda, you may use one photo credited and linked back directly to the project post.

Free CraftsBy email every week

Latest crafts straight to your inbox!

Copyright ©2025, Crafts by Amanda. All Rights Reserved.
Design by Pixel Me Designs

Rate This Tutorial

Your vote:


To share a photo with your comment click here!

A rating is required
A name is required
An email is required

Recipe Ratings without Comment

Something went wrong. Please try again.