
In December of 2000, I made a bunch of these little snow people from recycled mittens and wooden balls. They are super easy to make and so much fun to give personality to! You can embellish them however you like, I made an entire family and placed them in a metal sleigh (pictured in the sleigh below).
Snow People from Recycled Mittens
by Amanda Formaro
You will need
children’s mittens
rice
cotton batting
11/4″ diameter wooden balls
buttons
mismatched infant or children’s socks
small pom poms
scrap material for scarves
silk florals (holiday springs, berries, flowers, etc.)
sleigh or basket
tiny black plastic eyes or black acrylic paint
rosey lipstick
black marker
What you do
Basic Snow Person

Fill the hand portion of a child’s mitten with one or two handfuls of rice, fill the rest of the way with cotton batting, be sure to fill thumb as well. Cut a scrap piece of material for scarf and gently tie around the mitten where the ribbing of the cuff meets the plain material of the mitten (end of the cuff). (When tying scarf, point the scarf material away from the thumb to make it appear as if the scarf is covering the person’s other arm.) Fold down cuff to cover scarf and form a turtle neck. Hot glue on wooden ball to top of turned down cuff. Glue on tiny plastic eyes or paint on with black acrylic paint. Use black marker for mouth. Gently dot on lipstick for cheeks by applying first to your finger and then dotting onto face. Glue 2 or 3 buttons to tummy area. Glue a stem of holiday florals or greenery tucked into the arm (thumb), and glue arm to the mitten body.
You can personalize each snow person with different hats, scarves, florals, and more. Our examples show how you can create an entire family of folks by simply using different colored mittens, scarves, and different styles of hats and ear muffs.

Grandpa
Our Grandpa (pictured above) wears a top hat that is fashioned from a scrap of scarf. Lay your basic snowperson face up on your work surface. Lay a rectangular scrap flat and place under ball head. Fold a flap of the material up to form the brim of the hat (see photo) and begin gluing in place, wrapping around the head as you work. Glue final seams in the back of the hat so they are not visible.

Little Sister
Little Jessica is wearing earmuffs instead of a hat. We simply cut a scrap piece from the cuff of an infant’s sock and glued it across the top of her head. At the ends of the headband, glue two pom poms for the muffs.
Mom & Dad
(pictured below)
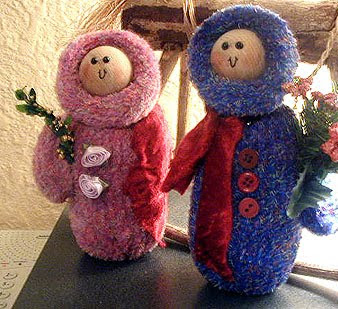
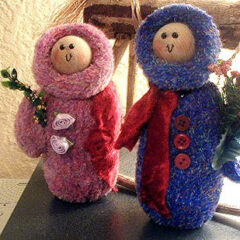
A slightly larger mitten was used for Mom and Dad. Because the cuffs of the mittens were much larger and thicker, we formed parka hoods by simply gluing the ball inside the cuff and gluing the “chin” to the mitten itself.
You can display these snow people in a basket with sprigs of greenery and holly berries, or place them in a sleigh. Fill the sleigh with cotton batting and place each family member in their seat. Place these cute little people on your fireplace mantel, or attach a piece of gold cord and hang from your tree or in your doorway.

Snow People from Recycled Mittens
Supplies
- children's mittens
- rice
- cotton batting
- 11/4 " diameter wooden balls
- buttons
- mismatched infant or children's socks
- small pom poms
- scrap material for scarves
- silk florals holiday springs, berries, flowers, etc.
- sleigh or basket
- tiny black plastic eyes or black acrylic paint
- rosey lipstick
- black marker
Instructions
Basic Snow Person
- Fill the hand portion of a child's mitten with one or two handfuls of rice, fill the rest of the way with cotton batting, be sure to fill thumb as well. Cut a scrap piece of material for scarf and gently tie around the mitten where the ribbing of the cuff meets the plain material of the mitten (end of the cuff). (When tying scarf, point the scarf material away from the thumb to make it appear as if the scarf is covering the person's other arm.) Fold down cuff to cover scarf and form a turtle neck. Hot glue on wooden ball to top of turned down cuff. Glue on tiny plastic eyes or paint on with black acrylic paint. Use black marker for mouth. Gently dot on lipstick for cheeks by applying first to your finger and then dotting onto face. Glue 2 or 3 buttons to tummy area. Glue a stem of holiday florals or greenery tucked into the arm (thumb), and glue arm to the mitten body.
Grandpa
- Our Grandpa (pictured above) wears a top hat that is fashioned from a scrap of scarf. Lay your basic snowperson face up on your work surface. Lay a rectangular scrap flat and place under ball head. Fold a flap of the material up to form the brim of the hat (see photo) and begin gluing in place, wrapping around the head as you work. Glue final seams in the back of the hat so they are not visible.
Little Sister
- Little Jessica is wearing earmuffs instead of a hat. We simply cut a scrap piece from the cuff of an infant's sock and glued it across the top of her head. At the ends of the headband, glue two pom poms for the muffs.
Brother & Sister
- Amy and Peter are wearing snow hats. These hats are both fashioned from infant socks. To make Amy's hat we simply fit the cuff of the sock onto her head and rolled up the edge of the cuff to form her hat brim. Then trim the end of the sock off and fold over neatly then glue in place. Glue a pom pom to the top. For Peter's hat, put sock on head the same way as Amy's, trim toe portion off, then cut the end of the sock into three sections. Pull those three sections together to form a cone type tip, glue three pom poms to that tip.
Mom & Dad
- A slightly larger mitten was used for Mom and Dad. Because the cuffs of the mittens were much larger and thicker, we formed parka hoods by simply gluing the ball inside the cuff and gluing the "chin" to the mitten itself.
- You can display these snow people in a basket with sprigs of greenery and holly berries, or place them in a sleigh. Fill the sleigh with cotton batting and place each family member in their seat. Place these cute little people on your fireplace mantel, or attach a piece of gold cord and hang from your tree or in your doorway.
- DIY Mosquito Repellent Candles - July 10, 2026
- Mason Jar Solar Lights - July 3, 2026
- Patriotic Pinwheels - June 23, 2026


Martha Marie Lofton says
I understand it is mittens and only has the thumb for an arm. how do I make another arm or will it matter ? thanks,
Martha
Amanda Formaro says
It doesn’t matter :) They look cute with one arm. If you want to add another you would have to cut one off of another mitten and sew it on. I wouldn’t bother though!
Martha Marie Lofton says
can I use gloves for this doll ? I am having a hard time finding mittens.
Amanda Formaro says
Gloves would make a completely different looking doll. Amazon has knit mittens here http://amzn.to/2hUclVZ
ann says
I love these snow peeps. I am always looking for something for my co-workers.
The possibilities are endless.
Amanda Formaro says
Thanks Ann! Hope you have fun making them :)
stich-bitch says
love love it
Amanda Formaro says
Thank you!
brenda briggs says
My friend would love to make them as i would. The only problem is would love to download the pattern but dont need all the lovely comments just to download the pattern.
Amanda says
Hi Brenda. If you click the link that says “printable version” just above the list of supplies there are no comments, ads, or any special formatting :)
suzanne says
I want to make mitten people again! but believe it or not I can’t find mittens! :( anyone know anyplace where i can get kids mittens?
Anonymous says
I absolutly love this idea
Anonymous says
I can't wait to find some odd mittens so I can make some of these. Will make a nice gift for a friends.
Amanda says
i Crystal! These are made from mittens so there are no fingers. You only have the thumb to contend with and that is shown in the project :) Have fun, they turn out so cute!
Crystal says
I love this! I'm totally going to make some next week. One question though, what do you do with the 'fingers' ?? I didn't see it anywhere as to what you do with them. Thanks!
Katie says
These are so cute and sweet, I love the whole family.
Jamie says
Those are so cute! What a great idea!
glor says
How cute and what a great idea. Adding to my to do list! Thanks.
Tracy says
Darling!!! Printing this off for NEXT Christmas! Great, great ideas!
The Girl Creative says
omg, those are so cute! Adding you to my blog roll. :)
Kathryn says
These are adorable!
Craft Passion says
This is beyond awesome, Amanda!!! You are great!!!!
Thanks for sharing!
Happy new Year :)
Kim -today's creative blog says
those are mittens? No way!
KKL Primitives says
Aren't these adorable!!!!!! tfs & Happy New Year!!
~Neenee~
Janice says
These are so cute, I love them.
Netta says
This is ADORABLE!
I wish I had time to make a whole family of them!
Thx for sharing!
creative gal says
I love this idea!!