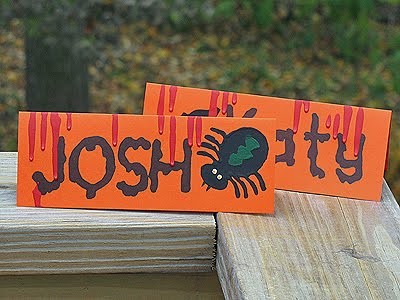
If you are hosting a Halloween party for kids, especially kids 5th grade and up, they are really going to love these place cards. They are quite simple, kids will just need a little patience to allow the paint to dry, so be sure to start very early in the day or even a day ahead. I’ve even included a couple of fun Halloween type fonts that you can choose from. If you have one on your own computer, by all means use that. :)
Bleeding Place Cards
you will need
foam stamps (spider, bat, etc)
5″x7″ card stock, one for each place card
acrylic craft paint: black, white, yellow, red
pencil or pen
2 black Sharpies, one fine and one medium point
Halloween letters
What you do
Fold the card stock in half lengthwise, crease neatly. Choose a foam stamp for your place card.
Coat it generously with black paint.
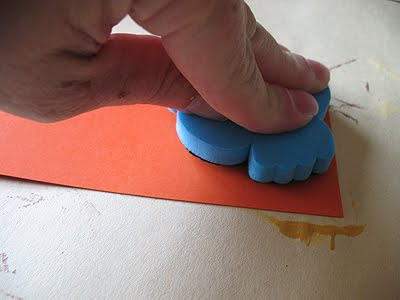
Press it, paint side down, onto one of the upper corners of your place card. To remove, lift straight up so that you don’t smear any paint. You will need to let this dry before moving on to the next step.
Print out these fonts, enlarge them on your printer if needed. You can either cut out the letters that you need, or just move the paper around as needed. I recommend cutting them out. Place the lettered paper over your place card and position them where you want them to appear on the card. Use a pen or pencil to trace around the letters.
This will create an indent in the card underneath. Now use your fine tip Sharpie to trace the indented lines. Use the medium point Sharpie to fill in the letters.
Now you will need to check the consistency of your paint. In my experience, most acrylic paints are at good consistency when new but will begin to thicken as they get older. To test your paint, put some in a paint palette and dip your paintbrush in. Pull the brush out and hold it up. Most paints will be thick enough that it will not drip off the brush. You want it a little thinner, as you do want it to drip, but not quickly. Thin the paint with a little water and keep testing until the paint slowly drips off the brush.
Stand the place card up on its ends and place a heavy drop of red paint at the crease, leaning toward the front of the card. If it doesn’t drip, just add a little bit more onto the first drop until it begins to drip down the front of the card. Repeat until you have the affect that you want.
When the drips are all dry, this will take several hours, you can use a toothpick to add eyes to you card’s creatures.
See? Easy peasy!
If you need a party idea, try my Pumpkin Painting Party!
Bleeding Place Cards for your Halloween Party
Supplies
- foam stamps spider, bat, etc
- 5 ″x7″ card stock one for each place card
- acrylic craft paint: black white, yellow, red
- pencil or pen
- 2 black Sharpies one fine and one medium point
- Halloween letters
Instructions
- Fold the card stock in half lengthwise, crease neatly. Choose a foam stamp for your place card.
- Coat it generously with black paint.
- Press it, paint side down, onto one of the upper corners of your place card. To remove, lift straight up so that you don't smear any paint. You will need to let this dry before moving on to the next step.
- Print out these fonts, enlarge them on your printer if needed. You can either cut out the letters that you need, or just move the paper around as needed. I recommend cutting them out. Place the lettered paper over your place card and position them where you want them to appear on the card. Use a pen or pencil to trace around the letters.
- This will create an indent in the card underneath. Now use your fine tip Sharpie to trace the indented lines. Use the medium point Sharpie to fill in the letters.
- Now you will need to check the consistency of your paint. In my experience, most acrylic paints are at good consistency when new but will begin to thicken as it gets older. To test your paint, put some in a paint palette and dip your paintbrush in. Pull the brush out and hold it up. most paints will be thick enough that it will not drip off the brush. You want it a little thinner, as you do want it to drip, but not quickly. Thin the paint with a little water and keep testing until the paint slowly drips off the brush.
- Stand the place card up on its ends and place a heavy drop of red paint at the crease, leaning toward the front of the card. If it doesn't drip, just add a little bit more onto the first drop until it begins to drip down the front of the card. Repeat until you have the affect that you want.
- When the drips are all dry, this will take several hours, you can use a toothpick to add eyes to you card's creatures.
- 30+ Organization Ideas and Tips - January 14, 2025
- Makeover: Plastic Storage Drawers - January 3, 2025
- Paint Stick Snowmen - December 31, 2024


jessica brown says
love your site!
Amanda says
Thank you Jessica!
Craft Passion says
Oh, this is creepy!!!! I love it!!! just became one of your fans in FB :)