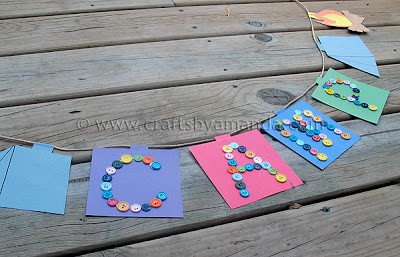
Whether you are a camp director or counselor looking for some fun craft projects, or a parent trying to find some creative ideas for making your own backyard or living room camp, this colorful banner fits the bill. Decorate construction paper with colorful buttons and hang this banner above your bunk, on the door or on the wall in the mess hall. A great summer camp craft.
If you prefer you can use beans, dried split peas, pony beads, sequins, or small pebbles instead of buttons.
Construction paper: light blue, yellow, orange, brown, blue, red, purple, green
White craft glue
Buttons
Twine, about 5 feet
Glue stick
Pattern
Use pattern to cut two tents from light blue paper, 6 logs from brown paper, and two sets of fire from yellow and orange.
Cut 4 squares, 4.5” x 4.5”, from purple, red, blue and green paper.
Cut strips, 4” x 1”, from the following colored papers:
2 each from yellow and light blue
1 each from purple, red, green and blue
Assemble the campfires by gluing the yellow flame to the orange flame, and gluing 3 logs together, then combining the two.
Use white craft glue to write the letters C, A, M, and P on each of the construction paper squares. Place buttons onto the white glue and let them letters dry.
Use a glue stick to add paper strip hangers to the back of each of the letter squares, tents and campfires.
Lay the twine out onto the work surface. Find the center of the twine and attach the letter “A” to the twine by folding the paper strip hanger over the twine and gluing it around the twine and to the back of the letter.
Add each of the letters and the tents and campfires to the twine in the same fashion.
Summer Camp Crafts
- 30+ Summer Camp Crafts for Kids
- Name Plate Can
- Acorn Mobile
- Colorful Walking Stick
- Twig Name Plate
- Winning Visors
- Friendship Bracelets
Camp Crafts: Camp Banner
Supplies
- Construction paper: light blue yellow, orange, brown, blue, red, purple, green
- White craft glue
- Buttons
- Twine about 5 feet
- Glue stick
- Pattern
Instructions
- Use pattern to cut two tents from light blue paper, 6 logs from brown paper, and two sets of fire from yellow and orange.
- Cut 4 squares, 4.5” x 4.5”, from purple, red, blue and green paper.
- Cut strips, 4” x 1”, from the following colored papers: 2 each from yellow and light blue, 1 each from purple, red, green and blue
- Assemble the campfires by gluing the yellow flame to the orange flame, and gluing 3 logs together, then combining the two.
- Use white craft glue to write the letters C, A, M, and P on each of the construction paper squares. Place buttons onto the white glue and let them letters dry.
- Use a glue stick to add paper strip hangers to the back of each of the letter squares, tents and campfires.
- Lay the twine out onto the work surface. Find the center of the twine and attach the letter “A” to the twine by folding the paper strip hanger over the twine and gluing it around the twine and to the back of the letter.
- Add each of the letters and the tents and campfires to the twine in the same fashion.
Did you enjoy this post? Why not subscribe to my feed, or better yet, to my free newsletter – Foodie in the Craftroom, which provides not only crafts but recipes from my other blog, Amanda’s Cookin’ as well!
- Winter Luminaries: Snowy Pinecone Candle Jars - November 19, 2024
- Pinecone Owls - November 12, 2024
- Thanksgiving Handprint Tree - November 1, 2024


Carolyn says
Very innovative, great idea! Kids will love it.
[email protected] says
I'm loving this camp series! Thanks so much for the awesome projects, I'll be linking.