• Home
  • About
    • About Crafts by Amanda
    • Visit Our Recipe Site
  • Work With Us
  • Join
    • Free Newsletters
    • Join our Facebook craft group
↑
  • Tutorials
    • Tutorial Index
    • Adult Crafts
    • Crafts for Kids
    • Crafts for Seniors
    • Recycled Crafts
    • Seasonal Crafts
    • Holiday Crafts
    • Free Printables
    • Craft Collections
  • Adult Crafts
    • Bath & Body
    • Beach Crafts
    • Clay Pot Crafts
    • Crafts for Seniors
    • Decoupage Crafts for Adults
    • DIY Gift ideas
    • Garden Crafts
    • Home Decor Projects
    • Kitchen Crafts
    • Light Bulb Crafts
    • Luminary Crafts
    • Mason Jar Crafts
    • Needlework
    • Photo Display Ideas
    • Recycled Crafts for Adults
    • Wearable Crafts for Adults
  • Crafts for Kids
    • Animal Crafts for Kids
    • Back to School Crafts
    • Beach Crafts for Kids
    • Camp Crafts
    • Cardboard Tube Crafts for Kids
    • Decoupage Crafts for Kids
    • Easy Crafts for Kids
    • Nature Crafts for Kids
    • Other Kid’s Crafts
    • Paper Plate Crafts for Kids
    • Recycled Crafts for Kids
    • Slimes, Doughs, & Clay
    • Wearable Crafts for Kids
  • Holiday Crafts
    • 4th of July Crafts
    • Christmas Crafts
    • DIY Gift ideas
    • Earth Day Crafts
    • Easter Crafts
    • Father’s Day Crafts
    • Halloween Crafts
    • Memorial Day Crafts
    • Mother’s Day Crafts
    • New Year’s
    • Other Holidays
    • Patriot Day Crafts
    • St. Patrick’s Day Crafts
    • Thanksgiving Crafts
    • Valentine’s Day Crafts
  • Seasonal Crafts
    • Winter Crafts
    • Spring Crafts
    • Summer Crafts
    • Fall Crafts
  • Skip to primary navigation
  • Skip to main content
  • Skip to primary sidebar
  • Skip to footer

Crafts by Amanda

crafts for adults and kid's crafts

  • Tutorials
    • Tutorial Index
    • Adult Crafts
    • Crafts for Kids
    • Crafts for Seniors
    • Recycled Crafts
    • Seasonal Crafts
    • Holiday Crafts
    • Free Printables
    • Craft Collections
  • Adult Crafts
    • Bath & Body
    • Beach Crafts
    • Clay Pot Crafts
    • Crafts for Seniors
    • Decoupage Crafts for Adults
    • DIY Gift ideas
    • Garden Crafts
    • Home Decor Projects
    • Kitchen Crafts
    • Light Bulb Crafts
    • Luminary Crafts
    • Mason Jar Crafts
    • Needlework
    • Photo Display Ideas
    • Recycled Crafts for Adults
    • Wearable Crafts for Adults
  • Crafts for Kids
    • Animal Crafts for Kids
    • Back to School Crafts
    • Beach Crafts for Kids
    • Camp Crafts
    • Cardboard Tube Crafts for Kids
    • Decoupage Crafts for Kids
    • Easy Crafts for Kids
    • Nature Crafts for Kids
    • Other Kid’s Crafts
    • Paper Plate Crafts for Kids
    • Recycled Crafts for Kids
    • Slimes, Doughs, & Clay
    • Wearable Crafts for Kids
  • Holiday Crafts
    • 4th of July Crafts
    • Christmas Crafts
    • DIY Gift ideas
    • Earth Day Crafts
    • Easter Crafts
    • Father’s Day Crafts
    • Halloween Crafts
    • Memorial Day Crafts
    • Mother’s Day Crafts
    • New Year’s
    • Other Holidays
    • Patriot Day Crafts
    • St. Patrick’s Day Crafts
    • Thanksgiving Crafts
    • Valentine’s Day Crafts
  • Seasonal Crafts
    • Winter Crafts
    • Spring Crafts
    • Summer Crafts
    • Fall Crafts
Craft Tutorials | Adult Crafts | DIY Gift ideas | Chalkboard Menu from an Upcycled Cutting Board

Chalkboard Menu from an Upcycled Cutting Board

Author by Amanda Davis on October 7, 2013 Updated on December 6, 2020

No ratings yet
Jump to Project
17 shares
  • Share
  • Tweet
  • Flipboard
  • Email

Chalkboard Menu from an Upcycled Cutting Board by @amandaformaro Crafts by Amanda


It’s inevitable, cutting boards wear out. Or, as in my case, they split down the middle. This wooden cutting board has fallen on the floor countless times and is no longer usable as originally intended. Instead of throwing it out, I’ve given it a new use: a chalkboard menu for my kitchen!

Chalkboard Menu from an Upcycled Cutting Board by @amandaformaro Crafts by Amanda

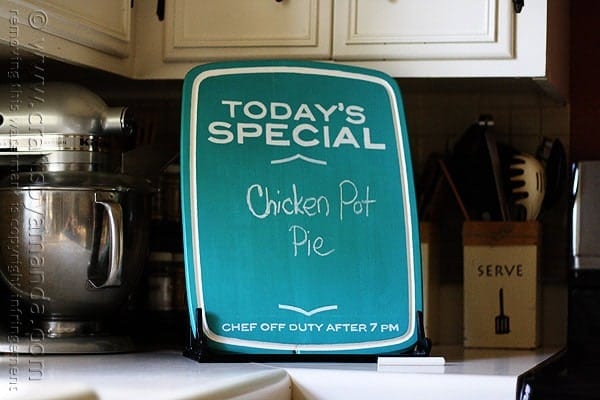
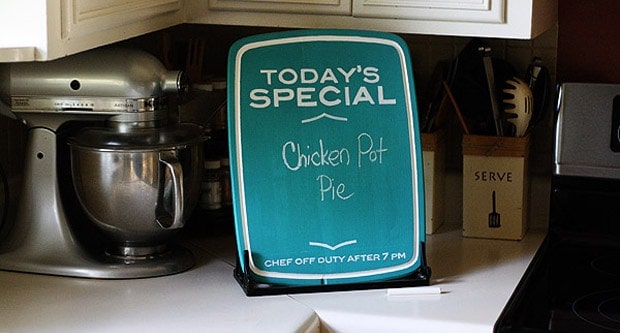
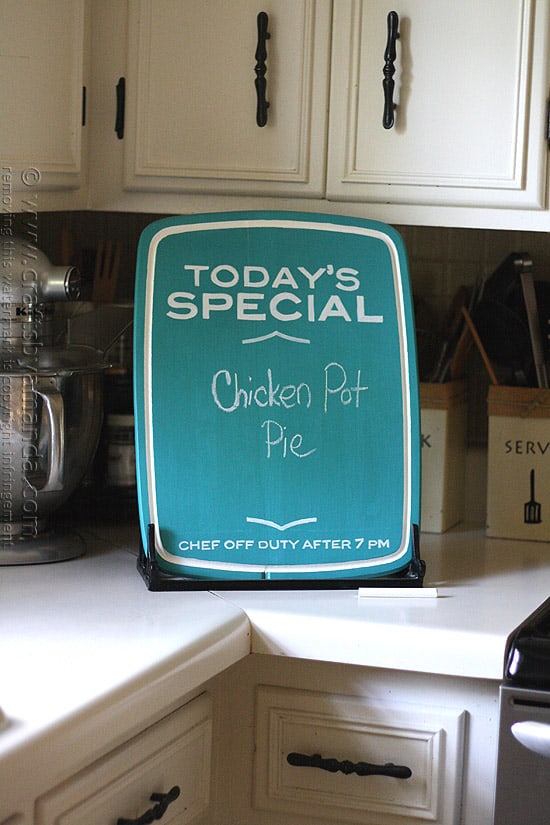
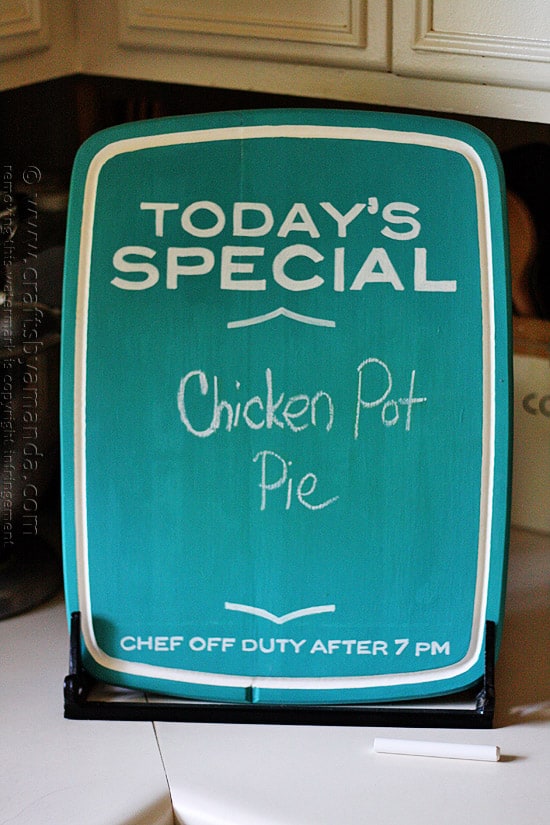
I’m really happy with how the chalkboard menu came out! In fact, I think I’m going to repaint my kitchen now as this Aqua color goes great with the cabinets, but not my wall color. By the way, if you like the utensil holders in the background, you can find the tutorial for those here -> Kitchen Utensil Holders.

Chalkboard Menu from an Upcycled Cutting Board by @amandaformaro Crafts by Amanda

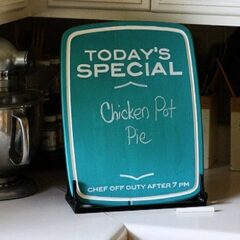
The only thing I don’t like about chalkboards is how messy my handwriting looks on them. Ha ha!

Chalkboard Menu from an Upcycled Cutting Board by @amandaformaro Crafts by Amanda

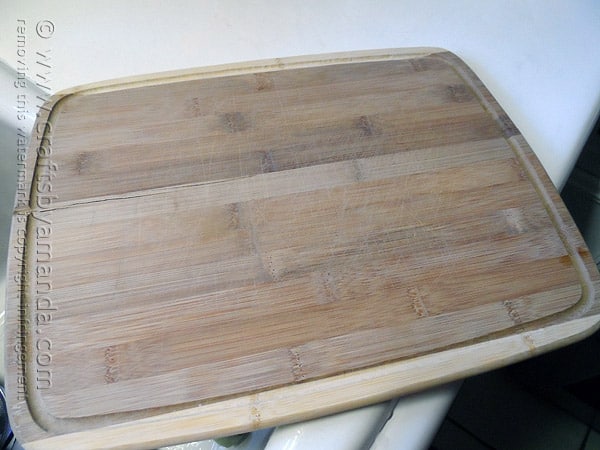
Well, here she is. It’s the last time she’ll be naked.

Chalkboard Menu from an Upcycled Cutting Board by @amandaformaro Crafts by Amanda

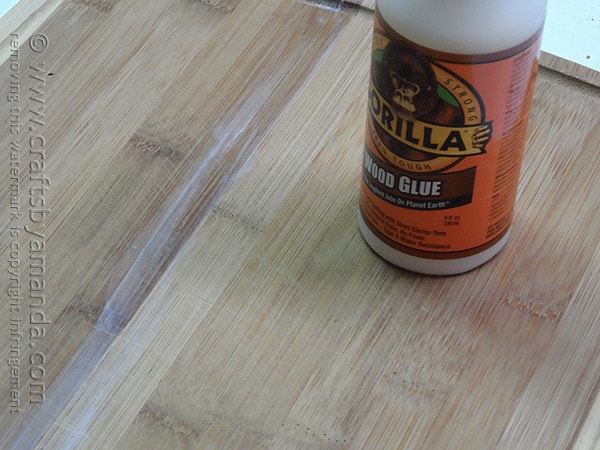
First and foremost I had the glue that split back together. Gorilla Glue’s wood glue did the trick!

Chalkboard Menu from an Upcycled Cutting Board by @amandaformaro Crafts by Amanda

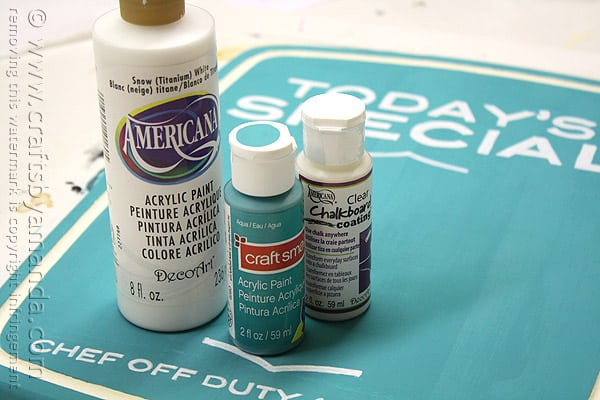
For this project I used Craft Smart paint in Aqua, Americana Snow White, and Americana Clear Chalkboard Coating.

Chalkboard Menu from an Upcycled Cutting Board by @amandaformaro Crafts by Amanda

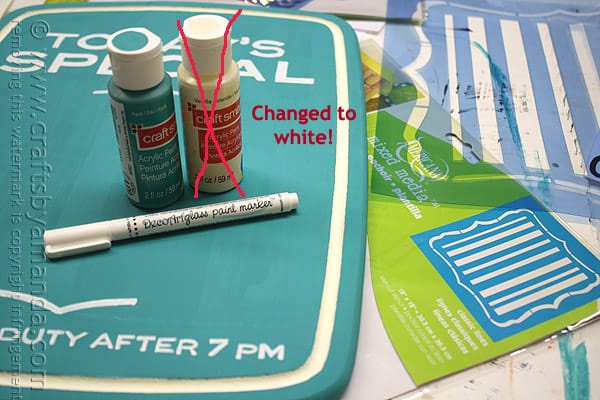
I also used a DecoArt Glass Paint Marker and a stencil called “Classic Lines”, also from the Americana line. As you can see I crossed out the Vanilla in this picture, you’ll read why below…

Chalkboard Menu from an Upcycled Cutting Board by @amandaformaro Crafts by Amanda

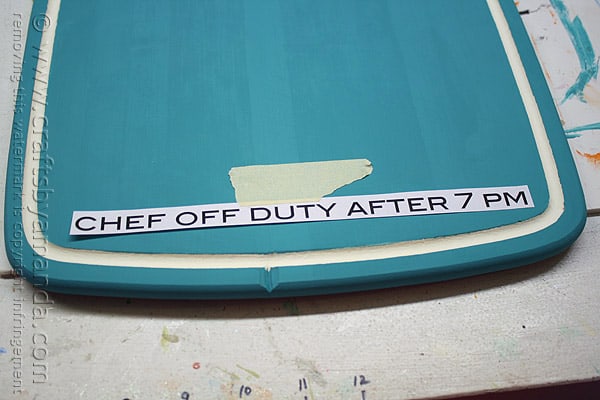
First I painted the drip catcher with Vanilla. But as you’ll see later, after I put the letters on the Vanilla didn’t match. So I later switched and repainted it with Snow White.

Chalkboard Menu from an Upcycled Cutting Board by @amandaformaro Crafts by Amanda

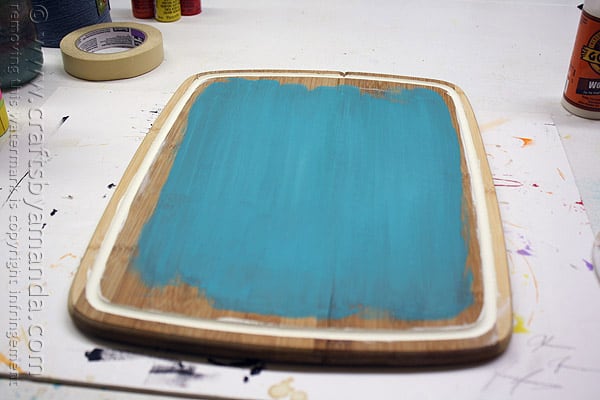
Next I painted the entire board and the outer edges with Aqua. I used Craft Smart paint which is available at Michaels. I actually did 3 coats.

Chalkboard Menu from an Upcycled Cutting Board by @amandaformaro Crafts by Amanda

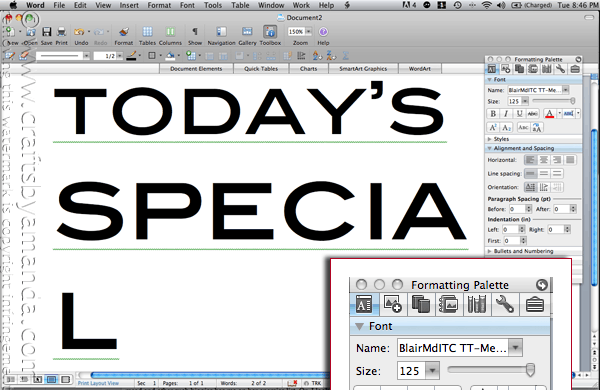
While the paint was drying I made my pattern. basically, I just opened up a Word document and typed out my words. I used a standard font called “BlairMdITC TT-Medium”. I made the word “special” larger than the word “today’s”.

Chalkboard Menu from an Upcycled Cutting Board by @amandaformaro Crafts by Amanda

I used the same font for the lettering at the bottom.

Chalkboard Menu from an Upcycled Cutting Board by @amandaformaro Crafts by Amanda

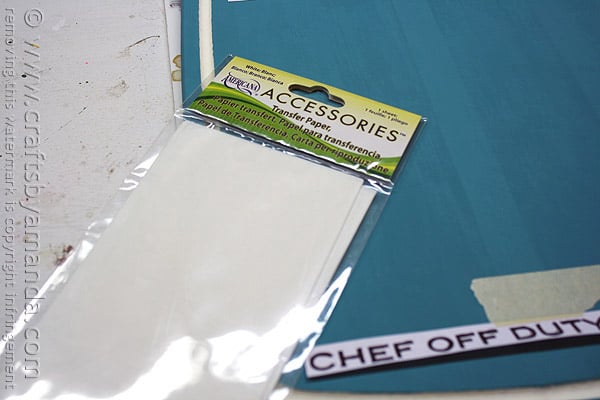
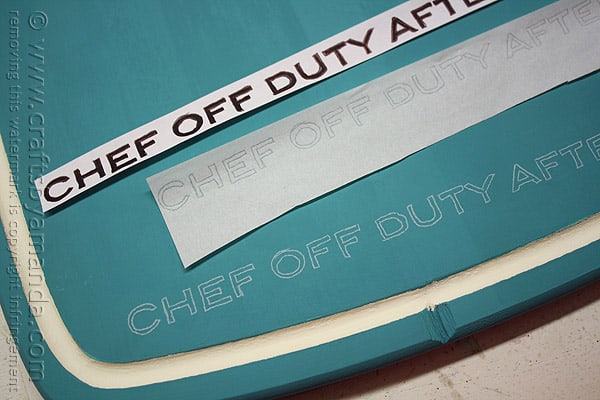
This is white transfer paper. If you haven’t used transfer paper, you need to pick up a package or two next time you hit the craft store. It’s probably in the artist’s section rather than the craft section. I always have white and black on hand. It’s very similar to carbon paper and can be reused several times.

Chalkboard Menu from an Upcycled Cutting Board by @amandaformaro Crafts by Amanda

You cut a piece of that transfer paper and slide it underneath your printed words, holding it in place with a bit of masking tape. Then use a ballpoint pen to trace over the outline of the letters.

Chalkboard Menu from an Upcycled Cutting Board by @amandaformaro Crafts by Amanda

See? Pretty cool huh?

Chalkboard Menu from an Upcycled Cutting Board by @amandaformaro Crafts by Amanda

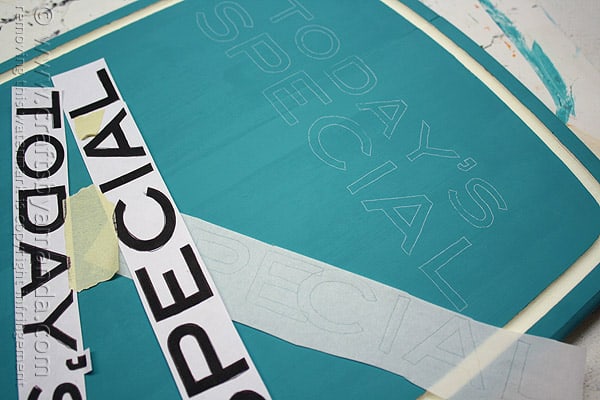
I did the same thing with the big letters at the top of the board.

Chalkboard Menu from an Upcycled Cutting Board by @amandaformaro Crafts by Amanda

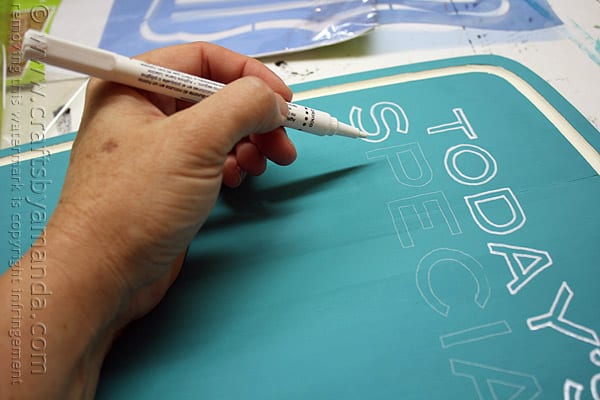
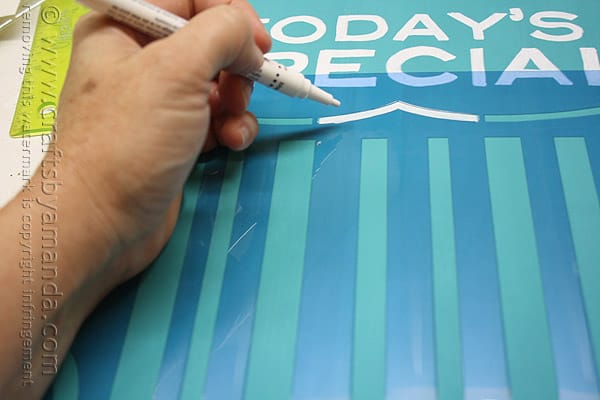
Next I used a DecoArt paint pen (LOVE these so much!) to trace the outline that the transfer paper made. Then I colored them in.

Chalkboard Menu from an Upcycled Cutting Board by @amandaformaro Crafts by Amanda

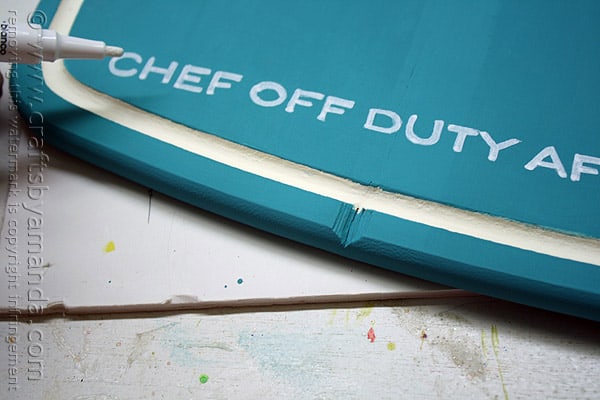
Same thing for the smaller letters. After the paint pen dried I went over it again to make it more visible.

Chalkboard Menu from an Upcycled Cutting Board by @amandaformaro Crafts by Amanda

I also used a stencil to add a little decoration on the board below the top letters and above the bottom letters.

Chalkboard Menu from an Upcycled Cutting Board by @amandaformaro Crafts by Amanda

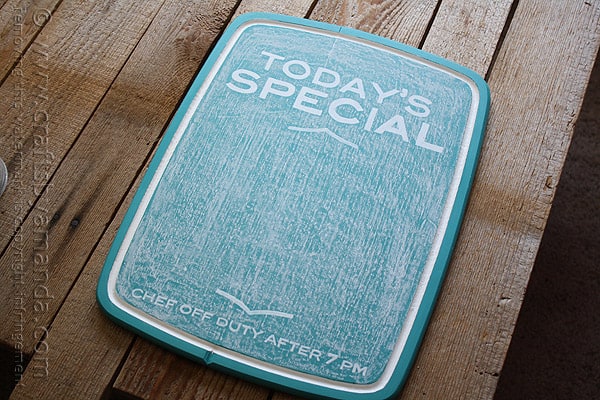
Then when everything was dry, I gave the entire thing a layer of clear chalkboard coating. This allows you to paint whatever colors you want and still use it as a chalkboard. No worrying about buying 5 different colors of chalkboard paint! You have to prime the board after the mandatory dry time. You do this by rubbing chalk all over the entire surface and then wiping it off.

Chalkboard Menu from an Upcycled Cutting Board by @amandaformaro Crafts by Amanda

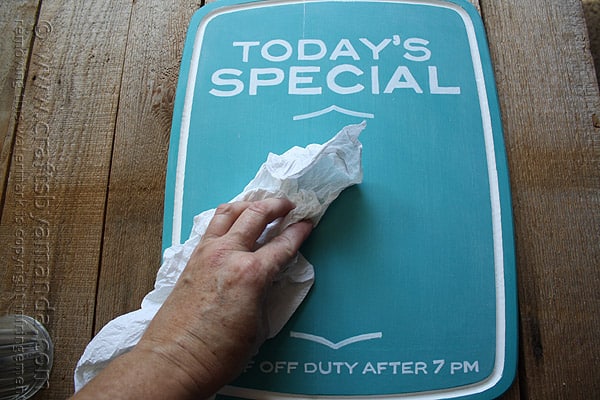
I also wiped it down with a damp cloth and then dried it off.

Chalkboard Menu from an Upcycled Cutting Board by @amandaformaro Crafts by Amanda

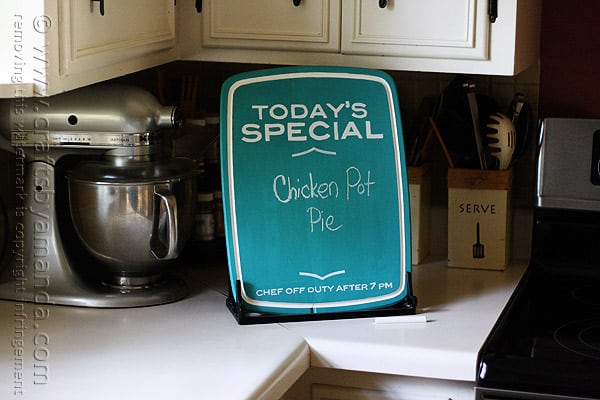
Now the chalkboard is ready to use! I hope you enjoyed this project and it inspires you to make something similar of your own!

I am a DecoArt Core Blogger. I was compensated for this post, but have always loved DecoArt products! Therefore, all opinions expressed here are 100% my own.

Print Project
No ratings yet

Chalkboard Menu from an Upcycled Cutting Board

Supplies

  • Wooden cutting board
  • Craft Smart paint - Aqua
  • Americana paint - Snow White
  • Americana Chalkboard Coating
  • DecoArt Glass Paint Marker - white
  • Americana stencil - Classic Lines
  • DecoArt white transfer paper

Instructions

  • If needed, sand the surface of the cutting board and wipe away all dust particles.
  • Paint drip tray with Snow White.
  • Paint cutting board with Aqua - 2-3 coats may be needed.
  • Create your letters in a Word document and print out. Transfer letters to painted cutting board with white transfer paper.
  • Trace transferred patterns with white paint pen and fill in to make solid.
  • Apply clear chalkboard coating as described on back of bottle.
  • Author
  • Recent Posts
Amanda Davis
Amanda Davis is the crafty, entrepreneurial mother of four children. She loves to bake, cook, make kid's crafts and create decorative items for her home. She is a crafting expert and guru in the kitchen and has appeared online and in print publications many times over the years.
Latest posts by Amanda Davis (see all)
  • Recycled Plastic Lid Windchime - July 11, 2025
  • Rainbow Tie Dye Shirts - July 4, 2025
  • Mason Jar Solar Lights - June 27, 2025
17 shares
  • Share
  • Tweet
  • Flipboard
  • Email

Filed Under: DIY Gift ideas, Kitchen Crafts, Recycled Crafts for Adults Tagged With: adult, adult craft, adult craft ideas, adult crafts, adults, chalkboard, core blogger, crafts for adults, decoart, kitchen, recycle, recycle crafts, recycled, recycled crafts

Reader Interactions

Free CraftsBy email every week

Latest crafts straight to your inbox!

Comments

  1. Darlene says

    January 10, 2015 at 11:59 am

    Hi! I am going to make the solo cup Gum Ball Machines for ppl at work for Valentines Day, could I see those instructions again please? Maybe asap? I appreciate your help! Love all your crafts you tell us about and can make!
    Thank You!!!

    Reply
    • Amanda Formaro says

      January 13, 2015 at 7:44 am

      Hi Darlene. Those are at this link http://www.meetthedubiens.com/2014/02/valentine-i-chews-you.html :)

      Reply
  2. Ananasa says

    October 28, 2013 at 1:43 am

    So creative and so fun! We love this one! Thank you for this amazing post!

    Reply
    • Amanda Formaro says

      October 28, 2013 at 6:07 am

      Thank you!

      Reply
  3. Nancy says

    October 24, 2013 at 7:41 pm

    Amanda, how can I use a plastic cutting board instead of a wooden one? I have several plastic that I might need to retire soon.

    Reply
    • Amanda Formaro says

      October 25, 2013 at 6:02 am

      Hi Nancy. Americana has a new paint called Multi Surface Satin. It can be used on plastic and works great, I’ve used it for several projects already. Multiple thin coats with drying time in between is best. Then of course, follow up with the chalkboard coating. :)

      Reply
  4. Brenda @ a farmgirl's dabbles says

    October 9, 2013 at 12:28 pm

    Great tutorial & fun project!

    Reply
    • Amanda Formaro says

      October 10, 2013 at 6:48 am

      Thanks Brenda!

      Reply
  5. Kelly says

    October 8, 2013 at 9:49 pm

    I LOVE this, Amanda!! What a fabulous upcycle. xo

    Reply
    • Amanda Formaro says

      October 9, 2013 at 6:39 am

      Thanks Kelly! I’m really happy with how it turned out :)

      Reply
  6. Bonnie @ Uncommon Designs says

    October 7, 2013 at 4:22 pm

    Love this! Have not used the transfer paper, but must have some now! ;)

    Reply
    • Amanda Formaro says

      October 8, 2013 at 6:34 am

      Thanks Bonnie! I used to tole paint, so transfer paper was something I used all the time. It’s very handy!

      Reply
  7. Angie | Big Bear's Wife says

    October 7, 2013 at 1:10 pm

    I do love it! I didn’t know that you could get clear chalkboard paint stuff!

    Reply
    • Amanda Formaro says

      October 8, 2013 at 6:34 am

      I know, isn’t that stuff great??

      Reply

Leave a Reply Cancel reply

Your email address will not be published. Required fields are marked *

Rate This Project


The maximum upload file size: 640 MB. You can upload: image, video. Links to YouTube, Facebook, Twitter and other services inserted in the comment text will be automatically embedded. Drop files here

Primary Sidebar

Hi! I’m Amanda and I’m the founder and head designer of Crafts by Amanda. I have spent over 25 years creating projects to share, but it’s not just me anymore! It’s turned into a complete family affair. Come and meet the Creative Team!

Free CraftsBy email every week

Latest crafts straight to your inbox!

All Time Favorites

Learn to make these adorable ladybug painted rocks. use special outdoor paint for this adorable garden craft so you can keep garden ladybugs all summer!

Ladybug Painted Rocks…

These colorful little ladybug painted rocks are the ... Go To project

snowy pinecone candle jar luminaries

Winter Luminaries: Snowy Pinecone…

Make pretty winter luminaries that appear to be covered ... Go To project

Make this wonderful deco mesh pumpkin wreath to hang on your door this fall!

Deco Mesh Pumpkin Wreath…

Adorn your door this fall with a pretty deco mesh ... Go To project

Reuse those empty prescription pill bottles in all sorts of ways. From organizing to making cookies. Yes, cookies! See how to use your empty pill bottles!

20 Uses for Prescription Pill…

You've been collecting prescription pill bottles for ... Go To project

Meet the Family

Amanda

Founder and Designer

Kristen

Editorial Manager

Lindsay

Social Media Manager

As seen on:

Footer

Favorites

  • Jar Photo Frames
  • No-Sew Roman Shade
  • Paper Flowers
  • How to Make a Scrunchie
  • Mermaid Slime

About

  • Home
  • Meet the Creative Team
  • Work with Us
  • Privacy Policy
  • Accessibility
  • Contact Us

Images/text copyright Amanda Formaro 2020. To feature a post from Crafts by Amanda, you may use one photo credited and linked back directly to the project post.

Free CraftsBy email every week

Latest crafts straight to your inbox!

Copyright ©2025, Crafts by Amanda. All Rights Reserved.
Design by Pixel Me Designs

Rate This Tutorial

Your vote:


To share a photo with your comment click here!

A rating is required
A name is required
An email is required