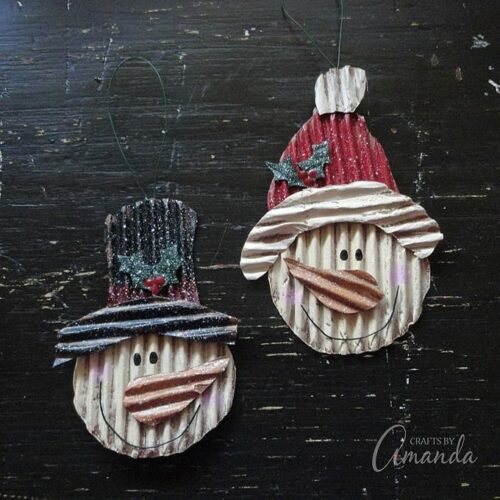
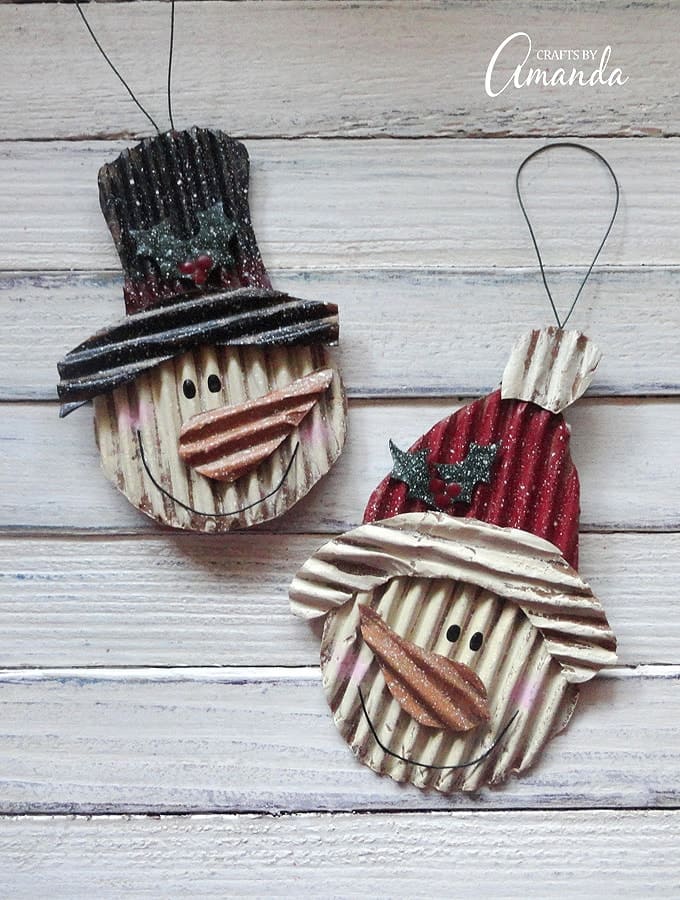
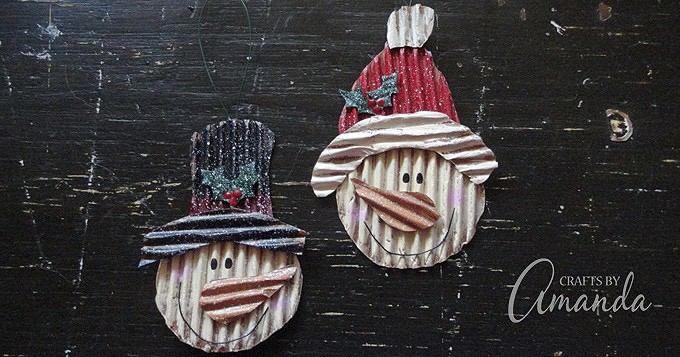
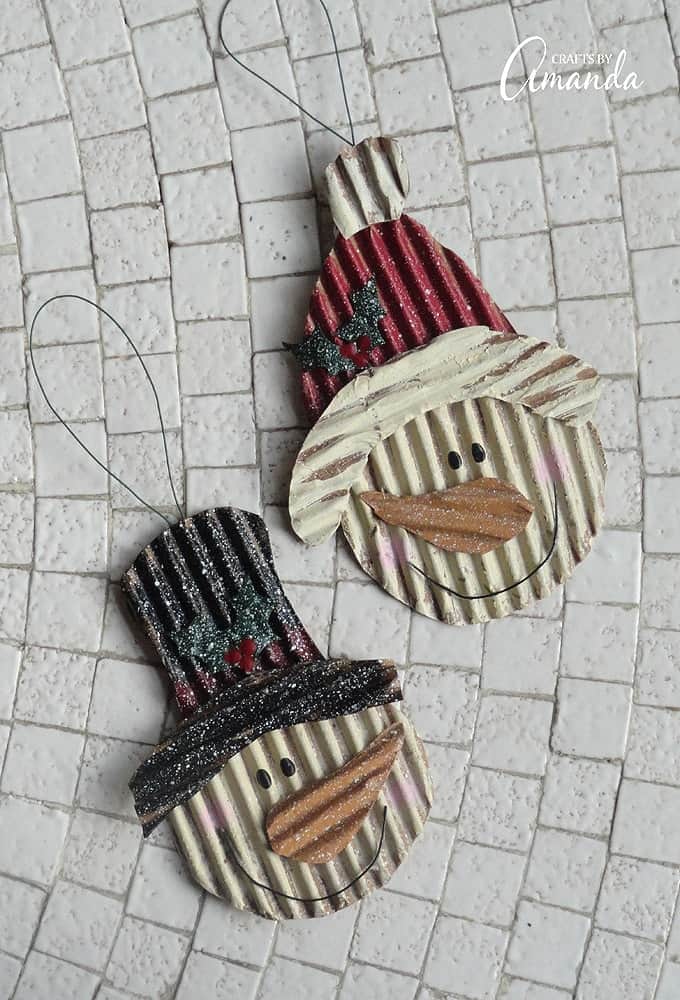
I adore snowmen, and every year I try to make at least one new snowman ornament. Several years ago I made these corrugated cardboard snowman ornaments. They have turned out to be one of my most popular snowman ornaments and are among my favorites on the tree every year!

Why we love this project
Snowmen are timeless. They make adorable decorations whether they’re made from snow, or handcrafted into decor pieces like this mason jar lid snowman. These snowmen ornaments are made from corrugated cardboard from a cardboard mailer, and they hang on my tree every year since I made them in 2011.
They’re secured together using glue dots, and I’ve never had a problem with the adhesive coming off throughout those 9 years, even with the textured feel of the corrugated cardboard!
Making cardboard snowman ornaments
These step by step photos and instructions are here to help you visualize how to make this project. Please scroll down to simply print out the instructions!

- First I drew the shapes for the ornaments, using the photo as a guide. I’ve created a pattern for you if you’d like to try these too. I had just received a book in the mail and it came in this corrugated cardboard mailer. Nice!
- After cutting out all the ornament shapes, I practiced painting on a scrap piece of cardboard. I wanted the paint to look like aged wood, so I used some strokes with the brush loaded with Americana’s Desert Sand, and then I dried the brush on a dry cloth before lightly brushing the creases.

- Once I was comfortable with the paint, I went ahead and painted all the pieces.
- While they were drying, I cut the holly leaves from an old silk plant I had laying around. You could use felt or fabric too. I placed the holly leaves on a scrap piece of cardboard and painted them in the color Hauser Dark Green.

- After the black hat dried I painted the hatband as well using the color Deep Burgundy.
- After everything was painted it was time to splatter. Thin some white paint with water, dip a toothbrush in it, dab off excess on a soft cloth, then drag your finger across the bristles to create a splatter effect.
- I used floral wire for the mouths. I shaped them into two smiles and painted them black.

- Now to put it all together! I used Instant Tacky Adhesive Dots. Don’t touch the sticky dot, instead press the dot using the plastic backing, onto the surface where you want the dot to stay. Apply some pressure, then peel the plastic backing off and the dot will stay in place. Then you can press the item onto whatever you want it to adhere to. In the picture above, you can see that I used two different sizes on the nose.

- After you’d put everything together using the dots, add the final details. You can add the holly berries using the handle end of a paintbrush that’s dipped in red paint.

- To add the smiles, squeeze some instant grab glue onto your scrap cardboard, then dip both ends of the smile into the glue. Then, place it on the snowman’s face.
- Use a small scruffy paintbrush to dab on the pink cheeks.
- Take the handle end of the paintbrush and dip it in black paint to dot on the eyes. The eyes didn’t come out round like I thought because of the ridge in the cardboard, but they’re still cute!

- For the hangers, I used that same floral wire, but because of the shapes of the ornaments, I made two different types of hangers. The first one I just created a loop, twisting the ends and rolled that twisted end in instant grab glue. Then I inserted that into the cardboard at the top of the snowman’s black hat.

- I didn’t want to put the hanger in the small pom pom of the red hat as I didn’t think there was enough stability. So for this hanger, I made a twist higher up so that I would have two ends to work with. After dipping those two ends in instant grab glue I inserted the ends into the cardboard on both sides of the top of the hat.
That’s it. All done! Aren’t they adorable?
More Ornament Ideas
- Light Bulb Snowman Ornament
- Jumbo Vintage Snowman Ornament
- Wood Slice Ornaments
- Gingerbread Boy Corrugated Cardboard Ornament – Audrey Pettit
I love to create and share my projects with you! I know it’s hard to remember to come back and search, so I’ve made it easy for you with my weekly newsletter! You can subscribe for free and I’ll send you fun crafts every week right to your email.
Corrugated Cardboard Snowman Ornaments
Supplies
Supplies
- Pattern
- Silk ivy leaves or felt
- Corrugated cardboard mine is from a corrugated cardboard mailing envelope
- Floral wire
- Toothbrush to create splatter effect
- Instant grab glue
- Glue dots
Americana Acrylic Paint:
- Sand snowman faces
- Honey Brown noses
- Deep Burgundy Santa hat, black hat band, holly berries
- Hauser Dark Green holly leaves
- Baby Pink cheeks
- Lamp Black Top hat, eyes, mouths
- Sand + White Santa cap’s pom pom and brim
- White splatter
Craft tools
- Paintbrush
Instructions
- Cut the ornament shapes from cardboard using the pattern. Practice painting on a scrap piece of the cardboard. For the paint to look like aged wood, I used some strokes with the brush loaded, and then I dried the brush on a dry cloth before lightly brushing the creases.
- Paint all the pieces. While they are drying, cut the holly leaves from an silk ivy. Place the holly leaves on a scrap piece of cardboard and paint them green.
- After everything is painted it’s time to splatter. If you’ve never splattered before, there’s nothing to it. Just thin some white paint with water, dip a toothbrush in it, dab off excess on a soft cloth, then drag your finger across the bristles. You should always do a practice run on something before hitting your actual project.
- Shaped some floral wire into two smiles and paint them black.
- Time to put them together. Don’t touch the sticky dot, instead press the dot using the plastic backing, onto the surface where you want the dot to stay. Apply some pressure, then peel the plastic backing off and the dot will stay in place. Then you can press the item onto whatever you want it to adhere to.
- After you’d put everything together using the dots, add the final details. You can add the holly berries using the handle end of a paintbrush.
- To add the smiles, squeeze some instant grab glue onto your scrap cardboard, then dip both ends of the smile into the glue. Then place it on the snowman’s face. Use a small scruffy paintbrush to dab on the pink cheeks. Use the handle end of the paintbrush dipped in black paint to dot on the eyes.
- For the hangers I used that same floral wire, but because of the shapes of the ornaments, I made two different types of hangers. The first one I just created a loop, twisting the ends and rolled that twisted end in instant grab glue. Then I inserted that into the cardboard at the top of the snowman’s black hat.
- I didn’t want to put the hanger in the small pom pom of the red hat as I didn’t think there was enough stability. So for this hanger I made a twist higher up so that I would have two ends to work with. After dipping those two ends in instant grab glue I inserted the ends into the cardboard on both sides of the top of the hat.
I had pinned this to my “Inspiration for Knock Offs” board. The post is from Today’s Fabulous Finds and it’s a tutorial for her adorable “Frame for Every Season“, so be sure to check that out! That’s when I saw the cute ornaments she bought at the dollar store. I’m not sure what they are made of, but I’m guessing some kind a tin material? At any rate, as soon as I saw them I knew I could make them using corrugated cardboard.
This post was originally published on this blog on Dec 8, 2011.
- Swirling Twirling Ladybugs - July 21, 2026
- Drip Tie Dye Backpack - July 17, 2026
- Mini Coastal Clay Houses - July 14, 2026


Deborah says
I have a roller thing that can make the corrugated look. I’ve used it on card stock. Now to get it out of my paper crafts storage. These are so cute! I love older, simple crafts of all kind. Thank you for sharing these! Oh, and handmade ornaments are the best to me!
SharonFromMichigan says
Found your site from AllFreeChristmasCrafts newsletter. Just love these ornies and love the fact that you’re recycling too! These would be a wonderful item for my church’s holiday market! (and my tree too! LOL)
Amanda Formaro says
thanks Sharon! They have really held up too! I put them on my tree every year :)
Brigitte Lee says
As always, you have come up with the most adorable project! These snowmen ornaments are so cute. Thank you for your creativity and for sharing with us!
~ Brigitte
Amanda Formaro says
Thank you so much Brigitte, that’s so nice of you to say! :)
Betty says
Amanda, love these snowmen ornaments. I need to know what a scruffy brush is to make painting easier. Also the back of mine looks bad. Any suggestions? Thanks. You do great crafts
Amanda Formaro says
Hi Betty! A scruffy brush is simply an older brush you have – then trim the bristles down to about 1/4″. The back of mine weren’t pretty either, but to remedy that, trace around your ornament onto paper to make a quickie pattern. Then use that pattern to cut a piece of felt that you can glue to the back :)
Betty says
Thanks for your response. I picked up some sheets of craft foam at Walmart and will try covering the back with that. Love your crafts. Keep them coming with the instructions. Thanks
Betty Godoy says
Amanda lastima no hablar el ingles…su trabajo es muy lindo y ese proyecto de reciclaje con el carton corrugado me encanto…lo voy a realizar. Abrazos y Bendiciones!!!!
Amanda Formaro says
Thank you Betty, so glad you enjoyed it!
Phyl says
I made 6 of these for my grandchildren. I always paint an ornament for them at Christmas and when I saw these I thought they were so cute. I had trouble finding the cardboard until I realized I had some from a long time ago. They turned out real cute. I used ribbon for the hanger instead of the wire. Thanks for all the directions. Big help..
Amanda Formaro says
That’s wonderful! So glad you were able to make them :)
anne says
How do you make the cardboard look so clean? I can’t get it to peel off that nicely.
Amanda Formaro says
I didn’t peel the cardboard, that piece came that way. It was the inside of a cardboard book mailer that someone sent me a book in. I have heard from scrapbookers who like to use corrugated cardboard that they lightly mist water on the cardboard to help release the glue when peeling.
Susie Searcy says
I am making 40 sets. I enlarged the pattern and used holly berries and holly leaves i boght on branches at the dollar store. I make snowmen every year to give as gifts. This has been a very fun project. Thanks for posting.
Amanda Formaro says
Wow that’s awesome Susie! I am so glad you are enjoying the project :)
Beth Rossignol says
Hello,
What is the instant grab glue that you used to attach the smiles? I Googled “instant grab glue” and it showed construction glue.
Thank you for posting these; they are wonderful.
Amanda Formaro says
Sorry about that Beth! It’s Beacon’s 3-in-1 Advanced Craft Glue – here’s a link! http://amzn.to/1cjcxF3
Marlene Affeld Facebook says
Nice project.Its looks simple but good.
Amanda Formaro says
Thanks Marlene!
Lila Willett says
I would like to print just the instructions for the snowman ornaments with out having to print 16 pages. I am 78 and not all that computor literate.It would really be helpful to be able to copy instructions in a simplified manner. Thank you
Amanda Formaro says
Hi Lila. I don’t have printable instructions for this particular project. If you are reading this comment, reply to it and I will copy and paste them and send them to you.
Carol says
I too would to just like to have the directions and shapes for pattern of snowmen tree ornaments. So cute and looks fairly easy too! We have a very tight budget so do not want to have to download all the other pages. Thanks for the amazing idea!
Amanda Formaro says
Hi Carol. I have updated the post to include a printable version :)
JoAnn @ SweetPepperRose says
Just adorable and making some for next year! Thanks for your tutorial.
susan says
These are adorable, Amanda. I am just starting a tradition with my nieces and daughter where we make ornaments with one snowman being the star of our production. This year we turned eye glasses into snowmen.
Next year we will use your pattern! I am off to look more on your site to see if you have posted other snowman ideas.
Thanks for sharing.
Amanda says
Thank you Susan, that’s so nice of you to say. And what a wonderful tradition to share with your girls!
Rebecca says
Love it, thanks! I made a snowman and a Christmas tree, but what did you do on the back side?? Mine look terrible. :-(
Amanda Formaro says
I really didn’t do anything on the back Rebecca. In fact you can see the back in the last step-by-step photo in this post. You could paint the backs, but since these were just for me, I didn’t. If I had made these to give as a gift I would have painted the backs, probably just white. You could splatter the back with black too :)
Rebecca says
Thanks!
Megan @ The Crafty Conundrum says
Those are so cute! I love using cardboard for projects. Great tutorial
Rachel Sue says
THese are adorable! I would love to feature them on Reduce, Reuse, Upcycle. Feel free to stop by and grab a featured button. Thanks!
Kate says
These are adorable … thanks for the tutorial. Merry Christmas
Lauren says
I love how these came out! I’ll have to make them for next year. Super cute!!!
I’d love for you to link up and share: http://tutusandteaparties.blogspot.com/2011/12/pinteresting-party-with-christmas.html
Korrie@RedHenHome says
These are SO CUTE! You did a great job.
somedaycrafts says
These are totally cute! Love them. I featured them today at somedaycrafts.blogspot.com.
Amanda Formaro says
Oh thanks so much for the feature!!
maggy,red ted art says
Oh my, the corrugated card really looks great! What a fabulous effect!
Thank you for linking to Kids Get Crafty.
Maggy
Charlotte says
Amanda…these are the cutest! I love snowmen and will try these soon. Thanks for the detailed directions! Merry Christmas to you!
Dawnee says
I adore these!!! I am with you, I enjoy making something new every year, and I think I shall have to give these a try!
janet dycus says
i love your project i would love to have your patterns i am not good at drawing things could i use like cardboard boxes and just peel off the box part i did this last year for a orement and it work good hope to hear from you please
Amanda Formaro says
Hi janet!
There’s a link to the pattern in the post so you can print it off from there. :) I’m sure what you are describing would work!
CM2 says
Amanda, You b=never cease to amaze with your creations! TY for this super share!
Amanda Formaro says
Thank you so much!
Lori says
I love these! I just Pinned these to my Xmas Pinterest Board. Thanks for such cuteness!
http://pinterest.com/pin/112027109450501931/
Amanda Formaro says
Thanks so much Lori!
Alexa says
This project turned out so cute and you did a great job with your tutorial. The project is a hit on our FB page :) Please like us and check it out if you haven’t already! facebook.com/lovetocreate
Amanda Formaro says
How fun thanks so much!
dacraftylady says
fun fun fun project…love it!! thanks for sharing
Erin @ Making Memories says
These are adorable!
Condo Blues says
When I first looked at your ornaments, I thought they were corrugated metal. I might have to rip through a few old boxes and give them a whirl.
Theresa Eldridge says
CRAZY CUTE!!!!!!!!!! LOVE EM!!!!! Thank you for such a cute idea!!!! Merry Christmas!!
Barbara' Cookie" says
Looking back at these they look like tin a little ,any way look tin or cardboard they are darling Another great one Amanda,,Thank’s
gail says
Amanda!!! I LOVE these snowmen! they are tooo darn cute! great job girl!
gail
Amanda Formaro says
Thank you Gail!!
Janet says
Wow Amanda! Your ornaments are spot on to the one’s that I bought, I’m so impressed! Thanks for the link to my frame. :)
Amanda Formaro says
Thanks Janet!
Marilyn says
Really CUTE!♥♫
Katrina says
So simple, yet I’ll bet they wouldn’t look as good if I made them. ;)
Karla Jones says
what a fun project. pinning this to remember it.
Kim says
These are so adorable!!! I just love snowmen, and these look so easy! Thanks for sharing!!
Michele @ The Scrap Shoppe says
Adorable!! Great tutorial, Amanda. These would make cute gift tags, too. Pinning! :)
Laura says
Very cool! Thanks for including so much detail. I’ll be on the hunt for suitable cardboard now!
Thanks!