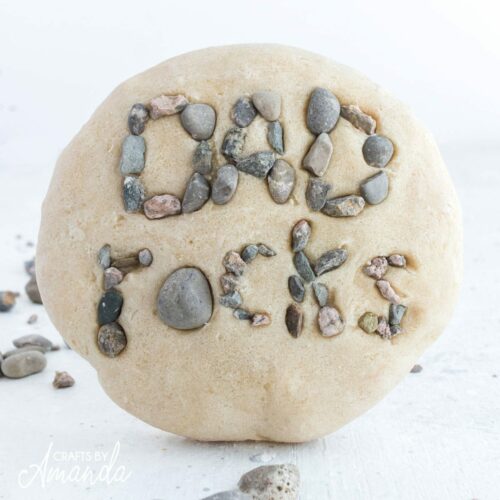
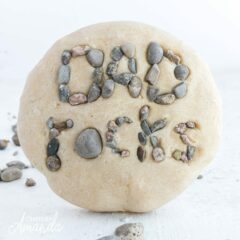
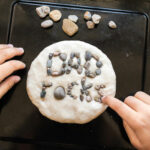
If you are looking for a last minute Father’s Day gift your kids can make, this Dad Rocks Paperweight is it! It’s fun to make, uses very few supplies, and there’s a very high probability you already have everything on hand to make this.

Why dad and the kids will love this project
Kids love to be outside, and adore creating. Send the kids out in the yard to gather some small pebbles, or if you have pea gravel that’s perfect! Pull out some salt, flour, and water and you are ready to make this great Father’s Day gift that Dad will cherish. The perfect keepsake he can take to work that’s easily customizable!
Pair this paperweight with a sweet printable Father’s Day card that kids can color in themselves.

Supplies you will need
Find the full printable instructions and ingredients list at the end of this post.
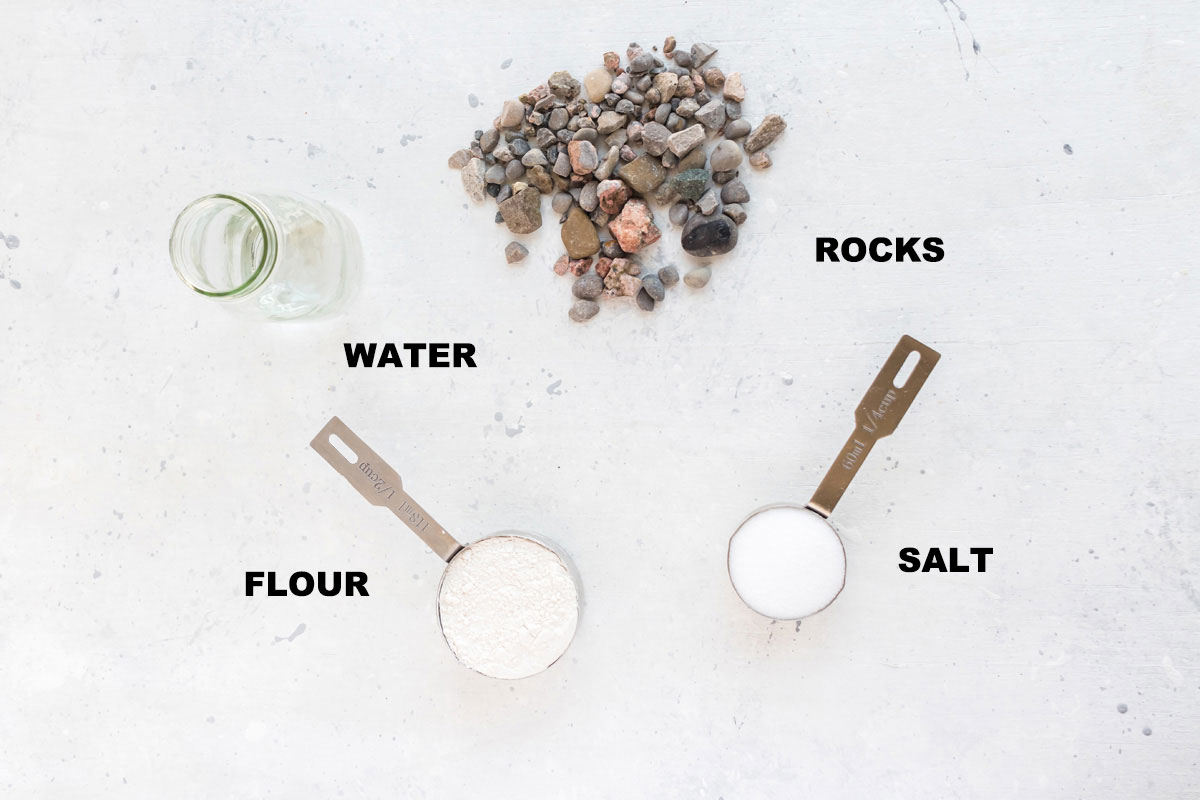
- 1/4 cup salt
- 1/2 cup flour
- 1/4 cup water
- bowl
- cookie sheet
- 1/2 cup pea gravel or rocks
How to make this Dad Rocks Paperweight
- Preheat oven to 250 degrees F.
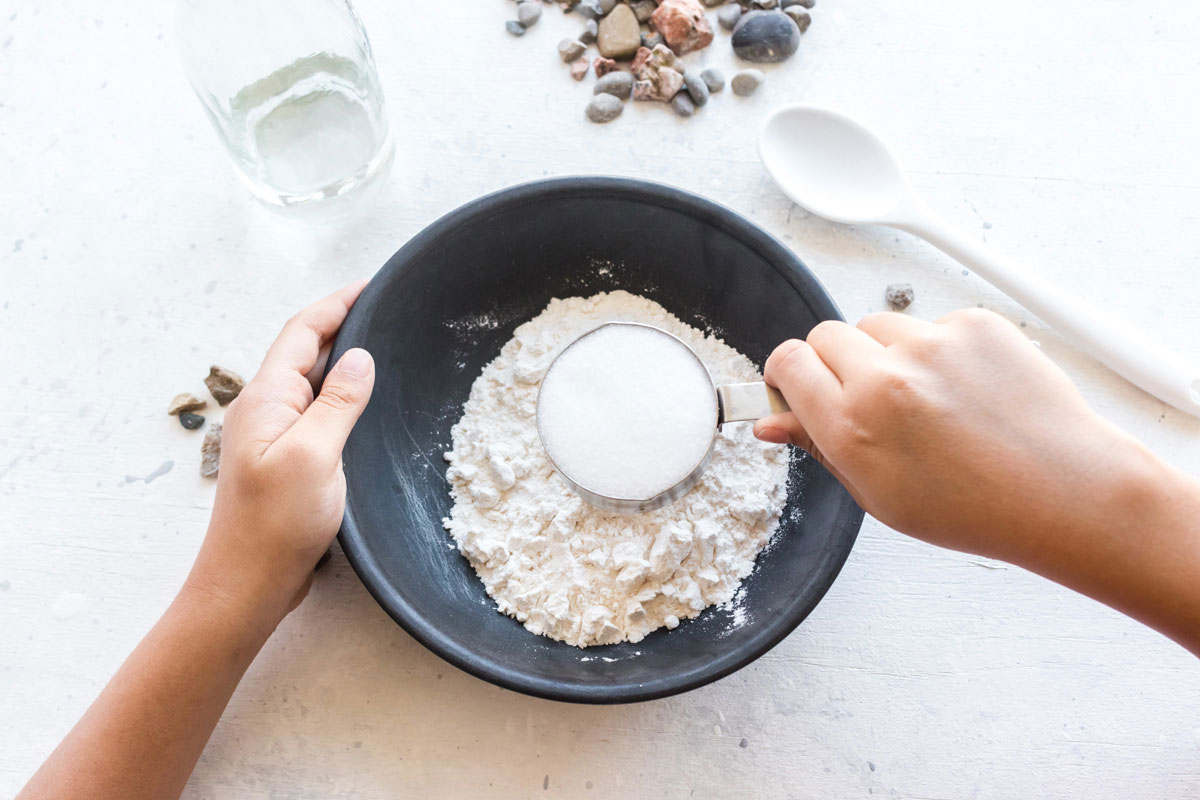
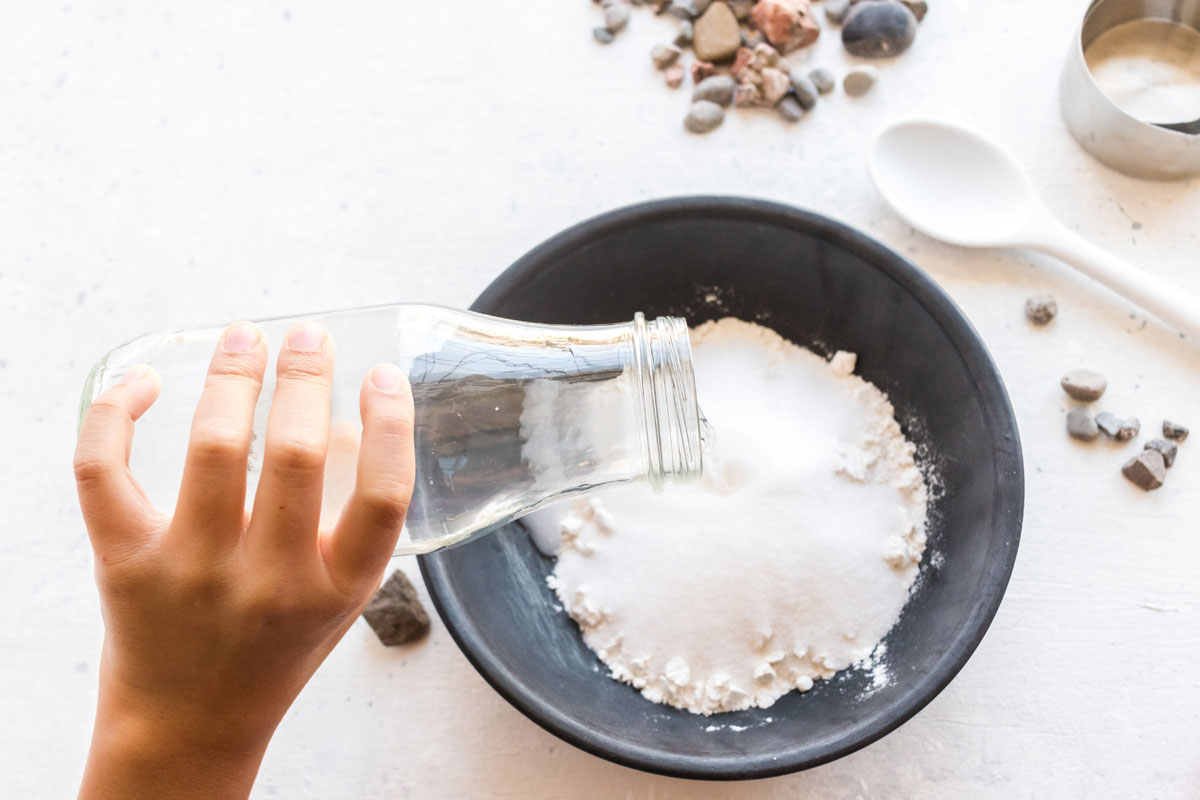
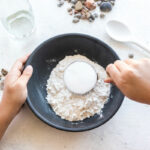
- Mix flour, salt, and water together in a bowl. If the dough is too sticky add small
amounts of flour until it is doughy and pliable. Be careful not to add too much as the dough will dry out and your creation will crack.
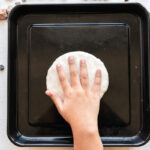
- Shape a piece of the dough into a ball in your hands. Place the ball on the cookie sheet and flatten to about ½″ thickness.
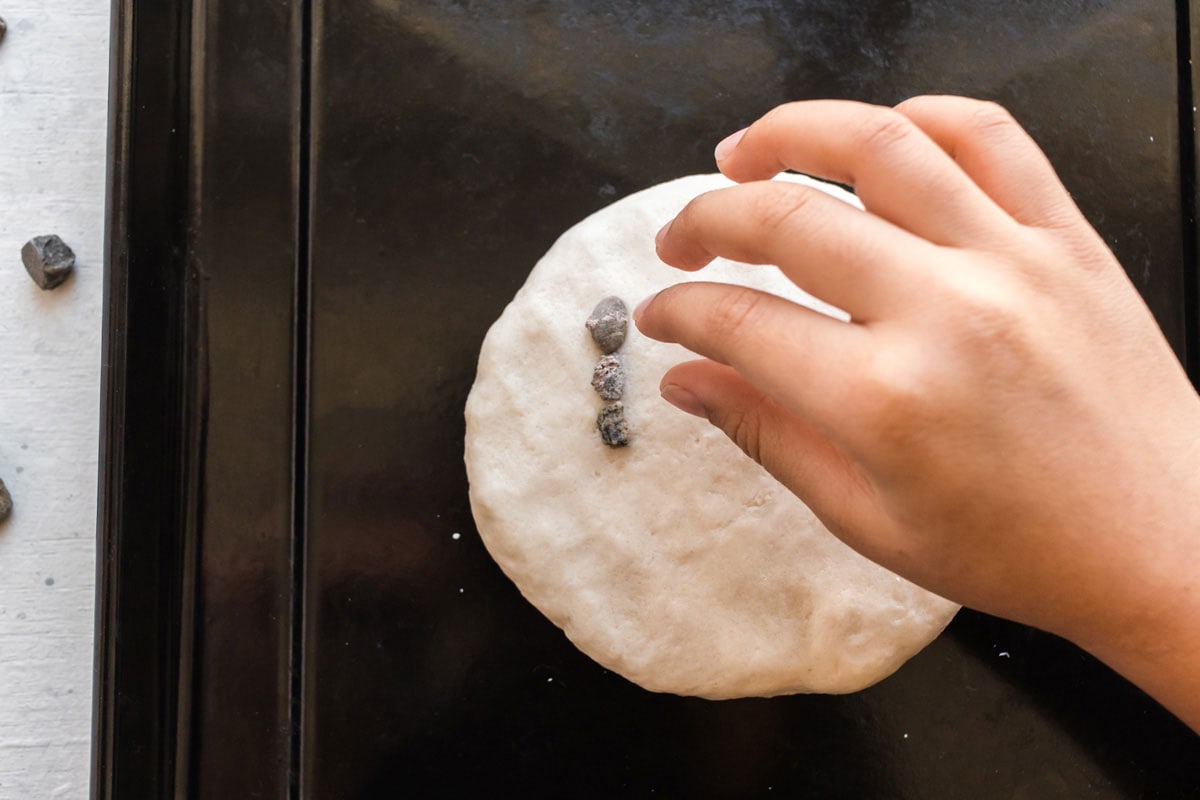

- Carefully select pieces of pea gravel to spell out “DAD ROCKS”. Press them firmly but gently into the salt dough.
- Bake your paperweight for 2-2.5 hours until completely dry.
- Remove from oven and allow to cool before handling or removing from cookie sheet.
- Optional: You can spray your creation with an acrylic sealer or paint it with a clear coat sealer.

You might also like:
- This Daddy & Me mug is a simple, yet sweet way to celebrate your dad on Father’s Day. Especially if he’s a coffee or tea drinker! Grab a plain white dollar store mug, some paint, and paintbrushes and make this fun fingerprint mug! You could even stuff it with some of Dad’s favorite chocolates!
- If you want to try another dough project, this tutorial from my friend Suzy’s site shows you how to make plaster castings with sand!
- Be sure to use this free printable Father’s Day card to go along with your gift!
- My friend Maggy made these awesome Crayon Rock Paperweights with her kids!
- How to Make a Duct Tape Wallet
- Quick Orange Rolls – from my cooking blog, a great breakfast for dad. Later you can make pizza on the grill!
- And don’t forget about our salt dough dad magnets!

Dad Rocks Paperweight
Supplies
- ¼ cup salt
- ½ cup flour
- ¼ cup water
- bowl
- cookie sheet
- ½ cup pea gravel
Instructions
- Preheat oven to 250 degrees F.
- Mix flour, salt, and water together in a bowl. If the dough is too sticky add small amounts of flour until it is doughy and pliable. Be careful not to add too much as the dough will dry out and your creation will crack.

- Shape a piece of the dough into a ball in your hands. Place the ball on the cookie sheet and flatten to about ½″ thickness.
- Carefully select pieces of pea gravel to spell out “DAD ROCKS”. Press them firmly but gently into the salt dough.
- Bake your paperweight for 2-2.5 hours until completely dry.
- Remove from oven and allow to cool before handling or removing from cookie sheet.
- Optional: You can spray your creation with acrylic sealer or paint it with a clear coat sealer.

This post was originally published on this blog on June 18, 2010 and has since been updated with new photos.
- Swirling Twirling Ladybugs - July 21, 2026
- Drip Tie Dye Backpack - July 17, 2026
- Mini Coastal Clay Houses - July 14, 2026


Brandi says
hello, I’m wondering if you can bake the handprints. and then use a clear glue poured into the handprint, then add the pebbles… to have them stick together.? does that make sense? can you recommend a good clear glue?.
BetsyO says
I would like to protect the desk from the paper weight…would you recommend gluing felt as a backing or using self-adhesive protective pads? If you would recommend gluing, is there is a type of glue that will adhere better to the rock?
Amanda Formaro says
You can use those self adhesive felt pads that go on the bottom of chair legs like these https://amzn.to/43pOVgD
Michelle says
This is such a cute idea!!
Danielle Warrender says
I don’t suppose you can add food coloring to the dough?
Amanda Formaro says
Sorry I’m just seeing this! I haven’t tried it – but a fellow blogger has a post on adding food coloring to salt dough here https://julieblanner.com/color-salt-dough-ornaments/
Rachel says
Hi ive done this with my daughter but it doesnt seem to have set completely can i put it back in the oven or will we have to start again? Many thanks
Amanda Formaro says
Sorry I’m just seeing this. It should have eventually dried out. Hope you were able to make it work!
Debra says
I’m not especially crafty, but these seem simple for Fathers Day. Grandkids will love to make
Amanda Formaro says
Hope you had fun!
Emily Gambill says
Love this! We made these for Mothers day with our cub scout troop! turned out great!! Thanks!!
Amanda Formaro says
How fun, so glad you had a great time! :)
Erika morley says
How many does the recipe make?
Amanda Formaro says
Hi, Erika. This will make one paperweight!
susan says
I have followed the instructions and it has now been in the oven for 3 hours and still nowhere near all dry – any suggestions for what to do please?
Amanda Formaro says
if you paperweight is thicker then it will take more time. It worn’t hurt it to cook it longer as long as the temperature is low. Just FYI – the baking instructions reference FERENHEIT, not celcius. Just in case…
Jaime Pfeffer says
So cute!!! Thank you! Definitely going to do this with my girls.
Amanda says
This is a fabulous father’s day craft and I have begun making with my preschool class. Any tricks with getting the rocks to stay? I am finding that I have pushed them into the dough a significant amount but some are falling out. Any advice would be greatly appreciated! Thanks!
Amanda Formaro says
Hi Amanda. The only thing that i can suggest is gluing the loose ones in after everything has dried. Salt dough can be a bit finicky :-P
Isa says
What a great idea! I’m gonna do it with my daughter. Can we acrylic color the pea gravel before baking?
Amanda Formaro says
Hi Isa, if you want to paint the gravel first, make sure you use a paint that can be baked, such as an enamel. Check with the manufacturer or check the label.
Isa says
Thank you very much for the advice :)
Ms Bradshaw says
Hi. I just love this idea. I am a teacher n wanted to do this for Mother’s Day. Question: do they have to be baked or can they air dry??? I wouldn’t have access to a oven at school. Could I bring them home n bake them? Or modify the recipe with sand and maybe glue?
Amanda Formaro says
hi there! These can air dry but will take a lot longer. If you have several days, or even a week ahead, that would be best! Not sure I would trust bringing them home and baking them, only because the pebbles may fall out before they get them home.
Unity says
do you use alfoil or baking paper??
Amanda Formaro says
You can use parchment paper if you like. I have always just baked these directly on the cookie sheet.
Amanda says
Ours just stuck like plaster to the cookies sheet. Wrecked the cookie sheets and our project! :(
Amanda Formaro says
Aww I’m sorry that happened! Sometimes if the dough has too much moisture content that can happen :-(
Stephanie says
The same thing happened to me.
Steph T says
I love this and have posted it on my blog with all credit back to you – thanks so much for this and I hope you don’t mind me sharing? Steph : )
http://ric-rac-uk.blogspot.co.uk/2013/06/dad-rocks.html
Amanda Formaro says
Thanks for the feature Steph!
Tess says
This came out so cute, but no one said “spray” the pan, or put the dough on foil, then on cookie sheet… so the paperweight & 8″pan are ONE :(
Amanda Formaro says
Oh no! So sorry that happened! That’s never happened to me before and I don’t use foil or baking spray. I just put the dough directly on the cookie sheet and bake. And you had the oven set at 250?
Terry says
This is great I’m going to help my 4 year old grandson make this for his dad my grandson loves rocks and his dad is in a band !! Murphy will love making this he loves to do crafts !!
Amanda Formaro says
That will be so fun for a musician dad!
Jasmine says
Are the measurements above for just one of these. I’m a preschool teacher and I wanted to do this with my class for father’s day.
Amanda Formaro says
Hi Jasmine. This dough will make several of these. It’s been several years since I made this, so I don’t know how many for sure. Sorry!
Deb Mullen says
Hi,
I love this idea I want to make it with my class. Do they have to bake or will they dry enough by air if we leave them?
Thank you,
Deb
Amanda Formaro says
Hi Deb! They are pretty thick, so if you want to air dry them it will take a while. I would say to make them far enough ahead that you could allow for a week of air drying, and that’s just a guess!
JDaniel4's Mom says
My son will love making this for his dad! Hunting for the rocks will be as much fun as making it. I am going to pin this to my Father’s Day board.
TommiAnn says
This is AWSOME my 2 kids are so excited to make this for their grandparents. U rock!!!
Amanda says
Thanks TommiAnn, hope you have fun!
Melissa D says
Loved your idea!! thank you so much…here is a link to the blog post I made where I showed mine :)
http://misapie28.blogspot.com/2012/06/fathers-day-pinterest-craft-projects.html
Amanda says
So cute Melissa!!
Stepford Sister says
My husband and father-in-law both love puns and I thought this was totally cute! I am planning on helping my stepson make one next year! I also wanted to let you know that my blog did a feature post on our top five Father’s Day Crafts and yours was #3!
You can check it out at: http://stepford-sisters.blogspot.com/2012/06/stepford-top-five-easy-homemade-fathers.html
Amanda says
Thanks so much for the feature!
Cassy says
Hi Amanda, I was wondering if this idea would work for an outdoor garden decor?? Do you think it would withstand weather or do you have any other houehold item ideas? Thank you, I love your work!
Amanda says
Hi Cassy! This particular dough (salt dough) will turn soft if it gets wet and it’s quite fragile. However, if you use plaster of Paris that would withstand the weather and work quite well!
Michelle says
I used the recipe on the post to make a model for my students, and the only problem was that it stuck to the cookie sheet! Do you think parchment paper would solve this problem?
Amanda says
Yes, try parchment. I have never had them stick, but I use insulated cookie sheets most of the time. Also, if the dough is really sticky, you can add small amounts of flour until you get a cookie dough type consistency :)
Lauren says
Mine stuck too. I used a plain aluminum cookie sheet. Would greasing the sheet cause any problems to the dough?
Amanda Formaro says
Hi lauren, so sorry to hear that! Makes me wonder now how many others had theirs stick. You two are the only ones to ever tell me that. The only thing I can think of is that the dough needed to bake longer. If the object is too thick, just like anything you bake, it will take longer in the middle. Sorry you had trouble!
Amanda Formaro says
Sorry, forgot to answer your question. I don’t know if greasing the sheet would cause any problems with the dough. I’ve never had to do it. I would suggest using parchment paper instead. At least then if it sticks to the parchment, you can get it off the sheet and peel the paper off the back.
Melissa says
I would like to have my class of 3rd graders make these for their dads. They would love this craft. However, how long can they sit until I get them in the oven?
Amanda says
You can actually air dry them, so it doesn’t matter how long they sit before going into the oven. Just make sure that the rocks go into the dough right away while it’s still fresh and soft :)
Miss E says
I was thinking of having my class make these for their dad’s on father’s day. Two quick questions – 1) Would I be able to make the dough a night in advance, or will it dry out fast? If it dries out fast, is it easy to make in the morning? 2) How many paperweights can I make out of your recipe provided above?
Thanks for your assistance and fun project!
Amanda says
Hi Miss E! I would say that you could get 2 decent sized paperweights from a combo of 1/4 cup salt, 1/4 cup water, and 1/2 cup flour. So multiply that out for the amount of kids that you have :) Oh and I wouldn’t suggested making it the day ahead as it might dry out some, even if wrapped.
Keri says
How many paperweights does this recipe make? We are looking to do this for our two classes – a total of 46 students. Great idea!
Amanda says
Hi Keri. The recipe on the post should make 2 paperweights. Have fun!
Michelle says
This is such a cute craft for the kids in my home daycare to do for father’s day next week. Thanks.
tryss says
I am going to make one of these for my dad for Fathers Day and i think he’ll like it!
Amanda says
That’s great tryss!
Eva Scott says
My son LOVES rocks so he would think this is cool. Thanks for the idea. :)
rhiannon says
I tried to make it but it was to hard. add in more details
Amanda Formaro says
I’m sorry you had trouble. All the details are in the instructions. I’ve had several people make this without a problem. Make sure you measure your ingredients properly, salt dough can easily be dried out.
Cady says
Hey I just wanted to let you know that I've actually put some of your ideas into my lesson plan at my summer camp–so don't be surprised if they show up on my blog.
You have a really nice blog. Your tutorials are very helpful. I'm hoping my campers will love this one especially!
bizzyshan says
this turned out super cute :) A tip that works with almost any salt dough recipe- is to color the dough w/ a packet of Koolaid :D i imprinted my daughter's hand, and then did a heart in rocks.
Amanda says
Those are so cute Andi!!
Andi @ Jane of all crafts says
Thanks so much for this quick and fun craft!! My girls had so much fun! I just posted about it and linked back to you. have a great weekend!
http://www.janeofallcrafts.com/2011/06/dad-rocks.html
Thread In Her Hair says
This is so great! My son is going to love making this!!
angee says
So cute! I will be linking tomorrow!
The Crafty Artisan says
I love this idea! I have made this the tutorial of the day on my blog, The Crafty Artisan. I have posted a photo and a link to have my readers visit your web site.
Happy Crafting!
http://wiserunning.com/blog/2011/05/27/fathers-day-craft-tutorial-dad-rocks-paperweight/
Amanda says
Thank you Joan! So nice of you to say so, hope you find lots of fun ideas here! :)
Anonymous says
Oh Amanda….I am so happy to have been introduced to your site from Shutterfly on Facebook! I love your craft ideas! They are all absolutely AWESOME!! I just wish I had found your site earlier so I could have kept my 8 yr old and her friends busier during the summer!! Looking forward to look at more!
Joan Lorenzo
Xhonane Olivas says
Hi Amanda! I love your blog!! I will be visiting often!! I am actually making a craft using this idea in my blog Familia Catolica http://familiacatolica-org.blogspot.com/ (it's in Spanish, but there is a translator). Thank you for sharing your great ideas!!
creativejewishmom/Sara says
This is great Amanda, I can see so many possibilites that I hadn't thought of for baker's clay projects! Thanks so much for sharing on Craft Schooling Sunday! all the best, Sara
Kaysi says
That is awesome!!! I need to remember this for next year!
Jerri says
How fun! Great project!
Thanks for linking up for Friday Favorites!
Rory from Tools Are For Women Too! says
This is just fun! Thanks for showing it to us on Modern Craftswoman Monday! Rory
Shugee @ Blue Heron Cottage says
Oh la la, Amanda. I love this, it has given me lots of ideas! Thanks for the inspiration! And your blog is FANTASTIC!
Megan says
These are too cute and perfect for daddy! Stumbled.
Beth says
Stopping by from Sunday Showcase! What a great idea, so cute! Saving for next year (or maybe his birthday) Thanks for sharing!
Michelle says
Very cute idea!
Jolene says
WOW! What an awesome idea! We are def doing this! Ill have pics up on my blog by tonite if u are interested!!!
Annemarie's Breiblog says
Oh this is sooooo cute! If you like you can add a link to your blog and a picture of something you've made yourself on my blog. Just check my latest blog post, it's really simple. Hope to see you there!
Bye!
Annemarie
Threeundertwo says
So cute. I love crafts that can be made from materials I already have around the house. Thanks for linking up to Finished for Friday!
Mary says
I made your project today for my husband ;) It's so cute. I put some blue food coloring in the dough and shaped it like a heart. Thanks for for the darling idea. Visiting from Show and Tell Friday~
Tiffiny Felix says
I love this–and I just happen to need a last minute thing for my kids to give their dad. Perfect!! :)
mother★lode says
This is AWESOME! We just might whip one of these up today for our Dad that ROCKS! Thanks for sharing!
Diane says
What a cute, cute idea for any kid to make for his dad and feel so proud when he presented it :o) Thanks for the recipe for making this.
Vera @ Cozy Little Cabin says
Too, too cute! I really like this idea!
Brenda says
I made footprints instead of putting the rocks on. They turned out good. Thanks for the salt dough recipes.
Amanda Formaro says
So glad you had fun with it!