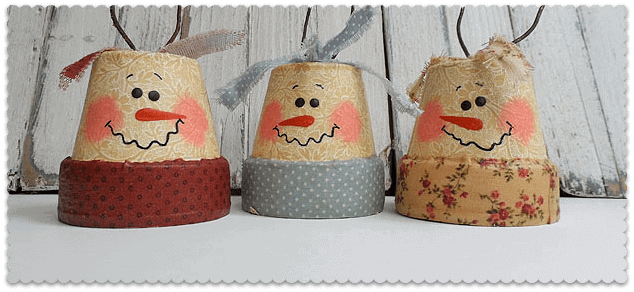

Add a little antique flair to your Christmas tree this year with these vintage inspired snowman ornaments made from clay pots, fabric and antique matte Mod Podge. Rusty wire was used for the hangers, but these are highly adaptable to fit your tastes and craft supplies on hand.

Have you tried the Antique Matte Mod Podge yet? I’ve tried it on several projects and there was only one I wasn’t happy with.

These snowmen however, were a complete success! It gave the cream colored fabric just the right amount of tint to look old without looking dirty.
 - CraftsbyAmanda.com") [Full printable instructions are below.] I also used Gesso, which is an artist medium that can be found in the art department of the craft store. I get mine at Michaels. It’s similar in nature to a primer. The reason that I paint them white or with gesso first is because the natural color of the pot is dark. Therefore, with the light colored fabric, it can be a bit transparent sometimes, depending on the material. Painting the pots first also hides any blemishes the pots may have, OR if you are recycling a pot from a previous project it’s a great way to create a “new slate” so to speak. :) So no, you don’t HAVE to paint them first, however I prefer to have a white canvas to work on when dealing with light colored fabrics :)
[Full printable instructions are below.] I also used Gesso, which is an artist medium that can be found in the art department of the craft store. I get mine at Michaels. It’s similar in nature to a primer. The reason that I paint them white or with gesso first is because the natural color of the pot is dark. Therefore, with the light colored fabric, it can be a bit transparent sometimes, depending on the material. Painting the pots first also hides any blemishes the pots may have, OR if you are recycling a pot from a previous project it’s a great way to create a “new slate” so to speak. :) So no, you don’t HAVE to paint them first, however I prefer to have a white canvas to work on when dealing with light colored fabrics :)
 - CraftsbyAmanda.com") You’ll create fabric bottoms for the pots (see instructions) and decoupage them on and fabric to the sides of the pot.
You’ll create fabric bottoms for the pots (see instructions) and decoupage them on and fabric to the sides of the pot.
 - CraftsbyAmanda.com") Decoupage patterned fabric onto the rim of the pots.
Decoupage patterned fabric onto the rim of the pots.
 - CraftsbyAmanda.com") Add cheeks and facial features.
Add cheeks and facial features.
 - CraftsbyAmanda.com") Make hangers from rusty wire. :)
Make hangers from rusty wire. :)

More Ornament Crafts
- Cinnamon Ornaments
- Scrabble Tile Ornaments
- Pom Pom Ornaments
- Beach Sign Ornaments
- Twisted Paper Ornaments
- Decoupage Wood Slice Ornaments
Vintage Clay Pot Snowman Ornaments
Supplies
- 2 " clay pots
- Gesso or white paint
- Ivory or white fabric
- Mod Podge Antique matte
- Colored patterned fabric
- Fine point black Sharpie
- Paint: pink black, orange
- Rusted wire
- Round nose pliers
Instructions
- Paint clay pots with Gesso or white paint.
- Trace bottom of clay pot on the ivory fabric. Cut out the circle and fold in half then in half again. Cut the tip off to create a hole in the middle of the circle. Decoupage this circle to the bottom of the pot.
- Decoupage ivory fabric onto the sides of the clay pot.
- Decoupage patterned fabric onto the rim of the pot.
- Apply a coat of decoupage over the entire pot and rim and let dry completely.
- Use scruffy brush dipped in pink paint, excess paint dabbed off on a paper towel, to add cheeks.
- Use the handle end of the brush dipped in black paint to add eyes. Use a Sharpie to draw on mouths. Add nose with orange paint. Let the paint dry completely then add another layer of decoupage.
- Make ornament hangers from rusty wire by bending a length of wire in half and creating a loop. Then twist the wire below the loop together. Insert the twisted end into the hole in the bottom of the pot. Squeeze the loop together so that you can push the loop almost all the way through the hole. This will give you enough room to coil the twisted end of the wire around your round nose pliers to keep the hanger from coming back through the hole. Push the loop back up through the hole and widen the loop again.
- How to Make Lavender Soap - April 28, 2026
- Plastic Spoon Bugs on a Branch - April 24, 2026
- Field of Lime Flowers - April 22, 2026


Summer A Clinton says
I love this project.
Amanda Formaro says
Thanks, Summer!
Christie says
These are adorable! Would love to do as an activity for our cookie exchange party. From start to finish, including drying time, how long does it take to make one? Thanks!
Amanda Formaro says
Hi Christie. Decoupage needs a few hours to dry, so I would say a solid 5 hours from start to finish including dry time.
jeanie peterson saez says
I did a variation. Painted pots white, added styrofoam balls for a head – and threaded a jingle bell inside. Felt scarf and hat ( plus face, of course) made a snowman while yarn hair and bits of lace made an angel. The finishing touch was wings made of shells from a local beach. Each one sounds a little different. Kids love to “play tunes” on them.
Amanda Formaro says
Sounds like a fun project Jeanie!
Karen V says
I just LOVE your site. I find myself making (or trying to make) so many of your great crafts. You don’t need a lot of “artistic” ability, either :) I LOVE the clay pot snowmen. How cute and easy (??) they look. I even have the pots, from a project I didn’t make. With your expertise, can you just paint them instead? I don’t have scrap fabric around the house. I don’t know how to sew either :D. That’s another day … another chapter.
Amanda Formaro says
Hi Karen! Yes, you can absolutely just paint them! And thank you so much for your kind words, they made my morning :)
Birgit says
I love them , too. The most I love is, how you have made the faces .Wonderful
Amanda Formaro says
Thanks so much Birgit!
becky says
I love these! What a great idea!
Amanda says
Thanks Becky!
Nancy D says
This is adorable! I came here via craftgossip.com because this project looked so cute. I happen to have a 3 pack of these little pots I bought from the dollar store. I had no idea what I was going to do with them, now I know :) I think I might add a bell inside, just cause I have them! The good thing about snowmen is they can be out playing all winter! Thanks for sharing this!
Amanda says
A bell would be really cute!
Judy R says
Thanks for this tutorial – definitely filing for next year’s projects. Love snowmen
Maryellen Webber says
I found your blog post from Craft Gossip and I just love your
clay pot snowmen. I am inspired to make one. Thanks for writing such
clear directions on how to make them!
Merry Christmas!
Maryellen Webber
Amanda says
You’re welcome Maryellen and thanks for the compliments, have a Merry Christmas! :)
Bob'sGal says
Oh Amanda….. you have sparked my creative Jeans… :D We grow Orchids as a hobby and needless to say are repotting to larger pots several times a year with various plants…. I fear my husband will be missing a few pots this coming January…..! ;D
Cookie 17 says
As usual another great & easy project,thank’s Amanda…Merry Christmas,,,,
Nadia@Loveliveandgarden says
Oh I love crafts that use little pots.. Very cute..
Michele @ The Scrap Shoppe says
I *love* this, Amanda!! I’m stalking my potting shed for extra clay pots so I can make these as gifts this year! Thank you!!
Amanda says
Thank you Michele, so nice of you to say! :)
Denise says
Love these!!
Is it really necessary to paint the pots since they are being covered in fabric?
Amanda says
It’s funny, when I wrote this up and then read through it I thought about explaining why I paint the pots and then dismissed it LOL! I’ll add it to the post, but to answer your question… the reason that I paint them white or with gesso first is because the natural color of the pot is dark. Therefore, with the light colored fabric, it can be a bit transparent sometimes, depending on the material. Painting the pots first also hides any blemishes the pots may have, OR if you are recycling a pot from a previous project it’s a great way to create a “new slate” so to speak. :) So no, you don’t HAVE to paint them first, however I prefer to have a white canvas to work on when dealing with light colored fabrics :)