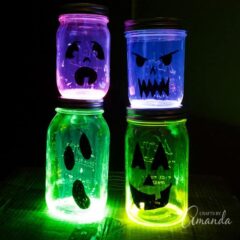
Glow sticks are inexpensive and can be used to make lots of things light up the night, see how we used them to make these Glowing Jack O Lantern Jars!

Why We Love This Idea
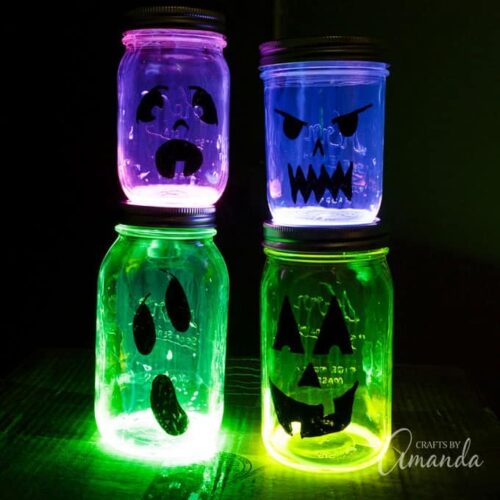
Halloween would not be complete without pumpkins, Jack O Lanterns, costumes, and things that glow in the dark. These jars look awesome lined on your driveway on Halloween night, or atop a bookshelf or mantel for your Halloween party. They’re simple to make and require only a few crafting supplies making it fun for kids and adults alike.
Expert Crafting Tips
- Some colors are better than others. First of all, green and yellow glow sticks work better than pink and purple. The green and yellow appeared much brighter. I didn’t test the blue but based on the hues, I would guess it would be the same as the purple. I could be wrong though so if you try blue, please leave me a comment and let me know how it did!
- Cutting the glow stick. Cutting a glow stick open is something that a grown-up should do. I used an Exacto knife and was able to hold the glow stick in my hand and simply apply pressure to the plastic and it went through. Now here’s the thing… I originally saw this idea last year on this site. The instructions there said to cut open the glow stick, dump the liquid, remove the glass tube, break open that tube, and combine the liquids. Either I’m a real weakling or the glass in glow sticks is not all created equal. I couldn’t break the glass tube without freaking myself out thinking liquid was going to go flying everywhere. So instead I activated the glow stick by bending it and making it glow, THEN I sliced off the top and poured the glowing liquid into the jar. That means that I ended up with pieces of glass inside the jar. This is the second reason this is a job for an adult. Unless you can do it easily, don’t bother removing the glass, just close the lid.
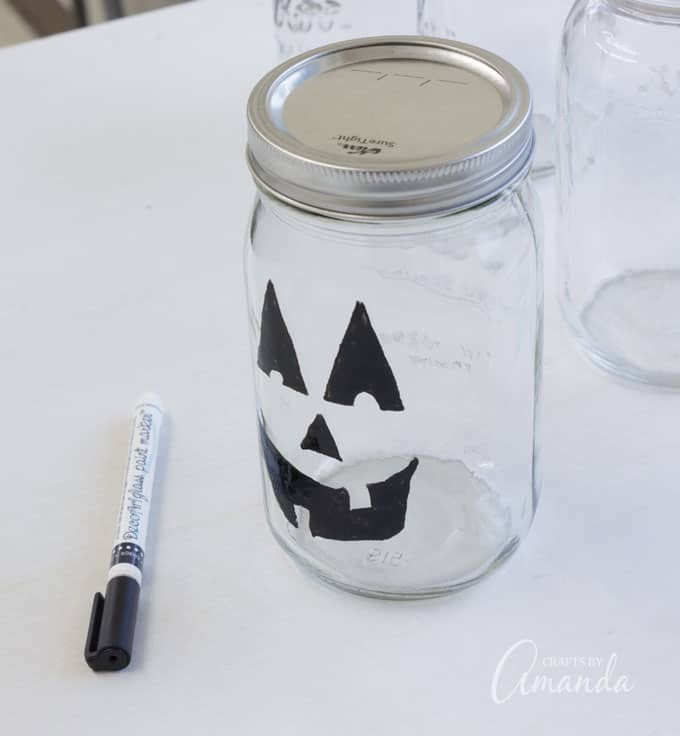
- I tested a black Sharpie on my glow stick pumpkin jars, but it didn’t work as well as glass paint pens. However, you can certainly use a black Sharpie, there’s no need to go to the craft store if you don’t think you’ll use it again. I use my glass paint pens all the time.
- Be aware that a black Sharpie will not be as “black” (if that makes sense) and will leave pen lines that a candle may shine through. So it seriously depends on your level of perfectionism. Mine’s kinda high, I’ll admit it. But kids could care less and their glowing Jack O Lantern jars will still look super cool!
How To Make Glowing Jack O Lantern Jars
These step by step photos and instructions are here to help you visualize how to make this project. Please scroll down to simply print out the instructions!
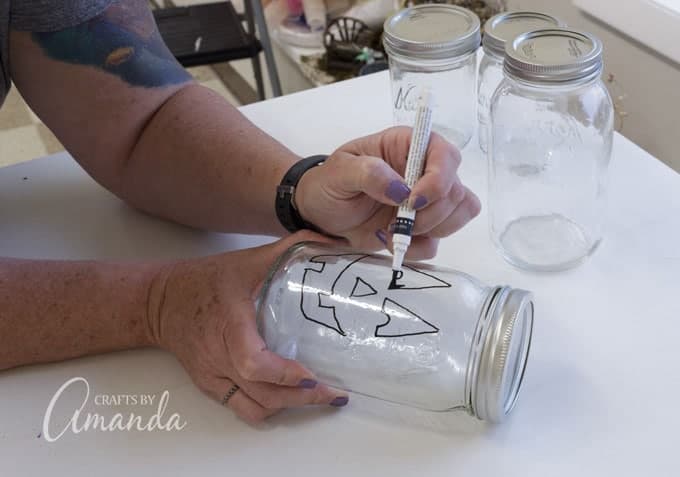
Draw some fun faces onto the jars with your glass paint pen or Sharpie and color them in. You can get some facial expression ideas from my Jack O Lantern felt board.
Guess what? You’re almost done making your glowing Jack O Lantern jars!
In fact, you can do this part as far ahead and you’d like. It’s just the glow stick step that needs to wait until the night of. Glow sticks last anywhere from 4 hours to 24 hours. Keep that in mind before you activate the sticks.

Activate each glow stick by following the directions on the package. Once the liquid is glowing, hold the glow stick upright so that there is air at the top of the stick. Use your other hand to press the Exacto knife into the top of the glow stick then slowly and carefully remove the top.
Pour the liquid into one of your jars and seal the lid. Turn the jar, allowing the glowing liquid to coat the inside of the jar. If you are worried that a small child will open the jar, use some E6000 to glue the lid on.

Your finished glowing jars may appear to be fading within several minutes. Pick them up and repeat the rolling and coating process. You can do this throughout the evening to help keep them glowing. If you let them sit they will be fine too.

A fine layer of the glowing liquid will adhere to the glass, but the rest will drip down and pool at the bottom of the jar. Crafting is not perfect!

Keep in mind these glowing jack o lantern jars are temporary, so if you want to make them wait until the night of your Halloween party, trick or treating, or Pumpkin Painting Party!
You may recognize some of these faces from my Halloween luminaries I made several years ago. In fact, you can get even more face ideas on that post!
More Halloween Crafts
- Paper Halloween Luminaries
- Zombie Mason Jars
- Halloween Party Ideas For Kids
- Wooden Jack O Lantern Blocks
- Halloween Decorations
I love to create and share my projects with you! I know it’s hard to remember to come back and search, so I’ve made it easy for you with my weekly newsletter! You can subscribe for free and I’ll send you fun crafts every week right to your email.
Glowing Jack O Lantern Jars
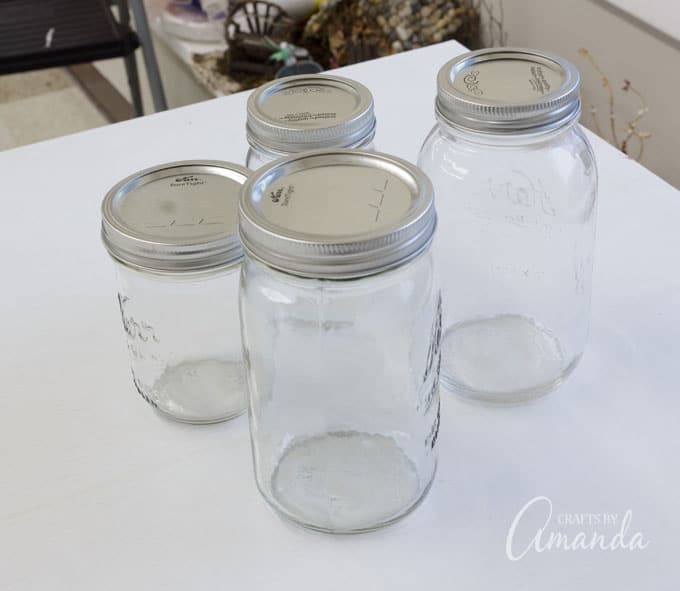
Supplies
- Clean glass jars
- Glow sticks
- Glass paint pen
Craft tools
- Exacto knife
Instructions
- Draw some fun faces on with your glass paint pen or Sharpie and color them in.
- Glow sticks last anywhere from 4 hours to 24 hours. Keep that in mind before you activate the sticks and pour them into your jars. You may want to wait until the day/night of the occasion you'll be using these jars to do so.
- Activate the glow stick by following the directions on the package. Once the liquid is glowing, hold the glow stick upright so that there is air at the top of the stick. Use you other hand to press the Exacto knife into the top of the glow stick then slowly and carefully remove the top. Pour the liquid into one of your jars and seal the lid. Turn the jar, allowing the glowing liquid to coat the inside of the jar.
Expert Tips & FAQs
- Your finished glowing jars may appear to be fading within several minutes. Pick them up and repeat the rolling and coating process. You can do this throughout the evening to help keep them glowing. If you let them sit they will be fine too.
- A fine layer of the glowing liquid will adhere to the glass, but the rest will drip down and pool at the bottom of the jar. Crafting is not perfect!
- I tested a black Sharpie on my glow stick pumpkin jars, but it didn’t work as well as glass paint pens. However, you can certainly use a black Sharpie, there’s no need to go to the craft store if you don’t think you’ll use it again. I use my glass paint pens all the time.
- Be aware that a black Sharpie will not be as “black” (if that makes sense) and will leave pen lines that a candle may shine through. So it seriously depends on your level of perfectionism. Mine’s kinda high, I’ll admit it. But kids could care less and their glowing Jack O Lantern jars will still look super cool!
- Some colors are better than others. First of all, green and yellow glow sticks work better than pink and purple. The green and yellow appeared much brighter. I didn’t test the blue but based on the hues, I would guess it would be the same as the purple. I could be wrong though so if you try blue, please leave me a comment and let me know how it did!
This project was originally posted here on August 10, 2017.
- DIY Mosquito Repellent Candles - July 10, 2026
- Mason Jar Solar Lights - July 3, 2026
- Patriotic Pinwheels - June 23, 2026


Deb says
I love the idea of the glowing jack o lanterns! I have one question though. You just use the contents of the glow stick? There is no water or other liquid in the jar?
I appreciate your time
Deb
Amanda Formaro says
Just the glow stick!
Jessica M Talbi says
I think this is not a safe project. the liquid from the glow stick is full of harmful quimicals. The liquid could cause an allergic reaction to a child and adult. I like the zombie luminaries better.
Tricia Bickett says
Instead of emptying the contents of a glow stick, how would it look with an unaltered glow bracelet in the bottom of the jar?
Amanda Formaro says
I’m not sure I haven’t tried that. But that would be an easy test! If you try it, please let us know how it looked!
Barbara says
Thank’s Amanda you do such great job & sharing all so
Amanda Formaro says
Thank you, Barbara :)
Paula says
A question – what do you recommend we do with the contents of the jar after the glowstick has lost its glow? What is the best way to dispose of the contents and reuse the jar?
Amanda Formaro says
Unfortunately it would just have to be thrown away. Soak it up with a paper towel and toss in the trash.
Paula says
I wonder if you can make these with plastic “jars”? It would make a create a nice jack o lantern for kids to carry when out trick or treating, but I wouldn’t want them walking around with glass. I’d attach a handle to the lid. Just wondering, I think this is a great idea!
Amanda Formaro says
I would imagine that would work! If kids will be carrying them, I would definitely glue the lid on so curious children can’t open it.