• Home
  • About
    • About Crafts by Amanda
    • Visit Our Recipe Site
  • Work With Us
  • Join
    • Free Newsletters
    • Join our Facebook craft group
↑
  • Tutorials
    • Tutorial Index
    • Adult Crafts
    • Crafts for Kids
    • Crafts for Seniors
    • Recycled Crafts
    • Seasonal Crafts
    • Holiday Crafts
    • Free Printables
    • Craft Collections
  • Adult Crafts
    • Bath & Body
    • Beach Crafts
    • Clay Pot Crafts
    • Crafts for Seniors
    • Decoupage Crafts for Adults
    • DIY Gift ideas
    • Garden Crafts
    • Home Decor Projects
    • Kitchen Crafts
    • Light Bulb Crafts
    • Luminary Crafts
    • Mason Jar Crafts
    • Needlework
    • Photo Display Ideas
    • Recycled Crafts for Adults
    • Wearable Crafts for Adults
  • Crafts for Kids
    • Animal Crafts for Kids
    • Back to School Crafts
    • Beach Crafts for Kids
    • Camp Crafts
    • Cardboard Tube Crafts for Kids
    • Decoupage Crafts for Kids
    • Easy Crafts for Kids
    • Nature Crafts for Kids
    • Other Kid’s Crafts
    • Paper Plate Crafts for Kids
    • Recycled Crafts for Kids
    • Slimes, Doughs, & Clay
    • Wearable Crafts for Kids
  • Holiday Crafts
    • 4th of July Crafts
    • Christmas Crafts
    • DIY Gift ideas
    • Earth Day Crafts
    • Easter Crafts
    • Father’s Day Crafts
    • Halloween Crafts
    • Memorial Day Crafts
    • Mother’s Day Crafts
    • New Year’s
    • Other Holidays
    • Patriot Day Crafts
    • St. Patrick’s Day Crafts
    • Thanksgiving Crafts
    • Valentine’s Day Crafts
  • Seasonal Crafts
    • Winter Crafts
    • Spring Crafts
    • Summer Crafts
    • Fall Crafts
  • Skip to primary navigation
  • Skip to main content
  • Skip to primary sidebar
  • Skip to footer

Crafts by Amanda

crafts for adults and kid's crafts

  • Tutorials
    • Tutorial Index
    • Adult Crafts
    • Crafts for Kids
    • Crafts for Seniors
    • Recycled Crafts
    • Seasonal Crafts
    • Holiday Crafts
    • Free Printables
    • Craft Collections
  • Adult Crafts
    • Bath & Body
    • Beach Crafts
    • Clay Pot Crafts
    • Crafts for Seniors
    • Decoupage Crafts for Adults
    • DIY Gift ideas
    • Garden Crafts
    • Home Decor Projects
    • Kitchen Crafts
    • Light Bulb Crafts
    • Luminary Crafts
    • Mason Jar Crafts
    • Needlework
    • Photo Display Ideas
    • Recycled Crafts for Adults
    • Wearable Crafts for Adults
  • Crafts for Kids
    • Animal Crafts for Kids
    • Back to School Crafts
    • Beach Crafts for Kids
    • Camp Crafts
    • Cardboard Tube Crafts for Kids
    • Decoupage Crafts for Kids
    • Easy Crafts for Kids
    • Nature Crafts for Kids
    • Other Kid’s Crafts
    • Paper Plate Crafts for Kids
    • Recycled Crafts for Kids
    • Slimes, Doughs, & Clay
    • Wearable Crafts for Kids
  • Holiday Crafts
    • 4th of July Crafts
    • Christmas Crafts
    • DIY Gift ideas
    • Earth Day Crafts
    • Easter Crafts
    • Father’s Day Crafts
    • Halloween Crafts
    • Memorial Day Crafts
    • Mother’s Day Crafts
    • New Year’s
    • Other Holidays
    • Patriot Day Crafts
    • St. Patrick’s Day Crafts
    • Thanksgiving Crafts
    • Valentine’s Day Crafts
  • Seasonal Crafts
    • Winter Crafts
    • Spring Crafts
    • Summer Crafts
    • Fall Crafts
Craft Tutorials | Adult Crafts | Mason Jar Crafts | Mason Jar Wind Chime
Mason Jar Crafts

Mason Jar Wind Chime

Author by Jane and Sonja on May 28, 2024 Updated on May 28, 2024

5 from 7 votes
Create a mason jar wind chime using beautiful strung colorful glass beads and enjoy the soothing sounds as the winds blow.
Jump to Project
mason jar wind chime
625 shares
  • Share
  • Tweet
  • Flipboard
  • Email

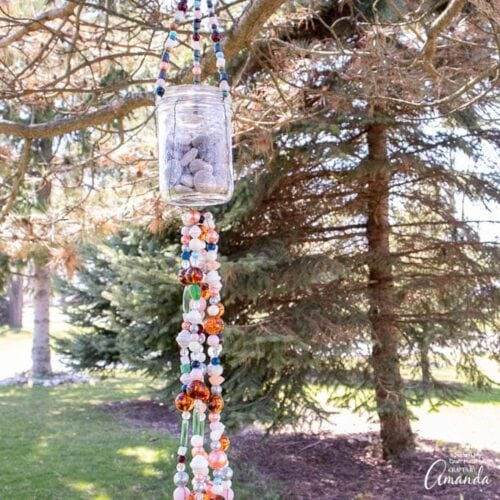
Create your own mason jar wind chime using colorful glass beads and floral wire. Then sit back and enjoy the soothing sounds as the wind blows!

mason jar wind cime


Why we love this project


This beautiful mason jar wind chime is made with colorful glass beads, a mason jar, and some floral wire. It’s the perfect project to use up your big bag of jewelry beads lying around! On top of adding a bit of personal flair to your outdoor space, the gentle sounds it makes as it blows in the wind add a touch of tranquility.

If you have a lot of leftover beads, head over to our Beaded Decorative Garden Stake for another outdoor decor project.

mason jar wind chime

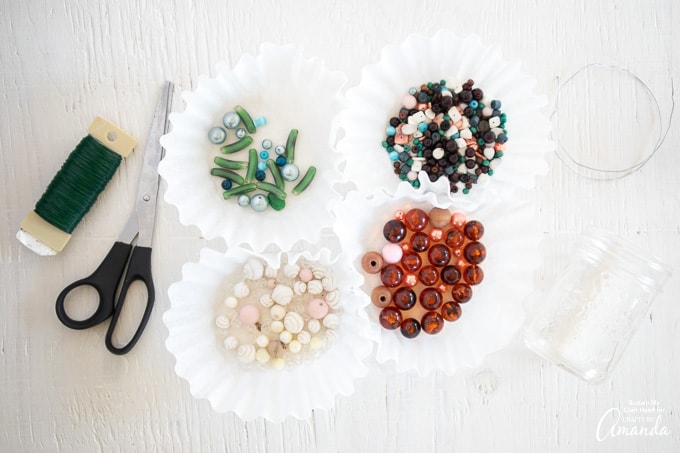
Craft Supplies You Will Need


  • Mason Jar, 8oz
  • Glass beads in assorted shapes, sizes and colors
  • Floral wire, 22 gauge
  • Wire, 12 gauge
  • Wire cutter or scissors
  • Pliers
  • Ruler
supplies needed to make a mason jar wind chime

How to Make a Mason Jar Wind Chime


Preparing the beaded strands

  1. Cut 6 pieces of floral wire 20” long.
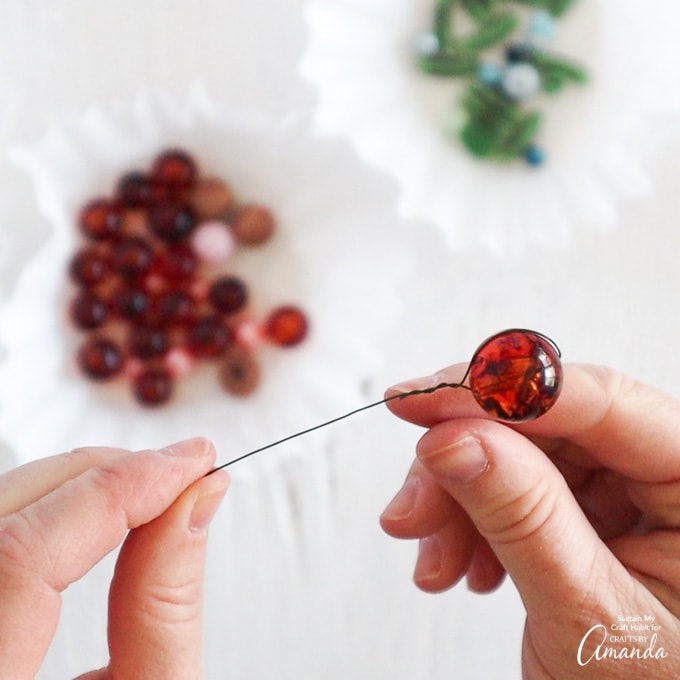
  2. Working one strand at a time, thread one of the larger glass beads with wire. Loop the end of the wire through the bead and wrap it around the other side to secure the bead in place. looping floral wire through bead
  3. Continue adding beads to the wire until your strand measures 10 ½” long. Loop the end of the wire through the last bead to secure in place. looping beads through floral wire
  4. Repeat with the remaining 5 pieces of cut wire to have 6 strands of beads in total. Put aside.
  5. Cut 3 pieces of floral wire 14” long.glass beaded floral wire
  6. Working one strand at a time, thread the smallest sized beads on to this wire. Loop the end of the wire through the bead and wrap it around the other side to secure the bead in place. adding small glass beads to floral wire
  7. Continue adding beads to the wire until your strand measures 6” long. Loop the end of the wire through the last bead to secure in place. 
  8. Repeat with the remaining 2 pieces of cut wire to have 3 strands of beads in total. Put asidefinished glass beaded floral wire stems

Assembling the wind chime

  1. Cut a piece of thicker gauge wire 18” long.
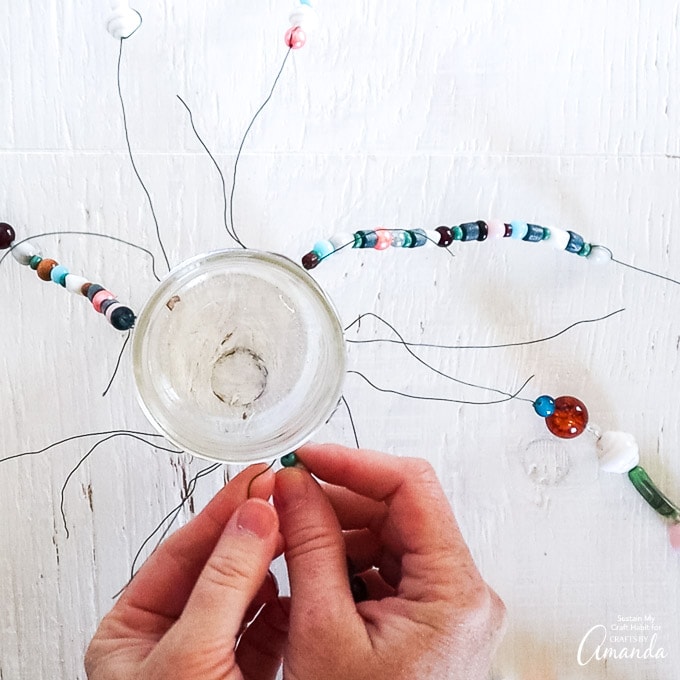
  2. Fold the ends of the beaded floral wire around the silver wire alternating the short strand with two longer strands. joining beaded wires together at the base
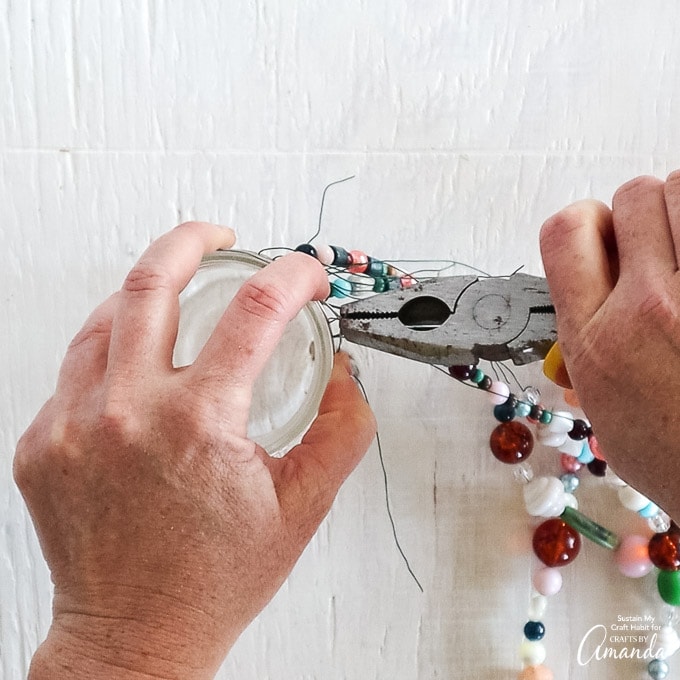
  3. Wrap the silver wire around the rim of the mason jar twice and wrap the ends together with a pair of pliers.
    wrapping floral wire around mason jar
  4. Secure the beaded wire strands to the silver wire and trim off the excess wire. securing beaded wiring to mason jar
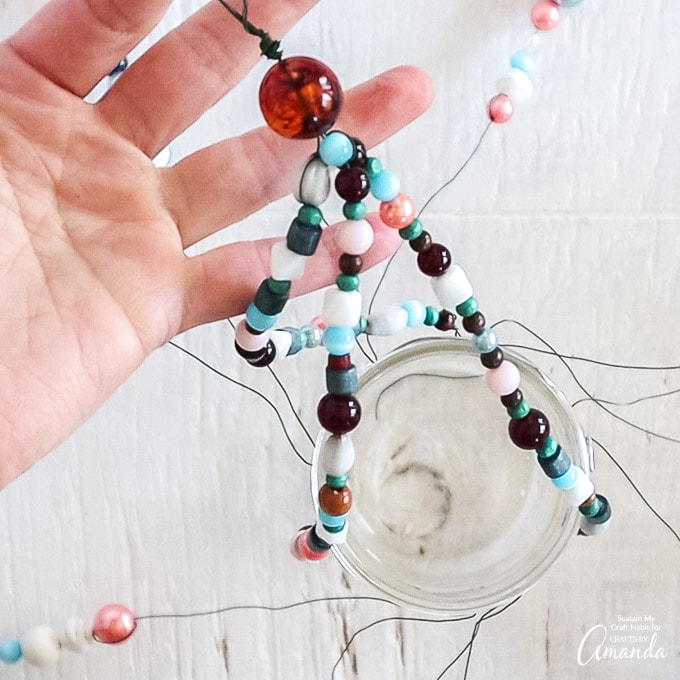
  5. Fold the shorter beaded strands upward and thread one large bead through all three wires. Next, fold the wire ends over to form a loop for hanging.beaded wire attached to mason jar
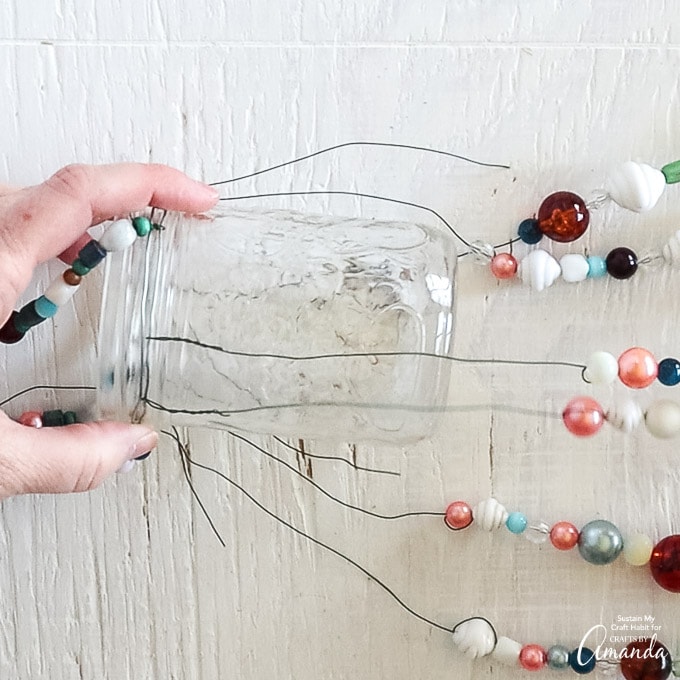
  6. Secure the longer beaded strands to the silver wire in a similar manner. Ensure you have about 1” of empty wire exceeding past the base of the mason jar. mason jar wind chime completed
  7. Cut another piece of floral wire about 3” long and wrap it around the top of the beaded strands just under the mason jar. 
mason jar wind chime

Fill the mason jar wind chime with pretty pebbles as we did here or even a small votive candle, then hang to enjoy!  I can imagine how pretty the colorful glass beads would appear at night when illuminated.

More Garden Crafts

  • Coastal Seashell Chime
  • Rainbow Button Wind Chime
  • Terra Cotta Pot Wind Chime
  • Recycled Plastic Lid Wind Chime
mason jar wind chime
Print Project
5 from 7 votes

Glass Beaded Mason Jar Wind Chime

Create a mason jar wind chime using beautiful strung colorful glass beads and enjoy the soothing sounds as the winds blow.
Age Group: Adult Crafts
Project Type: Spring

Supplies

  • 1 8oz mason jar
  • glass beads in assorted shapes and sizes and colors
  • 166 inches floral wire 22 gauge
  • 18 inches wire 12 gauge
  • 1 wire cutter or scissors
  • 1 plier optional
  • 1 ruler

Instructions

  • Cut 6 pieces of floral wire 20” long.
  • Working one strand at a time, thread the larger glass beads on to the wire until each bead strand measures 10.5" long.
  • Cut 3 pieces of floral wire 14” long.
  • Working one strand at a time, thread the smaller glass beads on to the wire until each bead strand measures 6" long.
  • Cut a piece of thicker gauge wire 18” long and wrap it around the rim of the jar, tightening with the pliers if needed.
  • Attach the beaded strands to the wire alternating between one shorter beaded strand and two longer beaded strands.
  • Secure the beaded strands in place.
  • Fold the shorter strands up and form a wire loop at the end for hanging.
  • Have the longer strands hang down and secure them together just underneath the jar.
  • Hang to enjoy!

Video

This post originally appeared here on Apr 24, 2020.

  • Author
  • Recent Posts
Follow Along
Jane and Sonja
Bloggers at Sustain My Craft Habit
Jane and Sonja are sisters, moms and lifelong craft addicts both living near Toronto, Canada with their families. They share their love of creativity, nature and coastal craft and DIY ideas on their blog Sustain My Craft Habit.
Follow Along
Latest posts by Jane and Sonja (see all)
  • Cheese Grater Owl - July 8, 2025
  • Seashell Wreath - July 1, 2025
  • Patriotic Painted Rocks - June 24, 2025
625 shares
  • Share
  • Tweet
  • Flipboard
  • Email

Filed Under: Crafts for Seniors, DIY Gift ideas, Garden Crafts, Mason Jar Crafts, Recycled Crafts for Adults, Spring Crafts, Summer Crafts Tagged With: beads, garden decor, wind chime

Reader Interactions

Free CraftsBy email every week

Latest crafts straight to your inbox!

Comments

  1. christina says

    May 12, 2023 at 2:44 pm

    Their are so many projects that can be done from recycle, your Ideas are great, sincerely, thank you, Christina

    Reply
  2. Tracy Klemens says

    April 26, 2020 at 8:12 pm

    This looks like a great project and it is so pretty!

    Reply
  3. Connie Reno says

    April 26, 2020 at 6:45 am

    LOVE your ideas

    Reply
    • Amanda Formaro says

      April 27, 2020 at 7:38 am

      Thank you Connie!

      Reply
  4. Marilyn Caro says

    April 25, 2020 at 5:07 am

    Pretty!
    Have a great day!
    Marilyn❤

    Reply
5 from 7 votes (6 ratings without comment)

Leave a Reply Cancel reply

Your email address will not be published. Required fields are marked *

Rate This Project


The maximum upload file size: 640 MB. You can upload: image, video. Links to YouTube, Facebook, Twitter and other services inserted in the comment text will be automatically embedded. Drop files here

Primary Sidebar

Hi! I’m Amanda and I’m the founder and head designer of Crafts by Amanda. I have spent over 25 years creating projects to share, but it’s not just me anymore! It’s turned into a complete family affair. Come and meet the Creative Team!

Free CraftsBy email every week

Latest crafts straight to your inbox!

All Time Favorites

Learn to make these adorable ladybug painted rocks. use special outdoor paint for this adorable garden craft so you can keep garden ladybugs all summer!

Ladybug Painted Rocks…

These colorful little ladybug painted rocks are the ... Go To project

snowy pinecone candle jar luminaries

Winter Luminaries: Snowy Pinecone…

Make pretty winter luminaries that appear to be covered ... Go To project

Make this wonderful deco mesh pumpkin wreath to hang on your door this fall!

Deco Mesh Pumpkin Wreath…

Adorn your door this fall with a pretty deco mesh ... Go To project

Reuse those empty prescription pill bottles in all sorts of ways. From organizing to making cookies. Yes, cookies! See how to use your empty pill bottles!

20 Uses for Prescription Pill…

You've been collecting prescription pill bottles for ... Go To project

Meet the Family

Amanda

Founder and Designer

Kristen

Editorial Manager

Lindsay

Social Media Manager

As seen on:

Footer

Favorites

  • Jar Photo Frames
  • No-Sew Roman Shade
  • Paper Flowers
  • How to Make a Scrunchie
  • Mermaid Slime

About

  • Home
  • Meet the Creative Team
  • Work with Us
  • Privacy Policy
  • Accessibility
  • Contact Us

Images/text copyright Amanda Formaro 2020. To feature a post from Crafts by Amanda, you may use one photo credited and linked back directly to the project post.

Free CraftsBy email every week

Latest crafts straight to your inbox!

Copyright ©2025, Crafts by Amanda. All Rights Reserved.
Design by Pixel Me Designs

Rate This Tutorial

Your vote:


To share a photo with your comment click here!

A rating is required
A name is required
An email is required

Recipe Ratings without Comment

Something went wrong. Please try again.