
Learn how to start a fairy garden of your own! Our fairy garden is made from a simple inexpensive wooden birdhouse and natural materials.

Starting a Fairy Garden
In April of 2015 I moved into a studio space. In May I planted a ton of flowers in the planter boxes under my windows. However, the planter on the left side has an awning above it which keeps it from getting any rain. Sun there’s absolutely no shortage of however, so what do you get with dry and hot? That’s right, basically sand. Starting a fairy garden was the answer.
I tried planting some flowers. They died. I watered them everyday, but it’s as if the water never made it to the roots. So I tried again. They died again. That’s when I decided it would be easier (and kinder) to put in a fairy garden where nothing else would thrive. You can see how this fairy house has held up over the year here!
NOTE: if you prefer to buy a fairy house or fairy garden, be sure to check out all the adorable options on Etsy!

I also wanted to share an amazing story with you. It’s a real life story that took place in Kansas in a little place dubbed Firefly Forest. This is an amazing video and it will melt your heart and remind you that there’s a little magic in all of us. In memory of little three year old Allie. Please watch:
Now on with the fairy garden tutorial…
Supplies you will need
- Wooden birdhouse
- Dried pods
- Twigs
- Colorful silk flowers
- Moss
- Small artificial birds
- Small terra cotta tray
- Tiny terracotta pot
- Hot glue gun
- Wire snips
If you’ve never made a fairy house, they are very easy. Start with a wooden birdhouse and use whatever elements make you happy. Fairies want you to be happy.

I’ll admit, I spent about $35.00 at Hobby Lobby shopping for this garden. I bought two bags of moss, a couple sprigs of colorful small flowers, some sort of dried pods, some twigs and of course the birdhouse.
You don’t have to spend that much, or you can spend more if that makes you smile! I didn’t use all the flowers, pods, and twigs, so I’ll be able to save them for another project. You can use things you already have on hand as well.

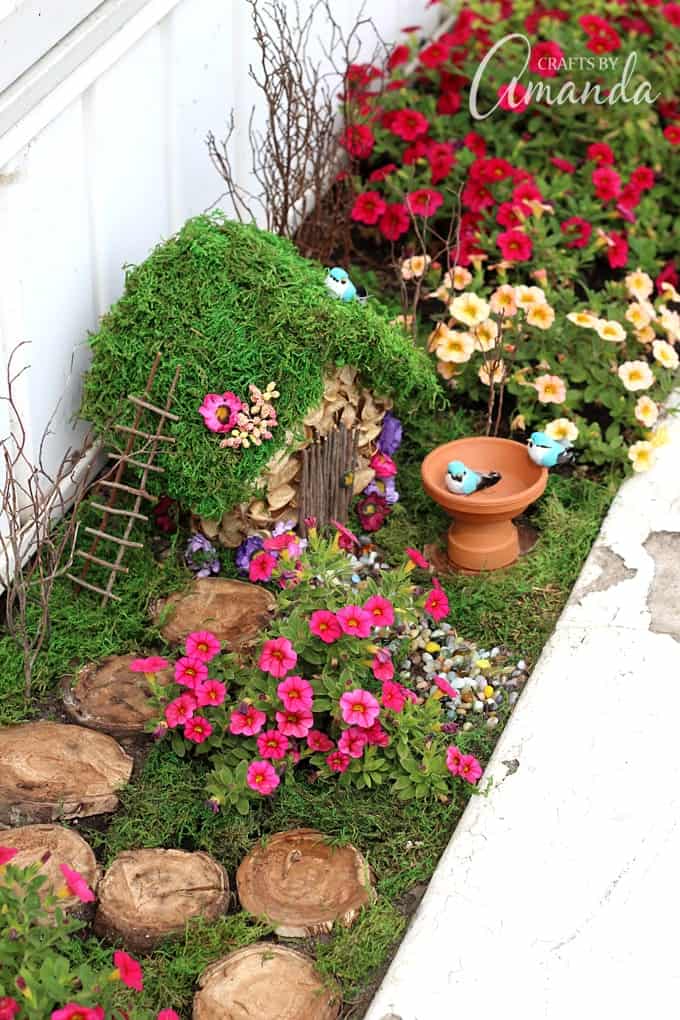
Fairies love flowers, birds, and all things from nature. Some houses, like this one, have a mossy roof while others may use flower petals or tree leaves. I’ve seen pinecone shingles as well as sticks and twigs atop their little homes. You can use what you like, just have fun and dust off your imagination.

This is what I started with. Dead flowers and some that are doing fine. So I kept the flowers that are growing and removed the dead plants.
How to Make a Fairy Garden

I started by hot gluing the pods to the birdhouse. I chose the back of the birdhouse as the front of my fairy house. This way I didn’t have to try and hide the little bird hole in the front. I glued pods to the front and both sides of the house.
To make the door, I snipped the ends of my twigs and glued them over the pods.

The doorknob is made from the center of one of the colorful silk flowers.

Next I glued moss to the roof eaves, all the way around the house. Once the eaves were covered I continued the moss onto the roof and back of the house. Note that you can purchase sheets of moss made just for putting on roofs, but I like the chunky look of the patches of moss I bought.

I finished the bottom of the house with moss as well, covering any exposed wood.
Did you notice the little ladder on the side of the house in the finished photo above?

I used more of the twigs, simply cutting two at equal lengths and cutting shorter pieces for the rungs then hot glued everything together. For finishing touches, I glued some flowers and a little bird to the house.
See, aren’t they pretty?

The little birds are so sweet, found those at Hobby Lobby as well!

I also put together a little bird bath. Simply glue a terra cotta tray to the bottom of a tiny terra cotta pot. Instant bird bath!

When I first laid it all out, it looked really cute… but felt like it was still missing something. I stuck twigs in the ground to look like trees, leaned the ladder against the house, added the bird bath, found some wood slices I had left over from this project and made a path using some tiny pebbles I had in my studio. Still, it felt like something was missing.

I still had a full bag of moss left over so I filled in all the empty spaces and it felt complete!

I think I want to live here. That door! I really do love the way my little fairy garden turned out. Who knows, I may add things from time to time or it may stay just as it is. For now, I love it.
I hope you enjoyed this project and it inspires you to create a tiny world of your own!
More garden crafts you might like
- Fairy House Night Lights
- Fairy Garden Mason Jar Terrarium
- Fairy House
- Painted Rock Garden Markers
- Watering Can That Pours Crystals
How to Start a Fairy Garden
Supplies
- Wooden birdhouse
- Dried pods
- Twigs
- Colorful silk flowers
- Moss
- Small artificial birds
- Small terra cotta tray
- Tiny terra cotta pot
- Hot glue gun
- Wire snips
Instructions
- Hot glue the pods to the front and sides of the birdhouse.
- To make the door snip the ends of several twigs and glue them next to each other over the pods.
- Remove the center from one of the colorful silk flowers and glue it on as a doorknob.
- Glue moss to the roof eaves, all the way around the house.
- Glue moss onto the roof and back of the house.
- Finished the bottom ledge of the house with moss as well, covering any exposed wood.
- Make a ladder by cutting two twigs at equal lengths and cutting shorter pieces for the rungs then hot glue everything together.
- Glue some flowers and a little bird to the house.
- To make a bird bath, glue a terra cotta tray to the bottom of a tiny terra cotta pot. Glue one bird to the rim and one inside the bath.
- Outside place your house where you want it then push twigs into the ground to look like trees, lean the ladder against the house, position the bird bath, and make a path using pebbles. Fill in any empty spaces with moss.
This post originally appeared here on Jul 24, 2015.
- Tie Dye Beach Towels - July 24, 2026
- Swirling Twirling Ladybugs - July 21, 2026
- Drip Tie Dye Backpack - July 17, 2026


gayle says
I LOVE LOVE fairy gardens and have many houses and decorations that I put in a filled-in pond….but YOUR idea is simply adorable and the PERFECT answer to my home’s side garden, where nothing ever grows! (too shady) That said – what are wire snips? small pieces of wire or wire cutters?
Cindy says
I also have a home side garden that I just made into a fairy garden. Would you be interested in sharing ideas?
Ayla says
Where can I find dried pods? I’m planning to throw a fairy garden theme party for my daughter and love the idea of making a house as a decor piece.
Amanda Formaro says
I found mine at a home improvement store in the decor section
Cheri says
This is such a great idea. I have a young neighbor that loves to make pretend fairy houses under the pines between our homes. She also likes to work in my flower beds. I think I will suggest this project to her for this spring. It will be such fun!
Denise says
Can you keep this outside all year?we live in PA so it freezes during the winter…
Amanda Formaro says
I would bring it in – I live in Wisconsin and don’t leave mine out.
Christina says
Hi i like the article but unfortunately cant read due to alk the ads. :(
Amanda Formaro says
You can close the videos and bottom ads using the X. The ads allow me to provide these crafts to you for free. otherwise I would have to charge for a subscription, which no one wants to pay.
Zachary O'Connor says
How could you like an article that you can’t read? Seems more like a passive aggressive comment due to your laziness and unwillingness to navigate the internet. A more polite comment would have been as follows; I loved the article, but I had a difficult time staying focused due to the ads and their page placement. Maybe you (the author) could look in to an alternative webpage layout to better suit your readers, but also give the ads the space they need.
Lucinda says
I love your fairy house! I make small fairy gardens in pots and flower boxes as well. It’s fun to switch them up and give them a new look from year to year.
Buske Azariah says
That ideas brilliant. I bet it is fun. Keep staying bright Lucinda!😋
Marilyn says
I think I would probably love some of your crafts, but there are way too many ads to read your site. Wish it were not so. I thought about joining the ‘get your own blog deal’ but when I saw your blog with all these ads I decided it is not for me. Thanks anyway.
Amanda Formaro says
Hi Marilyn! Thanks for your feedback. I always appreciate hearing from readers, whether it’s positive or not. Have a great day!
Karen says
Was wondering what people would suggest to use for ground coverage for my large outdoor fairy garden. I am in the process of getting all
the old mulch out and need to put someyhing down to conain weeds but be able to support all the figures. Any ideas? Would moss hold up? What kind do u suggest?
Jean says
Hi Amanda,
Just love your bird fairy garden! So cute! Question: Did you have any problems with the preserved moss getting mildew? I’m designing my first miniature garden (indoor) and I’ve read that the preserved moss will mildew if combined with live plants (since the live plants need to be watered and the preserved moss is not alive). Thanks!
Amanda Formaro says
Hi Jean! I didn’t, but only because I switch mine out each year with new materials. The moss wasn’t there long enough to mildew.
Chris Wiltfong says
Hi.I have never made a fairy garden so I have a stupid question.Are the flower bushes in the garden real or fake?
Amanda Formaro says
Hi Chris! Those are actually real, I placed my fairy garden in my flower planter box with my flowers :)
Rachael says
Where did you find the colorful pebbles that form the pathway to the front door of the house?
Amanda Formaro says
Hi Rachel. I actually found mine near the vase filler at a home improvement store. You can check craft stores and look near the vase filler and the beach craft supplies (near the stones and pebbles). You can also use aquarium rocks! :)
Debra Bailey says
thank you for the Allie (little owl) story video it brought me to tears. Our first grandson died when he was 5 days old, his name was Zachary. My daughter was his mother and had a daughter 18 months old when he was born, which was good because after his death she was told not to have any more babies, her girls would carry the problem & pass it their children & her boys would all die like Zachary. Zachary would have been 25 this year on July 29, had he lived.
Amanda Formaro says
I am so sorry for your loss, Debra :( That is heartbreaking to hear. Thinking of you and the family!
Nancy says
I have started a fairy garden outside, in a small area that gets mid-morning and early afternoon sun. And no protection from the rain. I needed my fairy house to be weather resistant, I loved your photo but was afraid hot glue would melt and pods/moss would not last the season. So I plan to make my fairy house from a large terracotta flowerpot, covered in a variety of small stones, and a purchased resin door. Needed a weather resistant glue, a new product from Elmers was recommended over Gorilla glue- It doesn’t dry nearly as fast as the hot glue, so attaching the stones to the pot will be a slow process. Can’t wait to finish this and add it to my garden. Also painted some mini clay pots, to resemble toadstools. (Loved your wooden bird house/ pod/ twig/ moss creation, so saving that for an indoor project with my grand- daughters. Thank you for sharing that!)
Amanda Formaro says
Nancy, your fairy garden sounds adorable! Be sure to let us know how it all came out :)
Sharron says
That is something I will not kill
Shari says
My littlest one has been wanting to build a fairy house in our yard. I’ve seen many people use those moss sheets. Since you seem to have set up yours outside, I was hoping you could tell me how it held up to the elements.
Amanda Formaro says
The moss will do ok outside, however if exposed to the sun it will definitely fade. I replaced mine after the first season.
Bobbi Convery says
This is so lovely, and the tutorial is so easy to follow. The video makes the whole thing magical.
Amanda Formaro says
Thank you, Bobbi! :)
Olivia says
The video it was amazing that was SO sweet
GAIL FRANCOIS says
I really enjoyed watching the video, thanks for sharing.
It’s amazing how many lives were touched by this little Firefly Forest and all its wonderful inhabitants.
Linda says
Hi, I wanted to thank you for providing the link to that amazing video. I cried as it touched my heart. I am saddened that the family that put the fairy houses in the forest had to take them down. It seemed like it gave them purpose through a tough time. Thanks Linda
pascal pirate says
I think your garden looks awesome. Did you think about a succulent? Some of them are very pretty and would like nice in a fairy garden.
Amanda Formaro says
Yes actually! This post is from last year, but I just planted my flowers for this year and cleared out the fairy garden planter. I bought some succulents and plan to go back and get more :)
Donna says
so do you not still have it?
Amanda Formaro says
Yes I still have the fairy garden :) I am redoing the roof on the fairy house and have the succulents waiting in my studio. I will probably plant this afternoon or tomorrow. I will do a new post with the updated pictures!
Cheri Hins says
Absolutely love it. I’ve been wanting a fairy house, now I know how. Thank you so much
Doris Calvert says
How cute is that, totally love it!! I am not a crafty person because I have no imagination but wish I did, if I coud buy it already made I would Thanks for sharing.
Sandra says
I want to thank you so much Amanda for this page. It has given such great ideas on how to create a fairy house and garden for my granddaughter.
Thank you again so much.
Sandra
Amanda Formaro says
Thank you Sandra! :) Hope you have fun!
MARY says
i ALSO DO THIS IN MY GARDEN. BUT YOU HAVE TO REMEMBER THAT IF YOU USE A HOT GLUE GUN DO NOT LEAVE IT IN THE HOT SUN BECAUSE THE GLUE WILL MELT AND ALL YOUR STONES OR WHAT YOU HAVE USED WILL FALL OFF…. I LEARND THIS THE HARD WAY.
Buske Azariah says
Aw… that must have been upsetting. My daughter figured that out too. She was only six… I was whiting her and helping her. And when we went to check it out…
Also why don’t you like the project? 3stars?
There’s a website called easy Peasy and fun. They charge you to figure out how to make stuff. Craftsbyamanda.com is my fav rote website thank you so much
Michelle says
Oh that little fairy house is so, so cute. OMW!!! You did an amazing job <3
Amanda Formaro says
Thank you Michelle!
Marie says
I love, love, love your fairy garden, it is so adorable. This will definitely be a project to do with my granddaughter this summer. We have an old sandbox that we just may convert into a fairy garden. Thanks for the great idea and instructions.
Robin P says
Where do you find these tie dried natural botanicals? I’ve looked at the dollar tree and Walmart and hobby lobby and cannot find them and I like the way they luck on this house? I love your Facebook page…… Thank you in advance…
Amanda Formaro says
I found them at Hobby Lobby. I have tried to find them online but with no luck. The package just says “exotic dried natural botanicals”
Tricia says
Love it! I can’t wait to make something like this with my daughter this summer.
fenny says
hi where do you put this garden at ur home?
how long will it Last?
I mean if it got dusty how to clean it?
do you have samples on making it a really garden with really flowers?
Amanda Formaro says
Hi Fenny. Mine was in a window box that had an awning, so when it rained it actually didn’t get wet. If you put yours outsie, I recommend that it be in a spot that is sheltered from the rain.
sgrmse. says
this is tooooo adorable!! :D :D :D i can’t stop reading and re-reading!
June says
This year, a fairy house for me! I live in Louisiana, hot and wet and humid. Has anyone made a house that stays outside? What material should be used? I’m thinking of trying to get real moss to grow on the wood, just an idea.
Sharon says
I love this and want to create it in my tiny yard but what happens to it when it rains??
Amanda Formaro says
Mine was protected by an awning, so I can’t guarantee what would happen in the rain. It should be placed in an area that is fairly protected. Use plastic figurines and silk flowers, those won’t be damaged in the rain.
Bev N. says
This is really cute. I think it’s a project I can do with my granddaughter. I may put it in a container so she can enjoy it all year long.
Thank you for the how to.
Amanda Formaro says
Thanks Bev, I hope you have fun!
Pam says
That is what I plan to do as well ? My granddaughter will love it!
Angela says
How do you keep this from weathering?? You just re-do it every year????? I have the bird house and interested in this… I also have a wine barell that is sitting empty…. this would be awesome…
Amanda Formaro says
Hi Angela. I plan to take mine inside at the end of the season. i have an unusual problem actually, I have “digger wasps” also known as “cicada killers” digging up everything in my fairy garden! But to answer your question, I am assuming this will fade by end of season and I will have to redo it, reglue things, etc.
Looie Jackson says
Love your fairy garden, I don’t have a green thumb, so would be perfect for me. I’m from Wisconsin, in the upper peninsula there is a cabin type house with grass on the roof and goats. May put a goat on my fairy garden cabin roof too.
Amanda Formaro says
Ha! I love that!
Linda says
So what happens when it rains?
Amanda Formaro says
Hi Linda. For my garden the rain doesn’t hit it because of the awning over the top. It’s actually the reason I put the fairy garden there to begin with, because I had trouble growing the flowers in such a dry area! For something you plan to make, you will probably want to find a dryer area, I can’t guarantee how this would fair in the rain.
Amna Majeed says
Ur fairy garden is awesome…….so beautiful ……I m mother of three cute kids……..but after watching ur fairy garden, I m felling just like kid….when I was kid I liked fairies……tiny houses….tiny tree…..u reached me back that time….ur work is fantastic .
Amanda Formaro says
Thanks so much Amna, so nice of you :)
Sofie says
Where can you get dried pods from in England do you know?
Amanda Formaro says
I would check with garden centers, craft stores and floral departments. Any type of dried seed, pod or shell will work!
Fatima says
That door that ladder that bird this all is so dreamy i wish to be a dwarf and start living my own life their its just so beautiful , thank u for sharing such lovely thing , this mad my day i am feeling happy from inside i dnt know why.
Amanda Formaro says
Thanks Fatima, that’s so nice of you!
Mary says
It’s cute to look at, but where do the fairies enter their home? No open windows or doors! :)
Amanda Formaro says
Fairies are magic. They don’t need open windows and doors ;)
Pam says
LOL!! Good answer!! ?
Donna Holmen says
Love your fairy house! My teen and I have recently purchased a couple of items as we are going to build a couple in our yard. Thank you for the ideas! Since we are just starting out, I didn’t know about the moss but I love the look it gives and it makes sense. Also, at Hobby Lobby there are little fairy charm items in the jewelry section that can add some charm if they have the right look. Our fairy houses will be a little more hidden. Thank you for the ideas!!
Amanda Formaro says
Thanks Donna! Thanks for letting me know about the jewelry section, I will definitely be checking there on my next trip :)
Lee-Anne says
I live in Australia, and with the winter trees died off, I’ve found a lovely little nook, just right for a fairy garden like this. My kids are all teenagers now, but 1 is still very into fairies.. I’m thinking a special Mother/daughter weekend could be coming up? We may even include a tinkerbell movie marathon.
Thanks for the inspiration and to whoever shared this on FaceBook! FaIrY kIsSeS tO yOu… XxXxXxXx
Amanda Formaro says
Sounds like such fun Lee-Anne!
Suzie P. says
LOVE the house – it’s super cute! I am inspired by this – the picture of the weeds really did it for me as I have a little spot just like that and never knew how to fix it. That said, I can’t find any dried botanical pods or seed pods anywhere locally or online. Clearly I’m searching for the wrong thing. I like the texture of those, as well as the color. Can you tell me what to look for (what they are called), or even better, where you got them? Closest thing I can find are dried flowers, and those aren’t durable enough to live outside.
Amanda Formaro says
Thanks Suzie! The ones that I used came from Hobby Lobby. You are not the first person to ask about these so now I wish I had paid better attention to where exactly in the store I found them. I know they were in the floral department, and they are pictured above in the photo of the supplies. There’s no bar code or anything, and I wasn’t able to google anything either, but the clear plastic container says “exotic dried natural botanicals” and they were marked at $5.99, but all florals were on sale for 50%. Not that that matters in your search LOL Hope that helps!
Lynn says
I live in mid NY. Do you bring this in during the winter? I’m thinking yes as the snow would ruin everything. I LOVE this! Think I will start crafting it this winter for the spring!
Amanda Formaro says
Yes, I do plan to bring them in for the winter. I’m guessing I may need to replace the moss after this summer, but I will definitely publish an update on this post at the end of the season.
Jennifer M says
I fell in love with your Fairy Garden and was so happy I could print the instructions (very easy to follow btw) but no picture of your garden printed, so I copied and pasted a photo of your completed garden. I surely hope that I haven’t infringed on your rights as it clearly shows your title in the picture. I find it easier to follow the directions when I can also refer to a finished product. Of course mine will have my own colors and touches so it won’t look exactly alike. I’m so excited to start but also thought about being able to bring it in to preserve it from our serious Iowa winters. I decided a small piece of plywood would suit perfectly as I’ll be using moss and other things to cover the wood. So my other question is: does your garden cover the entire window box and roughly how long is it? Just want to say how much I enjoy your posts!
Amanda Formaro says
Hi Jennifer Totally fine on the picture. I’ve actually just changed my printable versions so that a small photo now prints with the instructions as well. :) Wht a great idea with the plywood, very smart! That wouldn’t have worked for me since I had to work around some live flowers, but it’s brilliant! And my fairy garden does not cover the entire window box, I just put it in the area where nothing would grow. But that means the fairy garden is surrounded by real flowers :) <3
Suzie P. says
This house is super cute! Can you tell me what those seed pods are called, or better yet where to find them? I’ve looked locally and online and can’t seem to put my hands on anything that even resembles seed pods or anything that might work. I’m trying to create my very own fairy garden – the “before” pictures of the weeds inspired me to fill in an empty space in my garden!
Amanda Formaro says
These remind me of those cotton plant type pods, but they are actually dried flowers or something. They are hard and pretty sturdy. I replied to your other comment about where to get them :)
Allison says
I believe those are the dried petals of a money plant.
Zara Littley says
actually it’s just uncounted, beige coloured popuri, you can buy online or at IKEA
Irene says
I love pistachio nuts and am always wondering what to do with the shells .. if you still are having trouble finding suitable seed pods, I wonder if they might be a suitable alternative?
Amanda Formaro says
That’s a great idea Irene!
Susan says
Hello,
Love the fairy garden . Did you use livíng moss? How did it cope with the glùe?
Thank you.
Susan
Amanda Formaro says
Hi Susan! The package says “preserved moss” :)
Arshiya says
Hi. Lovely beautifully made. I’ll make it for sure. Amanda can u help me with some things. Need to know if all this used is artificial?? Or real too.. As moss if grows wld b my question.
Amanda Formaro says
Hi Arshiya :) The bag of moss says “preserved moss”, I bought it at Hobby Lobby. It looks real, but I’m afraid that’s all I know. I did find this:
“Preserved moss is dead, no amount of moisture or tender care is going to bring it back. It is often treated with chemicals and dyed for decorative use.”
Hope that helps!
Linda says
I have one in my flower bed right beside the door. I call it gnomeville dince l have little gnomes all around. I too couldnt grow anything there. But now weeds are growing. First year Tried round up. Second year Tried newspaper covered with weed control screen. Dont know what to try next. I just know l love my gnomeville !
Amanda Formaro says
Weeds are such a pain! Have you tried the landscape screen they sell at home depot?
Gale says
Try a very thick layer of newspaper and cover with the landscape plastic. I put pine bark on top of that, anchored it down and waited. I actually kept it down two seasons because I was trying to kill a 12 x 12 foot square of “bear grass” with bulbs as big as a baking potato! When I pulled off the plastic there was nothing there but the richest dirt I’ve ever seen. Roots, newspaper and those huge potatoes totally gone!
Gayle Borovian says
Hi
I know you posted “a long time ago” ….but just wanted to let you know that I use artificial grass which is inexpensive indoor/outdoor carpeting under my fairy & gnome garden displays and it works beautifully!!! I had the same problems you did. You can purchase this artificial grass in lots of places and I sell it on my FairyDelights ETSY Shop. You can cut it to the exact size you like with regular scissors, the water goes right through the artificial grass and it just looks fantastic. Since you can cut the grass, you can place real plants where ever you like & with the water going right through the artificial grass – the plants get rain ‘watered’. PLUS it blocks weed growth :-)
Best of luck!
Gayle
Amanda Formaro says
Awesome, thank you so much for that tip!
Beth Vitagliano says
Like your simple to use and fun to make ideas! Thanks!
Amanda Formaro says
Thank you Beth!
Barbara says
I really like this fairy garden! Will have to make me one! Thanks!
Amanda Formaro says
Thanks Barbara, I’m glad you like it and hope you get to make one :)
MeLisa says
Amanda, Sorry to ask a silly question, but it’s ok for this to get rained on?
Amanda Formaro says
I would be concerned about it getting wet. I would only put this in a location that is sheltered or doesn’t receive much rain. Mine is in a window box, but that box is covered by an awning. Actually as I stated in the post, the main reason I did this was because that window box doesn’t get the rain so the flowers always die. :(
JoAnn says
Thanks for all your ideals just love them I’m making my own fairy gardens I have enjoyed your Craft’s and ect. Thanks Amanda
Chris says
ADORABLE. Cutest thing I’ve ever seen. Thanks.
Amanda Formaro says
Thank you Chris!
Mehreen says
Thank you so much for your wonderful art crafts
I’m really enjoying. I’m kindergarten art and craft teacher so it’s help me lot
Thanks.
Mehreen.
Amanda Formaro says
Thank you Mehreen, so glad you are finding ideas here!
Kim Daves says
Love this iam trying to do one myself with the mini outdoor furniture with a grill cooler table chair and a lamp lol. Trying to grow my own stuff plants grass. So its better to hot glue than supper glue I using skewers trying to .make a gazebo for mine it keep falling apart. Thanks I’ll try hot glue. Love the stuff you post hugs God bless you
Amanda Formaro says
Sounds like fun Kim! :)
Jan Boerema says
I love fairy gardens and have one inside. Made from a new oil pan people catch oil in when changing oil. I put dirt in it and a couple of small fairies, used small miniatures I have around the house, one earring that’s a flower, tiny mouse and stones for a pathway. Also used slices of wood – make a table from wood too. It’s fun and one can be as creative as their minds allow them. I put a baby tears plant in and it has taken off! Need to trim if often, Some small plants work well but water once a week or as needed….have a jade plant in there too……love it, and thanks for your ideas – may add a house to mine too.
Amanda Formaro says
That sounds awesome Jan!