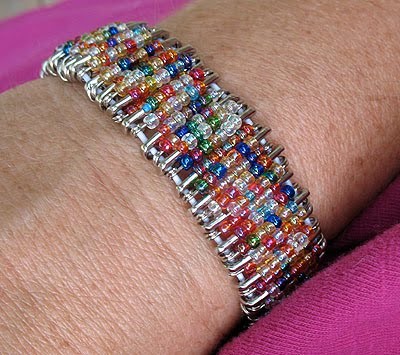

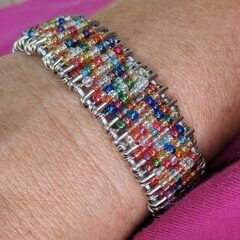
My daughter came to me one day and said she saw these really cool bracelets made from safety pins and beads. As luck would have it, I had just seen one as well so I promised to make her one. She wanted one made with smaller pins than the one she had seen, so I bought 3/4″ safety pins for mine.
Notes: Make sure you do the needle nose plyer step, don’t skip it. I was walking through WalMart and felt something poking me. I discovered that two pins on my bracelet had come open, all the beads had fallen off, and then were stabbing me as I walked. Also, made sure you get cord that will fit properly through the safety pin head and bottom. I used elastic beading cord.
Safety Pin Bracelet
3/4″ safety pins
Elastic beading cord
Seed beads
White craft glue
Toothpick

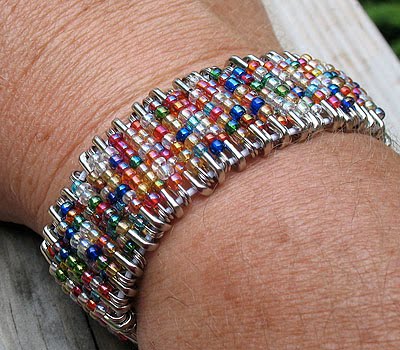
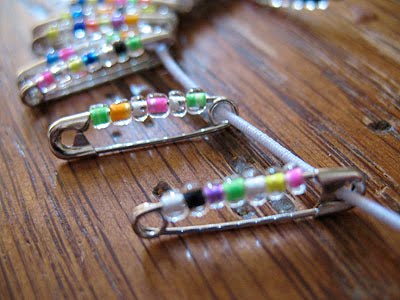
Open a safety pin and thread as many seed beads on as you can, leaving enough room to close the pin. Fasten the pin and squeeze it together using needle nose pliers to keep it from opening. Continue this process until you have enough pins for your bracelet.
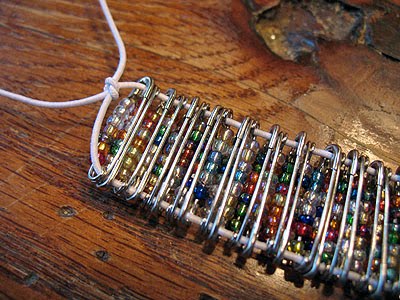
Cut two pieces of elastic beading cord, about 12″ long each. Line them up evenly and loosely tie together at the end. This is just temporary so that your pins don’t fall off the other end as you thread them on.
Thread one of the cords through the head of a pin, then the other cord through the bottom of the pin. To ad the second pin, reverse it, so that your pins alternate, top, bottom, top, bottom. Be sure that the beads are all on the same side as you work or you’ll end up taking a bunch of pins off and starting over (trust me on this ha ha!).

When you have enough pins to create your bracelet, remove the knot from the tied end. Bring the bracelet together to create a circle.
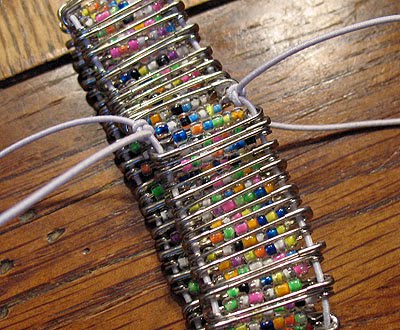
Tie the top cords together and the bottom cords together. Trim all but about two inches off the cords. Tuck remaining cord into the underside of the pins and add a little bit of glue. Let dry.
Another fun project kids love are these popsicle stick bracelets!
Safety Pin Bracelet
Supplies
- 3/4 " safety pins
- Elastic beading cord
- Seed beads
- White craft glue
- Toothpick
Instructions
- Put some glue on a paper plate, about the size of a quarter.
- Open a safety pin and thread as many seed beads on as you can, leaving enough room to close the pin. Dip toothpick into the glue and use it to add a dot of glue to the end of the pin, then fasten. Continue this process until you have enough pins for your bracelet.
- Cut two pieces of elastic beading cord, about 12" long each. Line them up evenly and loosely tie together at the end. This is just temporary so that your pins don't fall off the other end as you thread them on.
- Thread one of the cords through the head of a pin, then the other cord through the bottom of the pin. To ad the second pin, reverse it, so that your pins alternate, top, bottom, top, bottom. Be sure that the beads are all on the same side as you work or you'll end up taking a bunch of pins off and starting over (trust me on this ha ha!).
- When you have enough pins to create your bracelet, remove the knot from the tied end. Bring the bracelet together to create a circle. Tie the top cords together and the bottom cords together. Trim all but about two inches off the cords. Tuck remaining cord into the underside of the pins and add a little bit of glue. Let dry.
More you might like from me:
Make Tie Dye Wall Letters
Ladybug Baseball Hat
Decoupage Light Bulb Birds
More cool stuff from the interwebs:
Pony Bead Safety Pin Bracelet – from Making Friends
Making Beaded Safety Pins – from Family Crafts at About.com
Safety Pin Belt – from …love Maegan
- Swirling Twirling Ladybugs - July 21, 2026
- Drip Tie Dye Backpack - July 17, 2026
- Mini Coastal Clay Houses - July 14, 2026


Susie says
What kind of elastic beading cord do you use? The kind I bought won’t stay tied. Did you have that problem? If so, how did you resolve it?
Amanda Formaro says
This is the type we used https://amzn.to/3r8ushO
RaD says
I actually did this when I was a teenager! Crazy how things come back around in popularity!
Amanda Formaro says
Yes! It’s definitely a vintage craft :)
Jennifer says
My question is how do you keep the safety pin
from cutting the cord on the closed end?
Amanda Formaro says
Hi Jennifer. Adding glue to all the pins keeps them from poking anything :)
Dawn roll says
I like to make some thing new and i love crafts to
Gail Plaskiewicz says
I’ve also found out that the package of safety pins I bought are all not the same size! Now I probably won’t have enough! I bought them at the Dollar Store and they all looked the same size until I opened them up. I can’t wait until I get this done so I can see how it looks and if I should make anymore. I didn’t know they came in different sizes in a package. Who knew I would have so much trouble on a kids bracelet? LOL
Gail Plaskiewicz says
I still don’t know how many to use. I’ve heard people say 80, and then some say 100. They also said you might need more or less depending on the size of your wrist. How big was your daughters wrist and how many did you use? My wrist is 6 1/2 but I would also like to try 7 or 71/2 for gifts also. I don’t know how many I’ve already done but it’s not close to 80. Thanks for any help you can give me.
Gail Plaskiewicz says
I’m reading all this and I think I get it. I am making one for me right now. My wrist is 6 1/2 inches. I’m guessing this will fit once I get all the safety pins on. What I think I am trying to ask is what if someone has a 7″ wrist or 7 1/2 inch? How do you measure a wrist if you are making one for a gift? How big was this one, what sized wrist did it fit? How many safety pins are there? Is it comfortable to wear? I’m thinking I may need to buy some more for mine and for a bigger one. This is so cute and is a way to use my seed beads.
Amanda says
Sorry I didn’t get to this right away! Did you get this figured out?
Sherry Hays says
So glad I found this! My grandson saw them and wants to make one for his mom for Christmas. I made these as a girl, with my girl scouts when my daughter was young & now with grandkids! Thanks for making it easy!
Linda says
That was realy cute I have been looking for safetypin crafts and yours was the first I found. My grandaughters will love then thanks so much. Linda
Amanda says
That’s great Linda, hope you have fun!
vera .m says
the pattern for denim braaelet w/ fringe & safety pins
Aurora says
Thank you for your information. You are the first one to say how you tie the ends of the cord. I couldn’t figure that out. A friend of mine was using the elastic 3/4″ wide material; putting the pins on that to make the bracelet. Thanks Aurora
Amanda says
You’re welcome Aurora, so glad it was helpful!
Vicki Hillhouse says
Amanda,
I just made my first safety pin bracelet! It was fun to make and turned out really cute. I teach middle school Home Economics and I am sure this will be a big hit with the kids! Thank you so much for sharing.
Amanda says
How fun, thanks Vicki!
Sue McEndree says
Amanda, Instead of using glue to secure the pins, I use a pair of needlenose pliars & pinch the ends of the pins together after I close them.
Amanda says
Sue that is so smart! Thank you for that tip, I will add it to the instructions!
Natasha from Indiana says
I use to make these all the time as a kid. They are a great project when you get grounded!
Amanda Formaro says
Ha ha, I bet!
Anonymous says
Thanks for the steps:)… YOU ROCK!!!
Serena@TentarNonNuoce says
you know, i made i lot of these when i was a kid :) maybe i'll start doing some again :) i had almost completely forgotten about them and this post reminded me of them :)
i hadn't noticed you had a craft blog, very very nice, useful, interesting and well done :) i really love the tea bags for valentine's day that you posted a while ago
Sere
Terri says
this beaded braclet is a fantastic idea… could be used in nursing homes too for the more active elders there .. i had dont a braclet similar to this eons ago of the flag.. when getting ready for the 4th of July .. so yea there are many such holidays ppl could celebrate with using this fine idea in bead making .. enjoy ya’ll… cheers !
Terri says
dont= done lol pardon my typos.. its 3:58 am here lol
Anonymous says
sweet and it is verey pretty but i do not have safety pins have any bracelets out have paper clips i can make
Amanda says
Thank you! ;)
Anonymous says
i like your bracelets (and reading ….books take me places)
Amanda says
Thanks Nan!
Chica – LOL! I burn myself with my glue gun all the time too. Occupational hazard??
Thanks Maegan!
...love Maegan says
awe, this is adorable and so reminds me of when I was a kid. We all had em! …and thanks for the mention ;) Happy Weekend!
Chica and Jo says
I would so be bleeding by the end of this project! I can't even operate my glue gun without getting injured! What a cute bracelet.
Nan says
Love the idea, I can finally have a bracelet small enough for my wrist!!
Amanda says
Thanks for all of your kind comments!
Threeundertwo says
This is great, thanks for the tutorial! And thanks for linking up to Finished for Friday.
AmieAnn says
Om Gosh! It brings back memories of making pin and string bracelets that I had forgotten about! I'll have to share these with my daughter!
creativejewishmom/Sara says
Hi Amanda, I've been wanting to make these for years! Maybe with your help I'll get to it…a great project for a group of girls! Thanks for sharing on Craft Schooling Sunday!
Chris says
How fun. We used to make these when I was in elementary school. I'd almost forgotten them. Now I have a fun idea to do with my daughter. Thank you.
Jennifer Juniper says
I'm with Wendy! I remember making these and calling them friendship bracelets – each bead color stood for something, but I can't remember what…
Wendy says
Ha this totally takes me back…. we use to wear beaded safty pins on our shoelaces. :) Fun bracelet!
Linda@Coastal Charm says
Amanda,
Such a cute bracelet…thanks for sharing it!
Blessings,
Linda
Amanda says
Great idea! So cute! Found your blog from Metamorphosis Monday. I'm your newest follower!
Amanda
http://notyetinvented.blogspot.com
Erin says
My daughter will LOVE this! Thanks for the tip on glueing the pins closed. I probably would have forgotten that step. Can't wait to make this!!!
http://www.makingmemorieswithyourkids.blogspot.com
couture unraveled says
very cute bracelet!! I have 2 girls that would love to make these! Thanks!
Martha layne says
Loved it
malia says
hi amanda– great craft idea… you are such a good mom to just dive in and make it happen for your daughter!