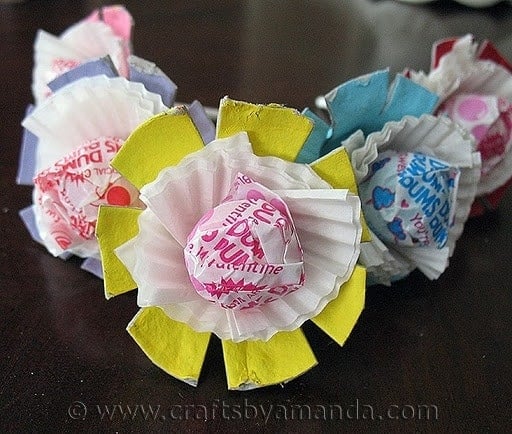

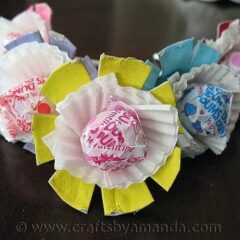
Using cardboard egg cartons, some paint and mini muffin pan liners, make these cute lollipops with your kids. A great way to hand out Valentine’s with a personalized touch. Fun as grandparent gifts, teacher gifts, or for your babysitter or neighbor too!
I realized that since Kaboose is working on their website and I haven’t been making anything for them lately that I haven’t been making any kid’s crafts! So I decided to remedy that today and came up with this fun Valentine craft you can make with your little ones. Have fun!

Egg Carton Lollipop Flowers
Cardboard egg cups
Acrylic paint
Mini muffin pan liners (2-4 per flower)
Lollipops
Tape if needed
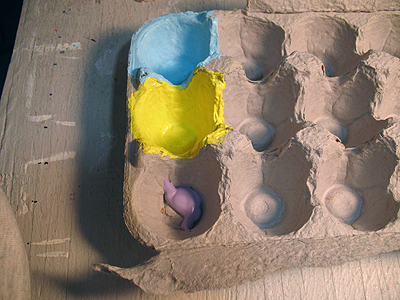
Paint the cardboard egg cartons inside and out. Use fun colors like yellow, pink, red, purple and light blue. Let dry. When dry cut out and trim.
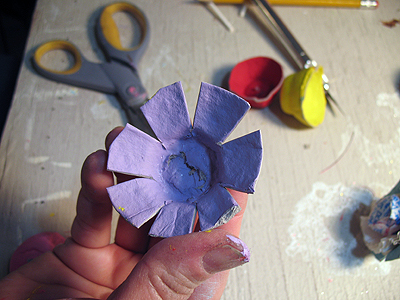
Cut slits in egg carton and fold downward to create petals.
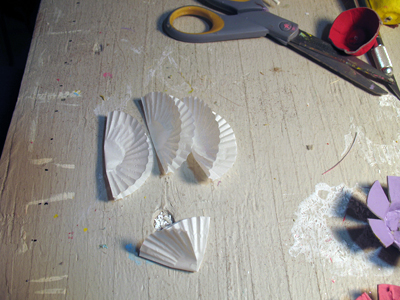
Fold mini muffin liners in half, and in half again. Use a toothpick to carefully poke a hole in the liner, going through all layers, about 3/4″ from the pointed tip.
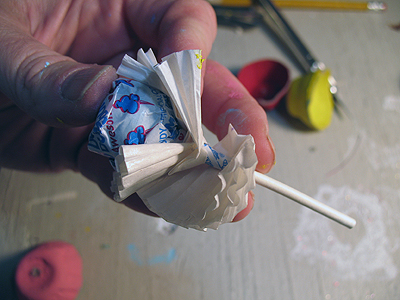
Carefully poke the lollipop stick into the hole in one of the folded liners. Repeat three more times, using four liners for each flower. You can also just fold them in half and use two instead, which may be easier for younger children.
Grown ups should carefully poke a hole in the bottom of the egg cup. Insert the lollipop stick through the hole, bringing the egg cup flower as far up as it will go. They should stay in place on their own, but if you have any that are not cooperating, simple secure the lolli stick with a bit of tape.

More Valentine’s Day Crafts
Valentine Egg Carton Lollipop Flowers
Supplies
- Cardboard egg cups
- Acrylic paint
- Mini muffin pan liners 2-4 per flower
- Lollipops
- Tape if needed
Instructions
- Paint the cardboard egg cartons inside and out. Use fun colors like yellow, pink, red, purple and light blue. Let dry. When dry cut out and trim.
- Cut slits in egg carton and fold downward to create petals.
- Fold mini muffin liners in half, and in half again. Use a toothpick to carefully poke a hole in the liner, going through all layers, about 3/4" from the pointed tip.
- Carefully poke the lollipop stick into the hole in one of the folded liners. Repeat three more times, using four liners for each flower. You can also just fold them in half and use two instead, which may be easier for younger children.
- Grown ups should carefully poke a hole in the bottom of the egg cup. Insert the lollipop stick through the hole, bringing the egg cup flower as far up as it will go. They should stay in place on their own, but if you have any that are not cooperating, simple secure the lolli stick with a bit of tape.
Below is a list of craft parties I link to each week. There’s lots of creative talent out there, check them out :) |
||
Craftomaniac Monday
|
Hookin’ Up with HOH
|
Weekend Wrap Up
|
- Swirling Twirling Ladybugs - July 21, 2026
- Drip Tie Dye Backpack - July 17, 2026
- Mini Coastal Clay Houses - July 14, 2026


maggy,red ted art says
These are super cute and such fun!
Thank you for sharing on Kids Get Crafty!
Maggy
Anonymous says
very nice!
Amanda says
How fun!! Thanks so much for sharing those with me, they came out so cute. I LOVE the daffodil twist!
Kristen Turkosz says
I made these for a party I had yesterday and everyone loved them! They looked so cute displayed in a vintage jar. Thanks for the great idea!
http://saltandpepperkristen.blogspot.com/2011/03/daffodils-for-spring.html
Michelle@ A Full Cottage says
I love this!! I just made these for my son to take to school today. They came together quick and easy and they look so stinkin cute!!
:) Michelle
Rachel {BubblyNatureCreations.com} says
this is so economical and cute!
Please share this over here: http://www.bubblynaturecreations.com/2011/02/project-party-weekend-flavored-lip.html
We would love to have you join us!
RecycleCindy says
Cute stuff and a fantastic way to recycle those egg cartons into cool Valentine's Day treats.
Kristen @ ladybug-blessings.com says
this is such a great idea!! Next time I need to make valentines I think I will do this :) If you ever get a chance I'd love for you to come link up to Handmade Tuesdays @ Ladybug Blessings :) http://www.ladybug-blessings.com. Oh & I have a giveaway going on right now for a inspirational dog print, it is too cute!!
Erin says
Oh my gosh! So totally cute!!!
Michelle Willow says
Love this idea! Linking it inside: http://www.squidoo.com/eggcarton
Liz says
Very cute idea! I love that they kids can help make them.
Shelby says
I must say, I really wish sites like this existed way back when my kids were little. Well, they could have, but I sure didn't know it! This is such a cool little craft!
Kathryn Michelle Jenkins says
so cute! very creative and simple.
kathryn
http://www.thedragonsfairytail.blogspot.com
Carrie at In the Hammock Blog says
This is so adorable!! I love it!
http://inthehammockvintage.blogspot.com
Sue says
So cute! Your brain must run on overdrive with all the great ideas you come up with, Amanda!
Tammy says
This is such an adorable idea! I love it!
Emilee says
love this idea; I think I'll do a bouquet for my kiddos teachers
Jenny @ Embellishing Life says
Love this idea! Not only is it cute, but you're up-cycling!
Andrea says
Thise are just precious!
Swing by I have an award for you
http://jadaroo.blogspot.com/2011/01/award-to-share.html