• Home
  • About
    • About Crafts by Amanda
    • Visit Our Recipe Site
  • Work With Us
  • Join
    • Free Newsletters
    • Join our Facebook craft group
↑
  • Tutorials
    • Tutorial Index
    • Adult Crafts
    • Crafts for Kids
    • Crafts for Seniors
    • Recycled Crafts
    • Seasonal Crafts
    • Holiday Crafts
    • Free Printables
    • Craft Collections
  • Adult Crafts
    • Bath & Body
    • Beach Crafts
    • Clay Pot Crafts
    • Crafts for Seniors
    • Decoupage Crafts for Adults
    • DIY Gift ideas
    • Garden Crafts
    • Home Decor Projects
    • Kitchen Crafts
    • Light Bulb Crafts
    • Luminary Crafts
    • Mason Jar Crafts
    • Needlework
    • Photo Display Ideas
    • Recycled Crafts for Adults
    • Wearable Crafts for Adults
  • Crafts for Kids
    • Animal Crafts for Kids
    • Back to School Crafts
    • Beach Crafts for Kids
    • Camp Crafts
    • Cardboard Tube Crafts for Kids
    • Decoupage Crafts for Kids
    • Easy Crafts for Kids
    • Nature Crafts for Kids
    • Other Kid’s Crafts
    • Paper Plate Crafts for Kids
    • Recycled Crafts for Kids
    • Slimes, Doughs, & Clay
    • Wearable Crafts for Kids
  • Holiday Crafts
    • 4th of July Crafts
    • Christmas Crafts
    • DIY Gift ideas
    • Earth Day Crafts
    • Easter Crafts
    • Father’s Day Crafts
    • Halloween Crafts
    • Memorial Day Crafts
    • Mother’s Day Crafts
    • New Year’s
    • Other Holidays
    • Patriot Day Crafts
    • St. Patrick’s Day Crafts
    • Thanksgiving Crafts
    • Valentine’s Day Crafts
  • Seasonal Crafts
    • Winter Crafts
    • Spring Crafts
    • Summer Crafts
    • Fall Crafts
  • Skip to primary navigation
  • Skip to main content
  • Skip to primary sidebar
  • Skip to footer

Crafts by Amanda

crafts for adults and kid's crafts

  • Tutorials
    • Tutorial Index
    • Adult Crafts
    • Crafts for Kids
    • Crafts for Seniors
    • Recycled Crafts
    • Seasonal Crafts
    • Holiday Crafts
    • Free Printables
    • Craft Collections
  • Adult Crafts
    • Bath & Body
    • Beach Crafts
    • Clay Pot Crafts
    • Crafts for Seniors
    • Decoupage Crafts for Adults
    • DIY Gift ideas
    • Garden Crafts
    • Home Decor Projects
    • Kitchen Crafts
    • Light Bulb Crafts
    • Luminary Crafts
    • Mason Jar Crafts
    • Needlework
    • Photo Display Ideas
    • Recycled Crafts for Adults
    • Wearable Crafts for Adults
  • Crafts for Kids
    • Animal Crafts for Kids
    • Back to School Crafts
    • Beach Crafts for Kids
    • Camp Crafts
    • Cardboard Tube Crafts for Kids
    • Decoupage Crafts for Kids
    • Easy Crafts for Kids
    • Nature Crafts for Kids
    • Other Kid’s Crafts
    • Paper Plate Crafts for Kids
    • Recycled Crafts for Kids
    • Slimes, Doughs, & Clay
    • Wearable Crafts for Kids
  • Holiday Crafts
    • 4th of July Crafts
    • Christmas Crafts
    • DIY Gift ideas
    • Earth Day Crafts
    • Easter Crafts
    • Father’s Day Crafts
    • Halloween Crafts
    • Memorial Day Crafts
    • Mother’s Day Crafts
    • New Year’s
    • Other Holidays
    • Patriot Day Crafts
    • St. Patrick’s Day Crafts
    • Thanksgiving Crafts
    • Valentine’s Day Crafts
  • Seasonal Crafts
    • Winter Crafts
    • Spring Crafts
    • Summer Crafts
    • Fall Crafts
Craft Tutorials | Adult Crafts | Beach Crafts | Button Starfish Wall Art
Beach Crafts

Button Starfish Wall Art

Author by Aimee Page on February 23, 2019 Updated on December 6, 2020

5 from 1 vote
Make this simple starfish wall art with buttons and a canvas. This coastal craft is a great way to upcycle and reuse old buttons.
Jump to Project
Make this simple starfish wall art with buttons and a canvas. This coastal craft is a great way to upcycle and reuse old buttons.
1687 shares
  • Share
  • Tweet
  • Flipboard
  • Email

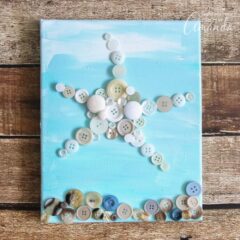
Make beautifully simple starfish wall art with buttons and a canvas. This coastal craft is a great way to upcycle and reuse old buttons, transforming them into an adorable button starfish that you can display around the home or add to your current beach themed home!

We love beach decor around here, and this button starfish wall art is an easy project to make!

Starfish wall art


Button Starfish Wall Art

This coastal wall art DIY came together in no time flat. It’s so easy, making this a perfect craft project when you are short on time or for a ladies night craft party.

Starfish crafts are so fun and versatile. That’s what makes this button starfish wall art an affordable, easy and super cute beach themed craft! Once you’re done crafting, this starfish wall art will make the perfect addition to a coastal gallery wall or your other nautical decor.

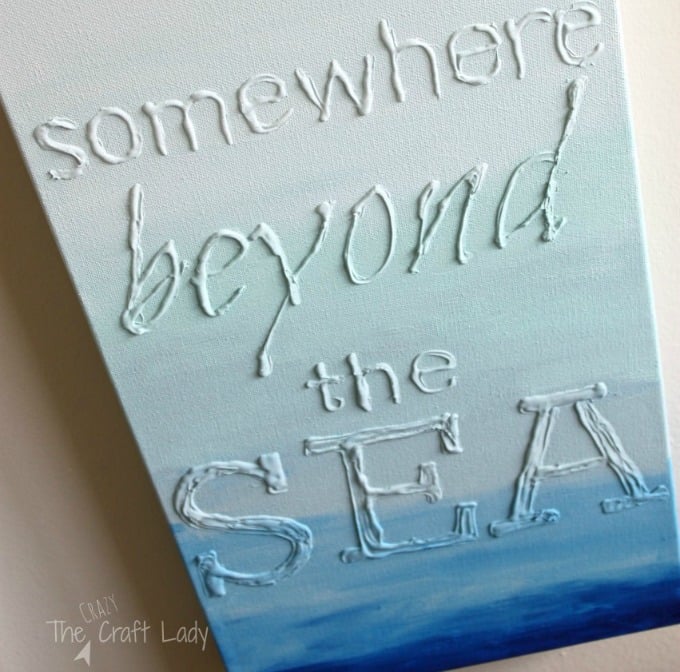
RELATED: For another adorable coastal themed decor idea, check out these beach signs and a bunch more beach wall art ideas! Bursting with relaxing coastal colors, these beach signs will complement your front porch, bathroom, bedroom, or just about anywhere. 

How to make Starfish Wall Art on canvas using buttons and paint

Supplies for this Button Starfish Wall Art

  • small canvas – 8 x 10 works well. You can use a larger canvas – you will just need more buttons.
  • acrylic craft paint in various coastal colors – light blues and teals plus white paint
  • paint brush
  • hot glue gun and hot glue sticks – I recommend using never-ending hot glue gun sticks for projects like this!
  • assorted buttons in neutral colors – tans and whites


Supplies needed to make starfish wall art

Tutorial – Starfish Wall Art

Start by painting your canvas. Apply a few shades of blue or teal to the canvas. Then bend the colors with a paint brush. If you don’t want to blend colors, you can just paint the canvas solid blue or teal as well. Don’t forget to paint the edges of the canvas.

painting canvas blue

Set the project aside and let the acrylic paint dry completely before adding buttons.

Now it’s time to create your button starfish. Start with the larger buttons, and arrange them in a star shape. The shape doesn’t have to be perfectly symmetrical and don’t be afraid to let the spokes of the star bend a little bit. Using hot glue, secure the buttons to the canvas. Then add in smaller buttons to fill in the starfish shape.

How to make starfish wall art with buttons

If you want to add an ocean floor to this wall art, you can use tan and brown buttons to make a wavy line of buttons at the bottom of the canvas. It will look just like sand. Secure with more hot glue.

Buttons in the shape of a starfish on canvas

If you liked this Starfish Wall Art craft, I think you’ll like these as well:

Hot Glue Canvas Art – Make custom wall art in any color or pattern. The design possibilities are endless!

Button Starfish Wall Art

This is such a fun and easy coastal craft! Don’t limit yourself to starfish, either. You could make just about any simple design or sea image – think fish, sea shells, a whale, etc. Don’t miss out on more coastal home decor ideas, check out this super easy to make beach flag or this wonderful driftwood art! Using paint sticks, paint and faux starfish you can make this coastal craft in no time.

Looking for more? Try all these canvas wall art ideas, including my mosaic sea turtle on canvas!

Make this simple starfish wall art with buttons and a canvas. This coastal craft is a great way to upcycle and reuse old buttons.
Print Project
5 from 1 vote

Button Starfish Wall Art

Make this simple starfish wall art with buttons and a canvas. This coastal craft is a great way to upcycle and reuse old buttons.
Author: Aimee Page

Supplies

  • Small canvas 8x10 or any size desired
  • Acrylic craft paint in various coastal colors. Light blues and teals plus white paint
  • Paint brush
  • Hot glue gunned hot glue sticks I recommend using never-ending hot glue gun sticks
  • Assorted buttons in neutral colors- tans and whites

Instructions

  • Start by painting your canvas. Apply a few shades of blue or teal to the canvas.
  • Then bend the colors with a paint brush. If you don't want to blend colors, you can just paint the canvas solid blue or teal as well. Don't forget to paint the edges of the canvas.
  • Set the project aside and let the acrylic paint dry completely before adding buttons.
  • Now it's time to create your button starfish. Start with the larger buttons, and arrange them in a star shape. The shape doesn't have to be perfectly symmetrical and don't be afraid to let the spokes of the star bend a little bit.
  • Using hot glue, secure the buttons to the canvas. Then add in smaller buttons to fill in the starfish shape.
  • If you want to add an ocean floor to this wall art, you can use tan and brown buttons to make a wavy line of buttons at the bottom of the canvas. It will look just like sand. Secure with more hot glue.

Button Starfish Wall Art

This post was originally published on this blog on Jul 17, 2017.

  • Author
  • Recent Posts
Aimee Page
Aimee Page
Blogger at The Crazy Craft Lady
Aimee is a twin mom, lawyer, and creativity junkie.She is dedicated to helping busy women and their families live more creative and inspired lives by sharing simple crafts, decor, recipes, and organizing solutions on her blog, The Crazy Craft Lady.
Aimee Page
Latest posts by Aimee Page (see all)
  • Black Cat Pumpkins - October 15, 2024
  • Lavender Sugar Scrub - April 23, 2024
  • Decoupage Wood Slice Ornaments - November 11, 2022
1687 shares
  • Share
  • Tweet
  • Flipboard
  • Email

Filed Under: Beach Crafts, Beach Crafts for Kids, Crafts for Seniors, DIY Gift ideas, Home Decor Projects, Recycled Crafts for Adults, Summer Crafts Tagged With: adult crafts, beach crafts, button craft, buttons, kid's crafts, starfish craft, starfish wall art

Reader Interactions

Free CraftsBy email every week

Latest crafts straight to your inbox!

5 from 1 vote (1 rating without comment)

Leave a Reply Cancel reply

Your email address will not be published. Required fields are marked *

Rate This Project


The maximum upload file size: 640 MB. You can upload: image, video. Links to YouTube, Facebook, Twitter and other services inserted in the comment text will be automatically embedded. Drop files here

Primary Sidebar

Hi! I’m Amanda and I’m the founder and head designer of Crafts by Amanda. I have spent over 25 years creating projects to share, but it’s not just me anymore! It’s turned into a complete family affair. Come and meet the Creative Team!

Free CraftsBy email every week

Latest crafts straight to your inbox!

All Time Favorites

snowy pinecone candle jar luminaries

Winter Luminaries: Snowy Pinecone…

Make pretty winter luminaries that appear to be covered ... Go To project

Make this wonderful deco mesh pumpkin wreath to hang on your door this fall!

Deco Mesh Pumpkin Wreath…

Adorn your door this fall with a pretty deco mesh ... Go To project

Learn to make these adorable ladybug painted rocks. use special outdoor paint for this adorable garden craft so you can keep garden ladybugs all summer!

Ladybug Painted Rocks…

I'm going to show you how to make these adorable ... Go To project

Reuse those empty prescription pill bottles in all sorts of ways. From organizing to making cookies. Yes, cookies! See how to use your empty pill bottles!

20 Uses for Prescription Pill…

You've been collecting prescription pill bottles for ... Go To project

Meet the Family

Amanda

Founder and Designer

Kristen

Editorial Manager

Lindsay

Social Media Manager

As seen on:

Footer

Favorites

  • Jar Photo Frames
  • No-Sew Roman Shade
  • Paper Flowers
  • How to Make a Scrunchie
  • Mermaid Slime

About

  • Home
  • Meet the Creative Team
  • Work with Us
  • Privacy Policy
  • Accessibility
  • Contact Us

Images/text copyright Amanda Formaro 2020. To feature a post from Crafts by Amanda, you may use one photo credited and linked back directly to the project post.

Free CraftsBy email every week

Latest crafts straight to your inbox!

Copyright ©2025, Crafts by Amanda. All Rights Reserved.
Design by Pixel Me Designs

Rate This Tutorial

Your vote:


To share a photo with your comment click here!

A rating is required
A name is required
An email is required

Recipe Ratings without Comment

Something went wrong. Please try again.