• Home
  • About
    • About Crafts by Amanda
    • Visit Our Recipe Site
  • Work With Us
  • Join
    • Free Newsletters
    • Join our Facebook craft group
↑
  • Tutorials
    • Tutorial Index
    • Adult Crafts
    • Crafts for Kids
    • Crafts for Seniors
    • Recycled Crafts
    • Seasonal Crafts
    • Holiday Crafts
    • Free Printables
    • Craft Collections
  • Adult Crafts
    • Bath & Body
    • Beach Crafts
    • Clay Pot Crafts
    • Crafts for Seniors
    • Decoupage Crafts for Adults
    • DIY Gift ideas
    • Garden Crafts
    • Home Decor Projects
    • Kitchen Crafts
    • Light Bulb Crafts
    • Luminary Crafts
    • Mason Jar Crafts
    • Needlework
    • Photo Display Ideas
    • Recycled Crafts for Adults
    • Wearable Crafts for Adults
  • Crafts for Kids
    • Animal Crafts for Kids
    • Back to School Crafts
    • Beach Crafts for Kids
    • Camp Crafts
    • Cardboard Tube Crafts for Kids
    • Decoupage Crafts for Kids
    • Easy Crafts for Kids
    • Nature Crafts for Kids
    • Other Kid’s Crafts
    • Paper Plate Crafts for Kids
    • Recycled Crafts for Kids
    • Slimes, Doughs, & Clay
    • Wearable Crafts for Kids
  • Holiday Crafts
    • 4th of July Crafts
    • Christmas Crafts
    • DIY Gift ideas
    • Earth Day Crafts
    • Easter Crafts
    • Father’s Day Crafts
    • Halloween Crafts
    • Memorial Day Crafts
    • Mother’s Day Crafts
    • New Year’s
    • Other Holidays
    • Patriot Day Crafts
    • St. Patrick’s Day Crafts
    • Thanksgiving Crafts
    • Valentine’s Day Crafts
  • Seasonal Crafts
    • Winter Crafts
    • Spring Crafts
    • Summer Crafts
    • Fall Crafts
  • Skip to primary navigation
  • Skip to main content
  • Skip to primary sidebar
  • Skip to footer

Crafts by Amanda

crafts for adults and kid's crafts

  • Tutorials
    • Tutorial Index
    • Adult Crafts
    • Crafts for Kids
    • Crafts for Seniors
    • Recycled Crafts
    • Seasonal Crafts
    • Holiday Crafts
    • Free Printables
    • Craft Collections
  • Adult Crafts
    • Bath & Body
    • Beach Crafts
    • Clay Pot Crafts
    • Crafts for Seniors
    • Decoupage Crafts for Adults
    • DIY Gift ideas
    • Garden Crafts
    • Home Decor Projects
    • Kitchen Crafts
    • Light Bulb Crafts
    • Luminary Crafts
    • Mason Jar Crafts
    • Needlework
    • Photo Display Ideas
    • Recycled Crafts for Adults
    • Wearable Crafts for Adults
  • Crafts for Kids
    • Animal Crafts for Kids
    • Back to School Crafts
    • Beach Crafts for Kids
    • Camp Crafts
    • Cardboard Tube Crafts for Kids
    • Decoupage Crafts for Kids
    • Easy Crafts for Kids
    • Nature Crafts for Kids
    • Other Kid’s Crafts
    • Paper Plate Crafts for Kids
    • Recycled Crafts for Kids
    • Slimes, Doughs, & Clay
    • Wearable Crafts for Kids
  • Holiday Crafts
    • 4th of July Crafts
    • Christmas Crafts
    • DIY Gift ideas
    • Earth Day Crafts
    • Easter Crafts
    • Father’s Day Crafts
    • Halloween Crafts
    • Memorial Day Crafts
    • Mother’s Day Crafts
    • New Year’s
    • Other Holidays
    • Patriot Day Crafts
    • St. Patrick’s Day Crafts
    • Thanksgiving Crafts
    • Valentine’s Day Crafts
  • Seasonal Crafts
    • Winter Crafts
    • Spring Crafts
    • Summer Crafts
    • Fall Crafts
Craft Tutorials | Seasonal Crafts | Fall Crafts | DIY Succulent Pumpkin Decor
Fall Crafts

DIY Succulent Pumpkin Decor

Author by Jane and Sonja on November 5, 2024 Updated on November 5, 2024

5 from 2 votes
Create your own beautiful and natural DIY succulent pumpkin decor for the Fall.
Jump to Project
succulent pumpkin
4723 shares
  • Share
  • Tweet
  • Flipboard
  • Email

Create your own beautiful and natural DIY succulent pumpkin decor for fall with these easy to follow instructions.

Succulent Pumpkin overhead shot


DIY Succulent Pumpkin


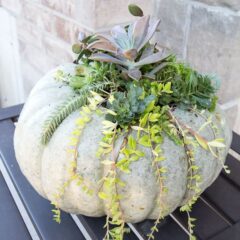
I distinctly remember growing up that there was only one type of pumpkin: orange. Now you can find blue, white and even pink pumpkins in addition to the traditional orange. The blue Cinderella pumpkins seemed to be the perfect container for a fresh succulent pumpkin arrangement.

While this project is considerably different from our miniature wine cork succulent magnets, finding new ways to decorate with succulents is always exciting! I recently came across this gorgeous Cinderella succulent pumpkin arrangement from Stone Gable Blog and was determined to make my own.

Pumpkin filled with succulents

Materials needed for the DIY succulent pumpkin


  • A fresh medium-sized Cinderella pumpkin
  • Pen
  • Sharp paring knife
  • Spoon
  • Bowl or another container that will sit inside of the pumpkin holding the succulents
  • Pebbles or charcoal for drainage
  • Potting soil for succulents
  • Fresh or faux succulents in different sizes and colors
Supplies you'll need to make a succulent pumpkin

How to make a fresh succulent pumpkin


  1. Begin by washing the outside surface of the pumpkin to remove any dirt and let dry.
  2. Use a pen or other writing utensil to outline the shape of the container that will be used to hold the succulents.
Tracing your hole for cutting the pumpkin
  1. Using the paring knife carefully cut out the top of the pumpkin using your markings as a guide.
First, carve your pumpkin
  1. Remove the top flap of the pumpkin that you just cut out and discard.
  2. Use the spoon or your hands to scoop out all the seeds from the inside of the pumpkin.
Carve out your pumpkin
  1. Once the inside of the pumpkin is all cleared out place your container inside the opening. Ensure that it doesn’t fall right into the pumpkin as it needs to just sit on the top of the surface. You can place a large stone in the pumpkin if needed for height and additional weight.
Place your container inside the pumpkin
  1. Start planting your succulent arrangement. Begin by placing some pebbles or activated charcoal to provide drainage at the bottom of the container.
Adding loose rocks to the succulent planter
  1. Fill the container to the top with loose succulent potting soil.
Patting down soil in the pumpkin
  1. Carefully plant the largest focal point succulent into the center of the container.
Adding succulent to pumpkin
  1. Continue expanding the arrangement by placing a variety of other succulents around the center one.
watering the succulent plants
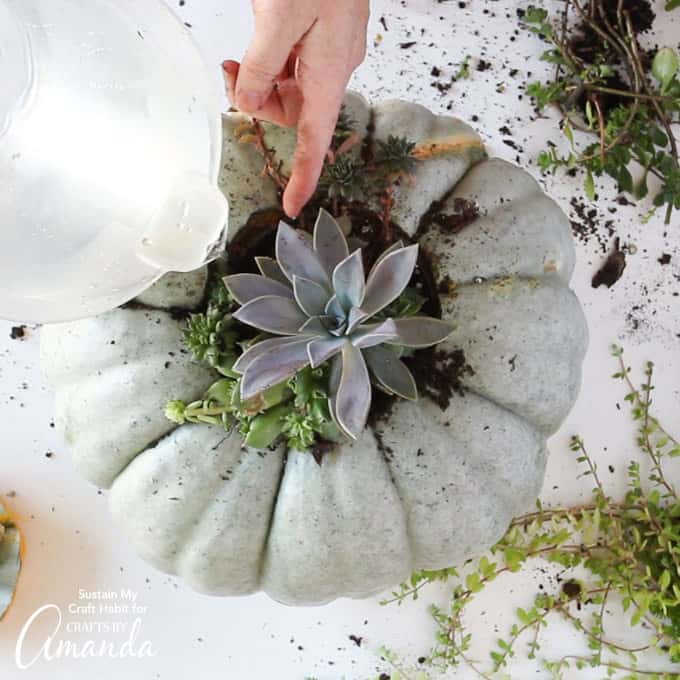
  1. Thoroughly water your new succulent arrangement.
overhead shot of succulents in the pumpkin

Caring for your Succulent Pumpkin


I feel like this Cinderella pumpkin succulent arrangement turned out completely magical. Since it is a fresh pumpkin it will only last about two weeks and then you can compost it.

However, you can take out the container with the succulent arrangement first, and place it in a different planter to continue growing. For a longer lasting succulent pumpkin decor, you may choose to use a plastic or foam pumpkin instead.

Pumpkin with succulents planted inside

More Pumpkin Crafts


I just love the non-traditional blues greens and soft purples as an alternative color palette for Fall. Last year I created a set of watercolor painted pumpkin place cards in similar modern hues which you can download to use for Thanksgiving.

  • This burlap pumpkin wreath is perfect for fall & all the way through Thanksgiving. You can also use this to make a plain burlap wreath to embellish however!
  • You’ve probably seen the masses of canning lid pumpkins floating around the internet, but did you know how easy they are to make? Find out how to make these mason jar lid pumpkins to display on your Thanksgiving table or on your mantle for the season!
  • And lastly, reversible scrap wood pumpkins – decor for fall all the way through winter!
 
succulent pumpkin
Print Project
5 from 2 votes

DIY Succulent Pumpkin Decor

Create your own beautiful and natural DIY succulent pumpkin decor for the Fall.
Age Group: Crafts
Project Type: Fall
Author: Amanda Formaro

Supplies

  • Fresh medium sized Cinderella pumpkin
  • Pen
  • Sharp paring knife
  • Spoon
  • Bowl or other container that was fit inside of the pumpkin
  • Pebbles or charcoal for drainage
  • Potting soil for succulents
  • Various succulents of different sizes and colors

Instructions

  • Use a pen to outline the shape of the container that will be used to hold the succulents.
  • Cut out the top of the pumpkin using your markings as a guide.
  • Remove the top flap of the pumpkin and discard.
  • Scoop out all the seeds from the inside of the pumpkin.
  • Place your container inside the opening.
  • Place some pebbles or activated charcoal inside the container.
  • Fill the container to the top with loose succulent potting soil.
  • Plant the largest focal point succulent into the center of the container.
  • Continue planting a variety of other succulents around the center one.
  • Water the freshly planted succulents.

Video

This post originally appeared here on Oct 22, 2018.

  • Author
  • Recent Posts
Follow Along
Jane and Sonja
Bloggers at Sustain My Craft Habit
Jane and Sonja are sisters, moms and lifelong craft addicts both living near Toronto, Canada with their families. They share their love of creativity, nature and coastal craft and DIY ideas on their blog Sustain My Craft Habit.
Follow Along
Latest posts by Jane and Sonja (see all)
  • Cheese Grater Owl - July 8, 2025
  • Seashell Wreath - July 1, 2025
  • Patriotic Painted Rocks - June 24, 2025
4723 shares
  • Share
  • Tweet
  • Flipboard
  • Email

Filed Under: Fall Crafts, Thanksgiving Crafts Tagged With: planter, plants, pumpkin, pumpkin decorating, succulent

Reader Interactions

Free CraftsBy email every week

Latest crafts straight to your inbox!

5 from 2 votes (2 ratings without comment)

Leave a Reply Cancel reply

Your email address will not be published. Required fields are marked *

Rate This Project


The maximum upload file size: 640 MB. You can upload: image, video. Links to YouTube, Facebook, Twitter and other services inserted in the comment text will be automatically embedded. Drop files here

Primary Sidebar

Hi! I’m Amanda and I’m the founder and head designer of Crafts by Amanda. I have spent over 25 years creating projects to share, but it’s not just me anymore! It’s turned into a complete family affair. Come and meet the Creative Team!

Free CraftsBy email every week

Latest crafts straight to your inbox!

All Time Favorites

Learn to make these adorable ladybug painted rocks. use special outdoor paint for this adorable garden craft so you can keep garden ladybugs all summer!

Ladybug Painted Rocks…

These colorful little ladybug painted rocks are the ... Go To project

snowy pinecone candle jar luminaries

Winter Luminaries: Snowy Pinecone…

Make pretty winter luminaries that appear to be covered ... Go To project

Make this wonderful deco mesh pumpkin wreath to hang on your door this fall!

Deco Mesh Pumpkin Wreath…

Adorn your door this fall with a pretty deco mesh ... Go To project

Reuse those empty prescription pill bottles in all sorts of ways. From organizing to making cookies. Yes, cookies! See how to use your empty pill bottles!

20 Uses for Prescription Pill…

You've been collecting prescription pill bottles for ... Go To project

Meet the Family

Amanda

Founder and Designer

Kristen

Editorial Manager

Lindsay

Social Media Manager

As seen on:

Footer

Favorites

  • Jar Photo Frames
  • No-Sew Roman Shade
  • Paper Flowers
  • How to Make a Scrunchie
  • Mermaid Slime

About

  • Home
  • Meet the Creative Team
  • Work with Us
  • Privacy Policy
  • Accessibility
  • Contact Us

Images/text copyright Amanda Formaro 2020. To feature a post from Crafts by Amanda, you may use one photo credited and linked back directly to the project post.

Free CraftsBy email every week

Latest crafts straight to your inbox!

Copyright ©2025, Crafts by Amanda. All Rights Reserved.
Design by Pixel Me Designs

Rate This Tutorial

Your vote:


To share a photo with your comment click here!

A rating is required
A name is required
An email is required

Recipe Ratings without Comment

Something went wrong. Please try again.