
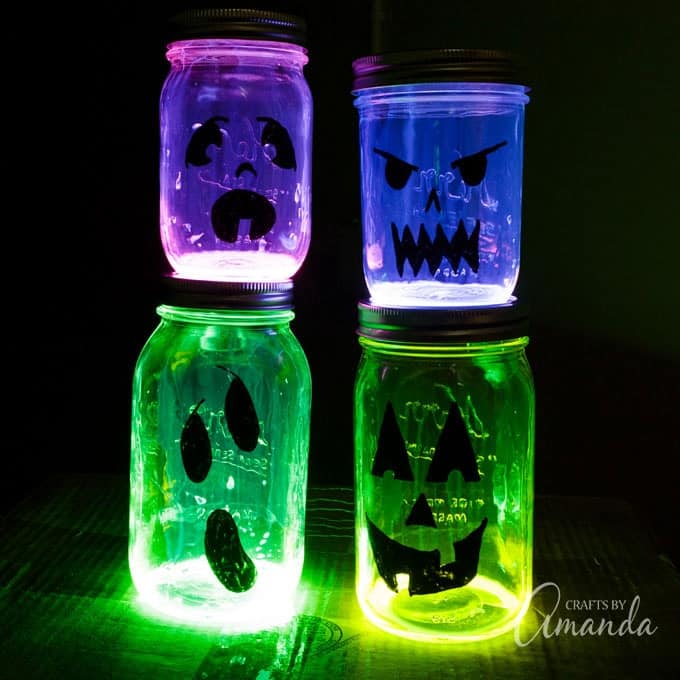
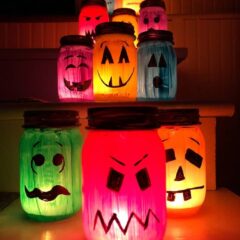
These colorful Halloween luminaries are made from painted mason jars and will light up your sidewalk or window this Halloween! These are a gorgeous addition to a Pumpkin Painting Party too!

Why We Love This Project
Halloween luminaries are a fun way to decorate your sidewalk, mantle, or bookshelf for Halloween! It’s a versatile craft in which you can use whatever colors you’d like, and the best part is just how easy they are to make yourself. Grab some friends or the kids and make it a Halloween themed craft night.
Back in 2009 I published these Halloween Painted Jar Luminaries. They were an instant hit and to this day remain one of the most popular Halloween crafts on this site. So here we are, 9 years later, and I decided to make them again and not only update the photos, but also make a video tutorial to help you all make them!

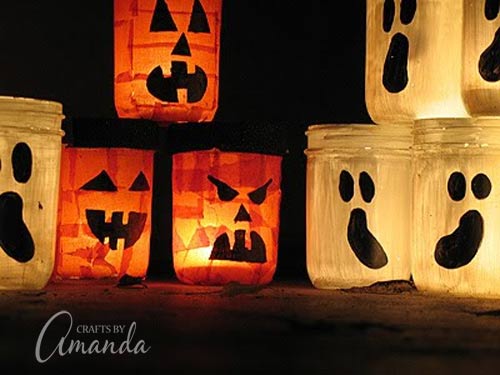
This isn’t the first time I’ve made Halloween luminaries. Several years ago I made these painted Ghost Luminaries, these decoupaged Jack O’Lantern Luminaries, and these Skull Luminaries.

Over the summer I bought a couple of boxes of canning jars with the intention of canning. Well, that didn’t happen. So I opened a box, went inside and grabbed my acrylic craft paint, paintbrushes, and a dish of water and went to work.

How To Make Halloween Luminaries
You can find the full printable instructions at the end of this post.
- Prep your pint jars by washing them with soapy water and make sure they are rinsed well and do not have any soap residue. Next, give them a rinse with rubbing alcohol and let them air dry.
- When the jars are dry, make sure your fingers are clean so as not to transfer any of your skin’s oils to the glass which can cause issues with the paint adhering.
- Use a flat paintbrush to add one layer of acrylic craft paint on the OUTSIDE of each jar. One layer is best as you want the candle light to shine through!
- I used a Sharpie marker to draw on the face, then I simply painted the facial features with black paint using a liner brush.
- I painted the jar rims with black paint. Then let them all dry for about half an hour. Spray with glaze, waiting 20 minutes between coats; I used two coats. Let dry for several hours.
After the Halloween luminaries have dried for several hours, you can have some fun displaying them. I place regular tea lights inside the jars and use a long-handled lighter to light them.
Be sure to watch the video below to see how it’s done!

Most commonly asked question on this post:
Q: Do you paint the outside or the inside of the jars to make these Halloween luminaries?
A: The outside of the jar. :)
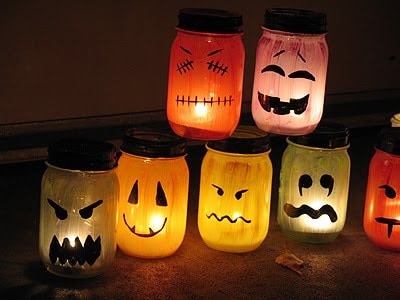
Want another easy and cheap idea for Halloween luminaries? Line your sidewalk on Halloween night with these quick and easy Glowing Jack O Lantern Jars. For a Halloween party, check out these awesome Zombie Mason Jars. Perfect to fill up with treats for Halloween guests! More Halloween decorating ideas here.
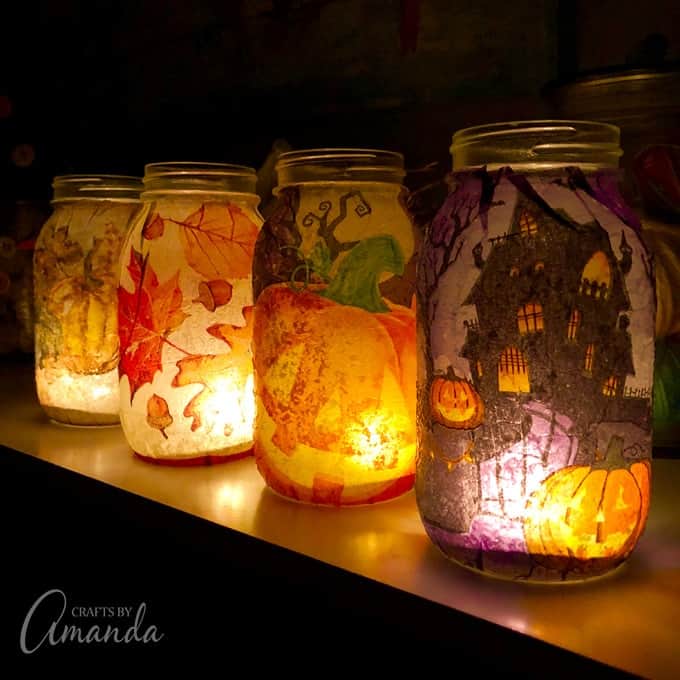
Fall Napkin Luminaries are another beautiful fall and Halloween luminary idea made from paper napkins and mod podge!
More Halloween Ideas
- Balloon Ghosts
- Halloween Ribbon Wreath
- Zombie Mason Jars
- Halloween Keep Out Door
- Paper Halloween Luminaries
- Clay Halloween Village
I love to create and share my projects with you! I know it’s hard to remember to come back and search, so I’ve made it easy for you with my weekly newsletter! You can subscribe for free and I’ll send you fun crafts every week right to your email.
Halloween Painted Jar Luminaries
Supplies
- Clean glass jars I used pint size Kerr jars, but Ball jars cost less
- Rubbing alcohol
- Acrylic craft paint
- Paintbrushes flat brush and liner brush
- Sharpie marker
- Glaze I use Krylon Triple Thick Crystal Clear Glaze
- Tea lights or LED tea lights
Instructions
- Prep the jars by washing them with soapy water and make sure they are rinsed well and do not have any soap residue. Next give them a rinse with rubbing alcohol and let them air dry.
- When the jars are dry, make sure your fingers are clean so as not to transfer any of your skin's oils to the glass which can cause issues with the paint adhering.
- Use a flat paintbrush to add one layer of acrylic craft paint on the OUTSIDE of each jar. One layer is best as you want the candle light to shine through!
- You can create your own stencils using cardboard or a piece of paper/cardstock for the faces. Or, you can freehand the designs which is what i opted for.
- I used a Sharpie marker to draw on the face, then I simply painted the facial features with black paint using a liner brush.
- I painted the jar rims with black paint. Then let them all dry for about half an hour. Spray with glaze, waiting 20 minutes between coats; I used two coats. Let dry for several hours.
- After they've dried for several hours, you can have some fun displaying them. I place regular tea lights inside the jars and use a long handled lighter to light them. If you prefer, you can use LED tea lights as well!
Video
Expert Tips & FAQs
Originally published right here on October, 19, 2009.
- Swirling Twirling Ladybugs - July 21, 2026
- Drip Tie Dye Backpack - July 17, 2026
- Mini Coastal Clay Houses - July 14, 2026


sharon says
Hi Amanda
i love these !!
just wondered if you have tried doing the designs going over again with a thicker sharpie instead of paint and if so how that worked out?
thanks
Amanda Davis says
I haven’t, but instead of Sharpie I would use acrylic paint pens.
Cassidy says
Hi, I’m wondering if I could do the same thing with plastic jars and buckets I have on hand and use phosphorescent paint for the faces instead of putting candles inside?
Amanda Formaro says
If you’re going to paint plastic, check out my tips in this post https://craftsbyamanda.com/tips-for-painting-on-plastic/ but I think it should work :)
Cassidy says
Thanks!
mary smith says
Hi, I love these! Could you tell us what shades of purple and green paint you used?
Amanda Formaro says
Oh my, I made this several years ago and I apologize but I did not write down the colors back then! A lavender shade would work great, and something similar to apple green :)
PATRICIA says
THANKS FOR ANSWERING MY QUESTIONS ABOVE ALSO WOULD YOR DO YOU HAVE ANY FALL THANKSGIVING OR XMAS ONES LIKE THESE I LOVE YOUR SITE IF YOU DO COULD YOU LET ME KNOW ALSO WAS WONDERING
EVEN IF YOU DID XMAS JARS ETC LIKE GREEN OR BLUE WOPULD YOU HALF TO PAINT THEM ON THE OUTSIDE TO
THANKS SO MUCH
Amanda Formaro says
Hi Patricia. I always paint my luminaries on the outside. I don’t trust putting a candle inside a jar that has been painted on the inside. As for more luminaries you can see all of mine (which include Christmas and other holidays) here: https://craftsbyamanda.com/category/craft-tutorials/adult-crafts/luminary-crafts/
PATRICIA says
i love your halloeen jars you only put one coatr on right but after that do you half to put a spray on is it necessary
or can you use regular mod podge on it but maybe that wouldnt light would ya let me know thanks love these of yours
Amanda Formaro says
I used the gloss spray sealer because I wanted mine shiny. I’m sure you could use Mod Podge as your sealer, but I haven’t tried that with these jars myself :)
Dawn Marie says
R,I,P, red guy on the right with the triangle eyes and the square mouth – did you sweep him up and throw out the glass or upcycle him somehow – love these luminaries – I prefer the “real” tealights as well – we also line our path with paper bags decorated with a little sand on the bottom and a tealight inside – the glow is really fabulous – thank you Amanda –
Amanda Formaro says
I’m sure I recycled the glass, poor guy! And yes, I love those paper bag luminaries too!
charmaine says
Your luminaries are SO cute! I wish I had time for another project. I actually have a question for you that is not about these cute little guys, but you seem to me like you would know a little something about paint and flames. I am painting a pumpkin this year for the Teal Pumpkin Project, but I would also like to carve it and put a candle in it. Do you think that’s safe to do? Also, do you know if there is a certain type of paint that is less flammable than others. Would love any thoughts or advice that you have. Happy Halloween!
Amanda Formaro says
I’m so sorry that I missed this comment/question Charmaine. What did you end up doing?
Kelly says
Planning on making these for Halloween. Q: did you use battery operated candles or votive candles?
Amanda Formaro says
I use regular tea lights that I light with one of those long handled lighters. LED tea lights will work as well :)
Chelsea Evans says
I love your ideas! I am going to share this post on our blog! Take a look tomorrow 9/15 to see! http://www.capturecreatephoto.com/blog
Thanks again!!
Chelsea
Amanda Formaro says
Thank you Chelsea, I appreciate the feature!
Tove Maren says
These are adorable! I will have to make them with my four little boys!
Amanda Formaro says
Thanks Tove, hope you have fun!
El İşi Tarifleri says
LOL !
Sue says
I looked for the link to the candy corn jars but it is no longer posted on Disney Kaboose. Are you able to re-post or send me the instructions?
Amanda Formaro says
HI Sue. Sorry about that. Spoonful was reorganized and I hope they will have the instructions back up soon!
Cherrie says
We love this luminary craft! We are doing this with 26 5th graders at our annual Fall Festival in a couple of weeks :) Did you use foam brushes or regular brushes to paint the jars? Also, about how many jars can be painted with a little bottle of Acrylic paint.
Amanda Formaro says
Hi Cherrie. I don’t know how many jars can be covered with one bottle, but for 26 kids I would say to take 4 with you, just in case. You’ll probably have plenty left ober. I used regular brushes for this, but you could use foam brushes if you think it’s easier for the kids :)
Tami says
These are sooo cute!! Do you think they would turn out ok with glitter acrylic paint? I have some leftover from another project (but am not exactly crafty lol) Thanks!
Amanda Formaro says
I think glitter acrylic would work fine!
Susy Hilterbran says
do you think a glow stick would be bright enough to use instead of tea lights? Also, have you tried the glow in the dark paint?
Amanda Formaro says
I’m not sure that glow sticks would work for these. I have not tried the glow in the dark paint for something like this. It tends to be really streaky.
Jennifer says
I know that you use acrylic paint, but do you use the pastels or the regular colors?
Amanda Formaro says
I think the purple and green were pastel shades and the rest were regular colors. Doesn’t really matter though, whatever colors you like will work!
Jean Morrissey says
I love these! I would suggest using the little battery operated tea lights instead of real tea lights (for safety reasons) Especially, if you line your sidewalk with them….little ones in Halloween costumes could be at risk.
Jean Morrissey says
Then you could use plastic jars too…I guess the paint would stick?
Amanda Formaro says
Hi Jean. I wouldn’t use plastic simply because of the heat from the candle. However if you use LED lights you won’t have that issue. Plastic is a trickier beast when it comes to paint. You would have to either rough up the surface to make it more porous, or buy a paint that is specifically for plastic surfaces. I would stick with glass if you can.
Stacey says
Do you *need* to add the glaze? I really want to make these but I’m living in Korea and a can of glaze runs nearly $20 :(
I love the look of them with the glaze but would hate to spend the money on the glaze if it’s not totally necessary.
Thanks so much and great job! Yours look fantastic!
Amanda Formaro says
Hi Stacey! You don’t HAVE to, it just gives them some added protection from nicks and scratches and adds a nice shine :)
Betty says
I think these are so cute, I will make them this Halloween, line up the walkway with them, but instead of candles, I like to use white christmas lights
Amanda Formaro says
Thanks Betty, hope you have fun!
Linda Storey says
These are wonderful. I have got to have my grandkids make some, they’ll love them! TFS!!
Avalon says
I have a bunch of used-up/burned out jars candles in different sizes – I couldn’t bring myself to just toss them, and now I think I will use them to make these! Thanks for the share!
Amanda Formaro says
Awesome, hope you have fun with it Avalon!
Sheri says
I took empty plastic peanut butter jars, washed them out well. I made labels on orange, purple, and yellow copy paper, cut them to fit inside the jar. On the top I cut a circle of fabric, tacked it with glue to stay on the lid, tied a Halloween ribbon around the cap. I made labels that said “Spider Jelly”, “Monster Mash” to name a couple of fun names. Inside I put a flameless candle. I have them on my steps, but these are cheap and make great neighbor gifts!!! I could reuse the jar for Christmas too!
Amanda Formaro says
That’s awesome Sheri, they sound adorable!
Yvette says
I LOVE THESE!! <3 I have a question when its sprayed by the glaze is the paint from the eyes & mouth are suppose to run off the jar?
Amanda Formaro says
Hi Yvette :) If the marker is running then one of two things have happened: 1) the marker wasn’t dry enough yet or 2) the spray can is being held too close to the jar and the application is too thick. I’m sorry that happened to you! :-(
Yvette says
Ok thank you so much & it only happened on one them but it still came out nice it gave the ghost a nice effect to it :)
Amanda Formaro says
Awesome! :)
Katie says
These are awesome, so much better than purchasing luminary bags every year. I have a question-do you paint the inside or outside of the jars? Thanks!
Amanda Formaro says
hi Katie! Paint the outside :)
LeAnne says
Did you paint the outside of the jars or the insides? Also do you know how this would work on plastic jars? I want to try this with my 4 yr old this year but concerned with the glass.
Amanda Formaro says
I painted the outside of the jars. You can paint plastic, but it’s best to use a multi surface acrylic paint for plastic. Or some enamel paints will work on plastic too. If you use regular acrylic paint, it’s possible it will peel and flake off later.
fairyCrafty says
Call me cheap, but i don’t want to use a good canning jar for this…but I think they are so cute! I’m thinking of an empty milk jug. Then lighting it with a battery operated votive for the ghost. Orange glow sticks for the pumpkins and green glow sticks for Frankenstein… that way the plastic won’t burn and I don’t have to use paint…do you think that would work?
Amanda Formaro says
Hi fairyCrafty :) My answer is two fold. 1) if you want these to last year after year (I just pulled these very jars out of the attic the other day and they still look awesome after 4 years) I would highly recommend using jars. You don’t have to use canning jars, you can use recycled mayonnaise or jelly jars and they will produce the same result. 2) if you are just looking for a decoration for this year, milk jugs will work just fine, though they might not store very well (who knows, they might!). You can see I did this exact thing (using the glow sticks) for a Frankenstein milk jug I made this year – here’s the link – https://craftsbyamanda.com/2013/10/glow-dark-frankenstein-milk-jug.html
Something important to keep in mind about using glow sticks. They only last one night and then you will have to drop another one in. That can get pretty pricey if you want to use these for a week before Halloween. ALSO, milk jugs are very lightweight. A windy autumn evening could scatter your luminaries all over your yard, or worse, the neighborhood! So if you do decide to use milk jugs, be sure to add rice or pebbles or even pennies to the jug to give them some weight.
I personally think that with all the factors mentioned above you’d be better off in the long run using jars. :) But either way will work. Hope you have fun!
Monique Moore says
These are so cute! I think I”m going to make some with leaves on them for Fall and Thanksgiving decorations, and some with snowflakes for Winter. Such a great idea, especially since mason jars are inexpensive.
Amanda Formaro says
Thanks Monique! Those sound like they will be pretty!
Mariah says
Very neat…did you paint inside the jar or outside?
Amanda says
The outside
Maria says
Just finished making a ton of these. Thanks for the amazing idea! Worked out great! It was so much fun, can’t wait to poke around and find more holiday crafts!
Amanda says
That’s awesome Maria so glad you had fun!
Lori says
Hi there,
Should I be concerned about the Krylon and the heat produced by a burning candle? I know some of these types of sprays can be highly flammable. Thanks!
Amanda says
A spray paint or sealer is flammable when wet and when being sprayed, but from what I understand loses its flammability when dry. I made these luminaries three years ago and bring them out every Halloween and light them. I have never had a problem.
Jami says
We made these @ homeschool day in the park. We dated the bottom and wrote names on them and plan to make them again so the kids will each have their own “collection” to keep! Thanks for the simple to follow directions and great pictures!!
Amanda says
How fun! Glad you enjoyed them Jami, thanks for letting me know! :)
denissa thurman says
Thanks for sharing i was trying to think of some way to get some Halloween stuff for my grandbaby’s now scene they live with me this i can afford again thank you very much you just made 2 children very happy
Amanda says
Aww that’s great, thanks Denissa!
Damaris says
love this!! i made these with my children and they had a blast! thank you :)
Amanda says
That’s great Damaris, so glad you had fun!
Christine says
I LOVE these. I made them and I have had requests from family to make more. I also linked your tutorial. Thank you :)
Amanda says
Thanks Christine, so glad you had a good time making these!
doro K. says
i like these jars. they’re simple but so decorative!
I linked to your tutorial on my blog – thanks for sharing!
doro K.
Amanda says
Thanks for the link Doro, so glad you liked them :)
Crystal Torres says
Thanks for such a great idea! I had some sauce jars and such in my recycle bin just waiting to be used :) I also took down my collection of wine bottles (I knew I was saving them for a reason!) I am so happy with the way the jars and bottles turned out. The kids loved them too!
Amanda says
How fun Crystal, glad you had a good time!
Marla says
These masion jars are wonderful!! I agree with all the pictures, I couldn’t decide which was my favorite either.
Which jar looked better with the candle in the dark?
I think this would be a great way to lite my walk way this halloween, add some to my flower gardens which are in an alcove at the front door. Thanks for sharing this!
Marla
Amanda says
I would have to say the yellow look the best, but they all look great!
Sonya Moore says
What kind of acrylic paint? I bought some last year, but you couldn’t really see thru them:( Thank you!
Amanda says
I just used regular acrylic craft paint, it was probably Americana, but could have been Folk Art. I only use one coat! Two would make them too dark.
Jessica says
Such a great idea! Love the colors and cute faces…
Sherri says
Hi Amanda! These are so cute! I’m thinking about making them for my yard, but I’m worrying about the tea lights. When you make them, do you punch holes in the lids and then put the lids on? Or do you think that would take away from the effect or put the flame out? I could buy the fireless votives lights, I guess, but I thought I’d ask about the lids first.
Thanks for sharing this adorable idea!
Sherri
Amanda says
Hi Sherri! I don’t use the lids on mine. If you want to use lids, I would get the LED tea lights. Putting lids on with the flame tea lights won’t work, the flames need oxygen to stay lit.
Toni Ann says
Love! Did you paint the inside or the outside?
Amanda says
Hi Toni! These are painted on the outside :)
Sherry Y says
I found these Halloween luminaries on Pinterest. I just love them. I can’t wait to make some for my grandsons (and myself) to put out next Halloween. I also can’t wait to peruse the rest of your delightful site. I’ve bookmarked it for future fun. Thanks for sharing your projects, Amanda!
admin says
Thank you Sherry!
christina says
Thanks for sharing these- I love them! I gave them a try and you can see the pics here: http://fromonemommatoanother.blogspot.com/2011/10/halloween-lanterns.html
Andrea @ HandMakeMyDay says
So happy I found you on Pinterest! My husband also painted some jars which turned out great! He actually scratched out faces on the back side so that you get a neat silhouette on the wall. http://handmakemyday.com/2011/10/19/easy-halloween-luminaries-he-made-painted-jars/
Amanda Formaro says
Those are awesome Andrea!
joyce hemker says
I’m going to try this with the plactic kool-aid containers
Shana says
found this post from a google search and i’m soooooo excited to make these; will let you know how it goes! thanks for the great pictures and all the detailed instructions
Amanda Formaro says
Awesome thanks Shana!
Stacey says
I absolutely love these! they’re genius. Halloween is my favourite holiday and you’ve helped me decide that I’m going to make a special space in my attic for halloween items so I can make something new each year.. this is definitely going to be in there! Brilliant, so thanks :) xx
Amanda Formaro says
Thanks for your kind words Stacey – glad you like them!
Sarah says
Hiya! I just tried these with my patients where I work, they loved them!! The only problem I am running into is that we used lights from the dollar store and we we place them in the jars the only color that shows is that of the light. So every jar looks orange! I am going to take a few home and try an actual flame candle and see how that goes! Thanks for the fantastic idea!!
Jen says
Really Cute!!
Margie Chao says
Hi, I love your painted Halloween jars! My kids can’t wait to make them. I had a quick question….I have lots of tempera paint. Would that work instead of acrylic paints? I’m thinking with the clear glaze the tempera would be okay. Any thoughts on using tempera instead of acrylic paints?
Thanks!
Amanda Formaro says
Hi Margie! I have never actually tried tempura paint on glass. You can always try it on one and see how it works. If you do, would love it if you would come back and leave a comment on how it worked!
Margie Chao says
The tempera paints worked great! I wanted an easier paint to work with since I’ve got little kids doing the project and I didn’t want the hassle of using acrylics. Acrylic paint did go on more smoothly on glass, so I can see why you chose acrylics. The tempura paints were more streaky going on, but after being sprayed with the clear coating, they came out more transparent, which was kind of cool! Thanks again for your project idea. I will continue to do this every year with my children!!!
Amanda Formaro says
I’m so glad to hear that! Thanks for letting me know about that, it’ll be great info if someone else asks. So glad you guys had fun! :)
Margie Chao says
Hi Amanda,
I wanted to share this in case others wanted to use tempera paints too…unless you apply like three coats of the lacquer spray the tempera paints will run if wet. I found this out the hard way this morning when the sprinklers went off near my porch steps! LOL :)
LS says
Thanks for the cool idea! Just made these last night and finished up today. My paint looks much more streaky than yours and when the candles are in it really shows. I’ve never painted on glass before so maybe it’s a serious learning curve, The clear coat is pretty cool and makes the appearance a bit better. We drew the faces with just sharpie as another reader suggested and it was a real pain in the bum until hubby found a large, lone, odd sharpie and he rocked out the rest of the ghosts with that. We put some tap led lights in & the kids are running around holding the Boo Story light :D.
Amanda Formaro says
Yeah painting on glass can create streaks. I tend to go over the paint several times, smoothing it as I go. BUT I actually think the streaks are cool too, adds character! :) So glad you had fun!
Tammy says
These are precious! I shared them with my readers today at Aimee Asher. I hope that is ok! Thanks for the wonderful idea!
Amanda Formaro says
Thank you so much, how nice of you!
Chris says
what kind of jars are you using? All the canning jars I’ve seen have some kind of markings or words bubbled into them. I’m sure they will show through as a shadow.
Amanda Formaro says
Ball jars! And the raised letters don’t show through.
LK says
I found these on parents.com and thought they would be fun for my 4 year old son and me to try. I used a foam brush because I thought a paint brush would be too streaky, but the foam brush did not put the paint on thick enough. I let it dry overnight and then tried to put on a second coat. It didn’t work. When you try to put a second coat of paint on it just takes the first layer off. I washed the paint off and will give it another try with a brush and a thicker single layer of paint this time. They are so cute that I want it to work.
Amanda Formaro says
Even with streaks they look good! :) adds character ;-D
Christina Aldrich says
Hi- I saw this link to your blog and luminaries on Pinterest (my new FAVORITE thing to do instead of cleaning!!!). Yesterday I bought everything I need to make these, except for the mason jars. The store was out but said they would be getting more in today or tomorrow. My 4 year old is home sick from pre-school today so I’ll be scouring my house for any empty jars that aren’t nailed down LOL. Can’t wait until the end of the week :-) Wish me luck!
Amanda Formaro says
That’s exactly what I was going to suggest! i always have a stash of empty jars of all sizes in the cabinet in the basement :)
Angie says
So glad to have found this…I gotta make some…SOOO creative!! =)
Kari says
Congratulations!
Your post has been nominated for a Mommy Blog Award. Mommy Blog Awards were created to highlight relevant and creative content that is worth sharing with family, friends and those in search of inspiration. Rather than following entire blogs and stories, our goal is to provide answers to current questions and snippets that can be easily shared. So, take a moment to visit your post, forward the link to your friends, vote, and hopefully find something worth sharing at mommyblogawards.com.
Amanda Formaro says
Thank you for the nomination!
Ashleyakamomto1tot says
I made these today! my daughter myself and my husband all of us really enjoyed it! i bought the battery powered tealights but i used large mason jars they almost needed 2 of them to get it lit well , i did use 2 coats of paint so it made it a little thicker for the light to show through…. BUT also i found out hello mason jars have that centerpiece under the lid u can keep off and still look like a lid is on it and it wont snuff out real tea light candles :) they turned out AWSOME i wi sh i could post pics thanks so much for sharing this idea! im a NON crafty mom but i made 12 of these to line the walk way and i will use them for many years! :)
Amanda Formaro says
How awesome Ashley!! Thanks for letting me know, it always makes me smile when one of my projects can inspire someone else :)
Wendy says
I’d love to do this for a craft in my child’s class…do you think I could use a blow dryer to speed up the process?
Amanda Formaro says
Abolutely!
becky says
do you paint the inside of the jar or the outside?
Amanda Formaro says
The outside :)
Christen Allen says
Found these on Pinterest and making them tonight with the fam! I love your blog. So cute. :)
Amanda Formaro says
How fun, hope you had a great time!
Rachel says
So cute! Just found you on pinterest! Love this and Im deff going to try it this Halloween!
Amanda Formaro says
Thasks Rachel, these are one of my favorites :)
Jennifer says
These are adorable! I found your site on Pinterest.com and decided that since I am one of the homeroom parents for my daughters 1st grade class…we are SO doing these for her Halloween party. I thought I better see how messy it would be first and made some this week with my daughter–LOVE THEM! I am going to write a blog later today and will link it to your page to give you credit. I just have one–and probably a really dumb one–question…Do you spray the clear coat inside or outside of the jar or both. OH, I also used the sharpie on the outside of the jars and didn’t have to use the black paint over it. Thanks for the cutest craft idea out there!!
Jennifer
Amanda Formaro says
Hi Jennifer, thanks for the compliments! You only need to spray the outside of the jars, it’s just to keep the paint from peeling off and to give them a nice glossy finish. Can’t wait to see your version!
pageturnershollow says
Loved your post! I mentioned it as my inspiration for a Halloween project in my blog!
http://pageturnershollow.wordpress.com/2011/09/15/halloween-silhouette-lanterns/
Keep up the good work!
Audrey says
I love this post and I'm so excited to try it out. I've also shared this with my readers!
http://lonelypaper-designs.blogspot.com/2011/09/how-to-jack-olantern-luminaries.html
Recovering Noah says
Thank you for stopping by my blog. I love love love this idea! Now I know what to do with all those salsa jars I have laying around. I'm so glad Halloween is just a few months away… I'd hate to have to wait any longer to try this idea. I'm loving your blog! Leslie =)
Amanda says
Thanks Carol! How awesome that you already made these! As for the marbles, yes you are spot on, those are a bit bigger than the average ones. I honestly can't remember if I found them at Michael's or a thrift store. If you do a google search for "large flat glass marbles" there are some there too ;) Thanks!
carol wolfgang says
Wow Amanda. This is actually very interesting to me. I made a few of these a couple years back.I actually thought of these idea cuz i seen them done with milk jugs. I like painting on jars. So of course today when i came acrossed your site i seen the epsom salt luminaries and im so going out to buy the stuff to make them. I save all kinds of jars, pickles, jelly mayo's anything. i save them. But yeah that is so cool that i made pumpkin luminaries like u did. I personally like yours better, but it was my first time doing them so im quiet happy. i also was wondering on the flat glass marbles how big are those. they look larger then normal size marbles. i cant find bigger ones anywhere though. I am wanting to make those to. And they dont have to be just for valentines. U can do anything u want with them. Thats for sharing your. I think u have alot of talent and interestign things to make. ideas on the page
Amanda says
Thanks so much Shweta, so glad they turned out! Happy Halloween!
Anonymous says
I absolutely love your blog and get inspired to try out all your crafts.I tried making them myself last week and they turned out so well!
Thanks for sharing,
Shweta
booturtle says
Thought I already commented. But wanted to chime back in that I finally made my pumpkin luminaries inspired by you and put pictures up on my blog. Thanks so much for the idea!
booturtle says
I finally finished my painted pumpkins and put them up on my blog with credit for inspiration from you. Thanks again for sharing.
Amanda says
erisgrrrl – How fun! Thanks for the kind comment, would love to see a photo of your jars. If you are on Facebook, you can post them on the Crafts by Amanda fan page! http://www.facebook.com/CraftsbyAmanda
erisgrrrl says
We did this today using recycled jars that I've refused to throw away. We let our son paint several of them and it's adorable! I think we might add a jar or 2 each year so we can kind of chronicle his abilities over time! :D
Thanks for such a great idea!
Amanda says
Thanks for the features ladies!
Jess @ Frugal with a Flourish says
I love these! Just featured you in my "10 Ways to Use Mason Jars in your Home" :)
booturtle says
Love this. I don't have jars but when I saw my local thrift store had squatty round floral vases for a dollar apiece your pumpkins came to mind. I picked up a few vases and plan to pain them this weekend. I'll be posting on my blog with a giant tip of the hat and link back to you. Congrats on the ivillage mention too.
Krystal says
This is so cute and a great idea! I featured this on my blog if you want to check it out and grab a button.
sassysanctuary.blogspot.com
Amanda says
Thank you very much for telling me. And on that one she's blatantly taking credit! Someone asked her what she was going to do with them and she sai she was going to make magnets, as if she really made them! UGHHH!
Anonymous says
She has your Bread Tag Monsters too. She admits in the bread tag post that the post about the luminaries was deleted because she didn't have links and claims that Cafemom won't let her have links up. People can have links there, just not in their signature or links to their own blog or website as advertising. I have seen her make links to her own stuff there though.
Amanda says
This is not i.heart.rachels tutorial, it's mine. Thank you VERY much for bringing this to my attention!
Anonymous says
What a cute idea! Did you get the idea from i.heart.rachel on Cafemom? She has a lot of her tutorials there including this one, same pictures and instructions and all.
Amanda says
Anon – baby food jars will work fine as long as the mouth is wide enough for a tea light. Those will be awesome! :)
Anonymous says
These are so cute! I'm making some today, only I'm using old baby food jars so I have different sizes. Thanks for the idea!
Amanda says
Thanks Melissa! So right you are. Kids love to paint as do adults. So this is great for all ages :)
Melissa says
These are so cool! And a craft that can span the ages! What kid doesn't like painting!
Amanda says
Thanks! Couldn't have a better compliment than that :)
Anonymous says
even though i have a teenager and i usually hate crafts + stuff like that, i am sooo excited to do these now! halloween is my favorite holiday and this seems like a lot of fun to do one day to really make my house look great:) thanks for posting too such clear instructions + good pictures!
Amanda says
Thanks Anna~ hope you make them, they are fun!
John, Anna & Rebecca says
How adorable!!!! I have a whole bunch of glass jars too. I wasn't sure what to do with them. Great idea and I think I'll even let me three yearold help me with them. I can't decide what I like more, the ghosts or goblins.
Anna
http://wastedbandwidth.org
Amanda says
Thanks Carmie!
Tonya how fun! So glad they were easy and you were able to make them, they sound great!
Tonya says
I made 5 of these last night but cut out leaf stencles and glued them on with a glue stick (glues washed right off) and just did a fall theme….AWSOME IDEA! They turned out great. Thanks so much for the "how to"!
Carmie, the Single Nester says
How fun! Scary too!
Amanda says
Thank you again everyone! :)
Carri – as long as the mouth of the jar is wide enough to get a tea light candle inside they should work fine!
Carri says
These are so fabulous! I'm going to try these with my Girl Scout troop. I wonder if the larger Baby Food jars would work?
malia says
amanda these are awesome! love for you to link up tomorrow to a crafty soiree at http://www.yesterdayontuesday.com
Katie @ Not Just Decorating says
These are simply adorable! I am going to have to try to make some of them! Thanks for the great idea!
Colleen @ MuralMaker&More says
You know, painting on glass is usually my absolute least favorite surface. But I have to try these. They are just so dang cute, I can't believe it! Thanks for all the tips, too. Great tutorial.
Would love for you to stop by Sunday and link them up to Passion for Paint.
Alicia says
I popped over from Under the Table and Dreaming, these are so cool. I want to try them right now =)
Amanda says
Thank you so much Corinna! :)
Veronica – thanks! I believe these were pint sized jars. They are still packed away (I'm bad, haven't pulled out my Halloween stuff yet!) but I know that the quart jars are what I used for my pickles, and they aren't as big as those :)
Veronica says
Love this! I too have lots of canning jars and can't wait to make these with my boys. Did you use the pint or the quart jars?
Corinna says
Saw these on Skip to my Lou. They are SUPER cute! I love your ghost ones also. And I have a ton of canning jars so I'm totally inspired by your post today! :)
Corinna
Amanda says
Than you EVERYONE for all of your kind comments!! :) :)
Kimber – yes Ball jars do have raised letters, but only on one side. :) The ones that I used also have the raised letters.
Kimber says
I love these. Could you tell me where you bought canning jars that are smooth like that? I know the ball canning jars have raised glass lettering on them. Thanks.
Liz @ LivingMySweetLife says
OMG! LOVE!
How did you know I had a box full of jars that I had NO IDEA what to do with????
You're amazing, I stopped by from today's creative blogs linky party and now I am poking around your site. It's awesome~!
katieb says
This was GREAT I loved this idea! I live on the second floor of an apartment and I have giant squirrles that love to run across my patio. I don't think having pumpkins this year will be an option, as I fear that they will eat them and never leave me alone.But now I'm SUPER EXCITED for halloween this year! This was great for my raining day sunday craft project! I also like a few other ideas you have and will be using them with my little cousin! :)
GREAT BLOG!! Thank you for the great fun and easy craft ideas! :)
Q @ JAQS says
OK THAT IS AWESOME. I will be making this for our house this year :). Thank you for sharing this awesome idea!
Christina says
Awesome!
Chic Cookies says
OK, I need to make these this year…
Erin says
I love them!!! And they are easy too!
Shannon @ Quarry Orchard says
These are so cute!
I just can't part with my canning jars though! :)
Patti says
These are cute…I made some last year and put strands of xmas lights in them!
Glenda says
your blog is awesome, I am following you so I can keep up with the great stuff on your blog.,can I borrow your idea for my nieces to make, we in Australia dont have a big Halloween but I still would love to make these for them.,love glenda
Anonymous says
I've done something similar with my neighborhood kids in recent years and let me remind all of you that plastic peanut butter and mayo jars are usable and especially good if you're letting smaller kids make their own "pumpkins" (and you can use the little battery lit candles from the $ store to lite them)…then you can screw the tops back on after lighting. Waiting for my grandbabies to grow so we can 'play' with things like this together.
Tracy's Trinkets and Treasures says
Really really cute. I didn't know clear glaze could do this to paint. I really like it. It is on my list.
gena says
Wow that's just adorable !!!! I'm going to try them myself this week !
thanks for sharing,
gena
http://www.thehouseonlavenderhill.blogspot.com
Pat says
Stopping by from Between Naps on the Porch. What a CUTE idea!
Heidi@TheCraftMonkey says
I LOVE these!!! I'm so going to make these!! Thanks for sharing!
Cassie @ Primitive & Proper says
glad you shared your own project! these are so adorable!
brookie says
How smart and cute! Love this.
creativejewishmom/sara says
love these Amanda, thanks so much for sharing on Craft Schooling Sunday!
KasiaJ says
I love them! I did something similar just the other day! You can check them out if you want:
http://kasiascrafts.blogspot.com/2010/09/jack-o-lantern-string-lights.html
Anonymous says
Please don't worry if you should post or not…. this was a great idea!!!!
Alison says
I have always wondered if acrylic paint would work well on these. I tried spray paint before and it didn't work out so well. :) And I am so jealous you could do the faces by hand! impressive!
Anonymous says
For the young toddlers, I just saved my milk cartons and let them draw on faces. I then went and got those fake candles and put them in the bottom. You can also use a strand of light.
[email protected]
divaskychick says
Well it's a good thing you posted on Craft Gossip. I am obsessed with all those posts and somehow didn't even know you had a separate blog!!!
Amanda says
Thanks Ecolicious! I couldn't find anything at that link, but thanks anyway! :)
Amanda says
Thanks Pam!
Ecolicious says
These are great! I just added them to my jar recycling lens http://www.squidoo.com/lensmaster/new_workshop/reuseglassjars
Pam says
Can't wait to try this fun project; thanks for sharing!!!
Amanda says
Thanks so much Julie!
Julie says
Found you from Craft Gossip. Love both blogs. You're so talented. Thanks for this. The glaze looks awesome!!
Amanda says
Thank you Karen :) I hope everyone feels the same way as you. Sharing it on Craft Gossip was a little nerve wracking for me. I don't want anyone to think I would use that as a tool to further my own blog!
Karen Harrington says
Seriously cute! THANKS for sharing!
Amanda says
Thanks everyone! Thanks for sharing Judy, those are very cute :)
Judy says
I am so impressed just by the sheer number of jars you have, let alone how cute they are. I made similar jars with fabric and Mod Podge and had so much fun! It's a great way to reuse those jars!
Barbara @ Modern Comfort Food says
I'm a year late, but these wonderfully creative luminaries are such a great idea. The short road our house is on is so dark that children often don't come our way on Halloween. I think I'll make these to light the way!
Elle says
I looooove these!!! And so simple, too! Yours are Halloweeny good!
Morgan Louise says
I'm making these for sure this year! Love your blog! :)
Sheila Irish says
LOVE these! Now I have to get me some canning jars….Freecycle here I come….LOL
Brittany says
these are so cute! i will have to start collecting jars!
Lana @ Never Enough Thyme says
Amanda! You are so talented! And creative! These are just precious. Great job.
Deeba PAB says
Woot woot…these are so cute! Precious Amanda, just too precious! Well done!
Megan says
These are way better then luminaries. I wouldn't worry as much with kids and costumes. Too cute, LOVE 'EM!
Creative Craft Ideas says
LOVe this idea too. It is cute (and easy) that you painted the jars—I have seen it done with glued on tissue paper but this would be much easier! ah, next year here i come =)
Anne
ZeidmanZoo says
We made some great ones on the fly with your inspiration! My kids made jack-o-lanterns out of various size glass jars, and ghosts out of baby food glass jars! I can't wait to adapt this idea to other holidays, and add more to the Halloween ones we now have! You can see the pictures on our blog: http://zeidmanzoo.blogspot.com/
painted maypole says
found you on the crafty crow – loved this simple and very cute craft. Posted a pic and a link to this post here: http://paintedmaypole.blogspot.com/2009/10/happy-halloween.html
BululuStudio says
This project is super cute and another way to reused. Excellent thank you for sharing it.
Amanda says
Karen – How awesome, thanks for stopping by!
Tonya – Good luck, hope they come out for you this time ;)
Akela – Thanks! Your drink bottle luminaries are cute!
Jolene – so glad you and the kids had fun! Since you painted them on the inside make sure you only use tea lights and not votive candles. The larger votives may leave black marks on your paint from the flames.
alexandra – fabulous! Hope you are having fun! :)
alexandra s.m. says
My 6 year old and I are in the process of making some . Thank You!!
Jolene says
Made these tonight with my 2 and 4 yr olds… we painted the insides of the jars, though, and the faces on the outside… less mess with little guys to paint inside…
Akela Joy says
These are just gorgeous! I made some out of 2 litre cold drink bottles – (http://www.craftsforcretivehands.blogspot.com) but yours look great! Love your blog.
Tonya says
Okay, so I took the paint back off of my jars, and I'm going to see which Apple Barrel colors are the most translucent so that I can start again today! Yay!
Karen says
Just made 2 with my 4 year old! Love them!!!
Amanda says
Thanks Regina, and thanks for coming by!
Regina says
I love these!! THey totally rock! THanks for the instructions.
Amanda says
Thanks Pom Pom!
Pom Pom says
Delightful! You give such wonderful instructions! Happy! Happy!
Amanda says
Hi Kristen – I used acrylic craft paint such as Delta Ceramcoat or Apple Barrel :)
Tonya – I'm sorry they didn't work! You can go ahead and wash them with a scrubby pad under warm water with some dish soap, that should get the paint off since you haven't put a glaze on yet. Are you sure though that the light won't shine through? Did you try one in a dark room with a tea light? I would do that before starting all over :)
Tonya says
I tried this yesterday and failed miserably. Can you tell me what kind or colors of paint you used? Mine aren't nearly transparent enough for light to shine through, and they look pitiful. And, do you know what I can remove my paint from the jars with? I didn't glaze then yet, and want to remove what I have on there and try, try again before this weekend. Your idea is great, but I am a craft noob and just did it stupidly! Thanks!
Kristen says
These are wonderful! I love them. What type of paint did you use though? Acrylic? Tempera?
Amanda says
Zeidman and Crafty Dollar – Thanks! hope you get to make them :)
Ollie thanks!
Painter Mommy – thanks for the compliments! You had some great ideas too :)
mizntc – great! Thanks for coming by. I was looking at your beads, those spider earrings are awesome!
miznyc says
Those are soooo cute! I found you through craftgawker. :D
Painter Mommy says
Oh my goodness, you craft ideas are awesome! I just subscribed to your blog.
And thanks so much for stopping by my Painter Mommy blog and commenting. I love your idea about framing the kid's artwork. I will be doing that too.
Have a great day!
DAWN
Ollie says
Cool! just need to get some glaze…
ZeidmanZoo says
Thanks so much for your reply! I have a clean pasta sauce jar in the recycling that I'm hoping to paint before the week is through! :)
The Crafty Dollar says
Those are so cute! Definitely need some of these for Halloween night.
Amanda says
Thanks ZeidmanZoo! Yes acrylic paint works great. I've painted on jars for a long time, and the trick to remember is not to add a second coat until the first coat has dried COMPLETELY, otherwise you run the risk of peeling off the first coat. However, with these luminaries there's only one coat required, so that's not an issue :)
ZeidmanZoo says
Awesome idea!!! I had no idea acrylic paint would work so well! Thanks for sharing!
Amanda says
Thank you Chica and Patrice! We are loving these little guys, glad you liked them\!
pinkpatrice says
I love this idea! I am definitely going to do this for Halloween this year! :)
Chica and Jo says
These are too cute! Will have to find the time to make them for my daughter's Halloween party!
Amanda says
Thanks Jen! Would love to hear about it if you do :)
Jen says
Wow, I love these, I want to make some!
Amanda says
Thanks Terri, yes love that spray :)
Terri says
Wow—so very cute!! Don't you just love that Krylon spray?
Amanda says
Thanks ladies!
The Party Animal says
These ROCK – thanks for the share
Felicia says
This is my new favorite blog!! You are amazing!
Emily says
These turned out sooooo cute! Great job with the paint (way faster :) Thanks for the link-up!
pam says
These jar luminaries are so cute. We are using them for our Girl’s wkend craft
Thanks for the easy and cute idea
Amanda says
That’s great, have fun!
angie says
You can use enamel paint, put the jar on foil, then on a cookie sheet, put it in a cold oven, set at 350. Bake for 20 minutes, pull out and let cool. This allows you to wash the jars without worrying of chips or flakes. You can also bake a clear glaze over the enamel paint.
will save you on having to touch up every year.