
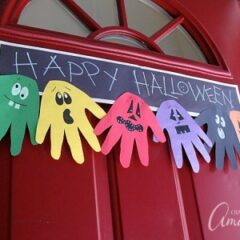
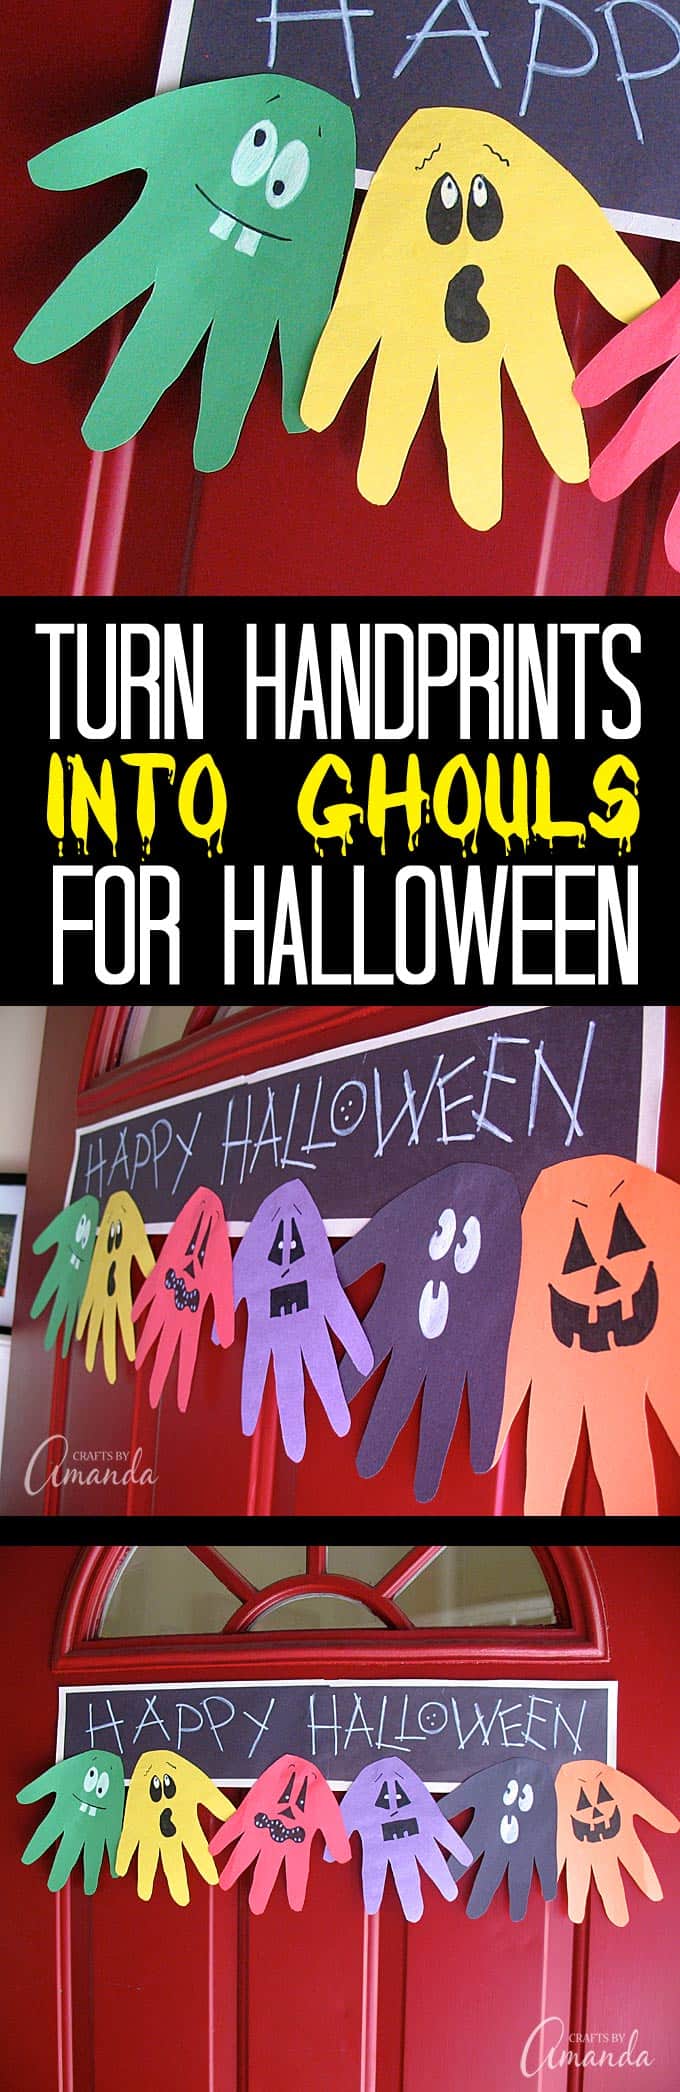
This Halloween handprint ghoul banner is a great project for the kids to make and hang on the door to greet trick or treaters. It lets them get creative by drawing the faces and it also makes a wonderful group project. If you’re having a Halloween party, set the supplies out and as guests arrive, have them create a handprint ghoul to add to a full Halloween party banner that just keeps on growing!
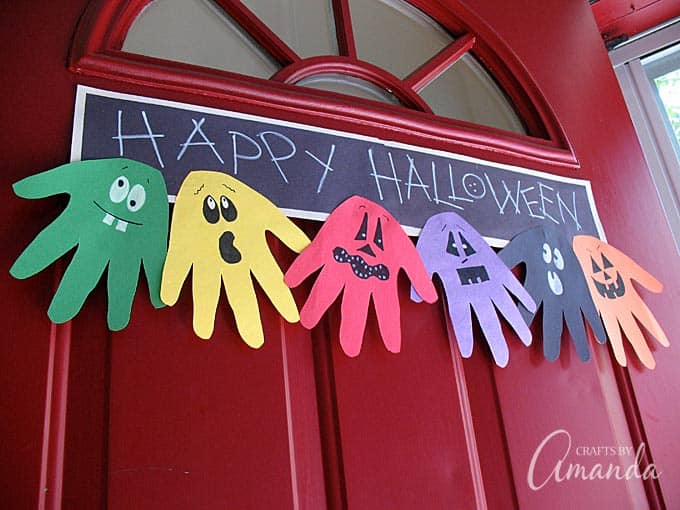
Halloween Handprint Ghoul Banner
Halloween brings out the creativity in me more than any other time of year. Not even Christmas conjures up the ideas that go through my head at Halloween. If you visit this blog regularly, you know I am obsessed with creating fun crafts for kids that use inexpensive or recycled supplies. I know that when I was a young mother I didn’t want to have to run out to the craft store just to make a project with my little ones, especially with the attention spans they had.
Much like my other kid’s projects, this handprint craft uses very minimal supplies, most of which you probably have on hand. Shall we get on with it then?
Supplies you will need:
- Construction paper: white, black, yellow, green, red, purple, black and orange
- Black marker (or crayon)
- White paint pen (or crayon)
- Scissors
- Glue stick
How to Make a Halloween Handprint Ghoul Banner
On any one of the colored papers trace your child’s hand. Stack green, yellow, purple, red, orange and black sheets on top of each other with the traced handprint sheet on top.
Tip: to keep the sheets together you can paperclip them on all four sides.
Cut out the handprint, cutting through all six sheets at once. If you prefer, do each one individually or only 2 or 3 at once. Whatever works best for you!
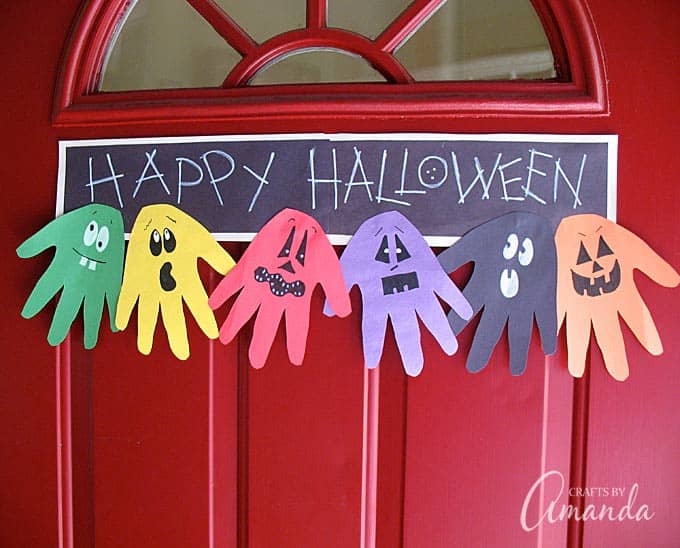
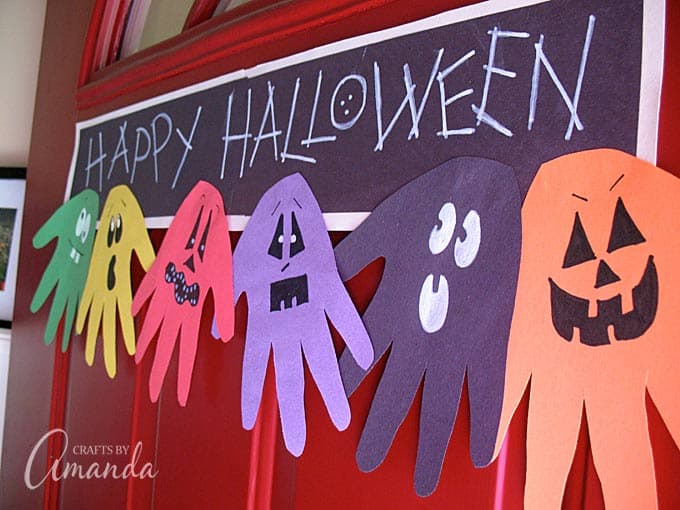
With fingers of the cutouts pointing downward, have children draw faces on the handprints.
Fold a sheet of white construction paper in half lengthwise. Open up and cut along the crease. Attach the two lengths of white paper together with a glue stick, end to end.
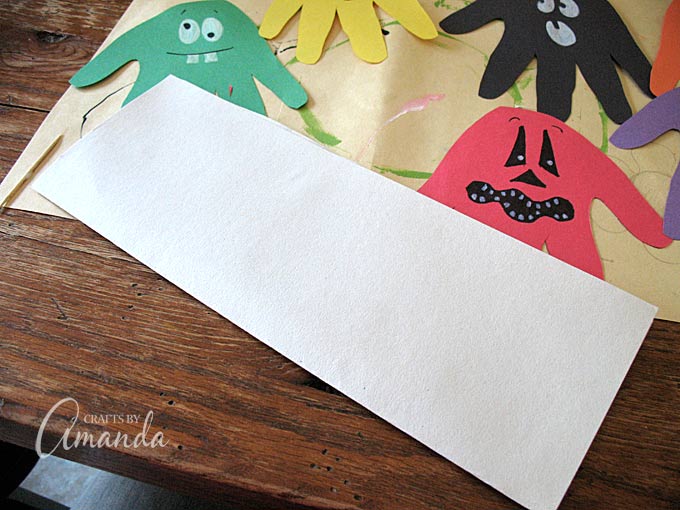
Repeat this step with a sheet of black paper as well, only this time after folding in half, trim off about 1/2″ from the long ends and the same on the short ends. The idea is to make the black the foreground color, placing it on top of the white banner, making the white banner the border.
After you trim the black sheet, go ahead and cut it in half lengthwise like you did with the white one and glue on top of the white sheets.
Attach the handprint ghouls to the bottom of the banner with the glue stick. Use a white paint pen or white crayon to write Happy Halloween across the banner. Hang!
You might also like:
If you think this project looks fun, you might like my creepy hand luminaries, also great for a Halloween party! Another craft I recommend are these cardboard tube ghouls, so colorful and fun! These Halloween treat cups and these bleeding place cards are also great for a party as is this Kitty Litter Cake! Hope you have fun crafting for Halloween, and be sure to let me know if you make my Halloween Handprint Ghoul Banner. :)
This post was originally published on this blog on September 25, 2010.
Halloween Handprint Ghoul Banner
Supplies
- Construction paper: white black, yellow, green, red, purple, black and orange
- Black marker or crayon
- White paint pen or crayon
- Scissors
- Glue stick
Instructions
- On any one of the colored papers trace your child's hand. Stack green, yellow, purple, red, orange and black sheets on top of each other with the traced hand print sheet on top.
- Tip: to keep the sheets together you can paper clip them on all four sides.
- Cut out the handprint, cutting through all six sheets at once. If you prefer, do each one individually or only 2 or 3 at once. Whatever works best for you!
- With fingers of the cut outs pointing downward, have children draw faces on the hand prints.
- Fold a sheet of white construction paper in half lengthwise. Open up and cut along crease. Attach the two lengths of white paper together with glue stick, end to end.
- Repeat this step with a sheet of black paper as well, only this time after folding in half, trim off about 1/2" from the long ends and the same on the short ends. The idea is to make the black the foreground color, placing it on top of the white banner, making the white banner the border.
- After you trim the black sheet, go ahead and cut it in half lengthwise like you did with the white one and glue on top of the white sheets.
- Attach the hand print ghouls to the bottom of the banner with glue stick. Use white paint pen or white crayon to write Happy Halloween across the banner. Hang!

- Swirling Twirling Ladybugs - July 21, 2026
- Drip Tie Dye Backpack - July 17, 2026
- Mini Coastal Clay Houses - July 14, 2026


Denise M. says
This was so cute and easy to do with my 2 yr old. I prepped in advance the eyes and mouths. We traced his hand and glued together.
tiffany says
Love this!! We’re sharing today over at our Play Eat Grow Great Halloween Roundup! :)
http://www.playeatgrow.com/2015/10/greathalloweenroundup2015.html/
Amanda Formaro says
Thanks so nice of you!
MamaGames says
Thanks for the fun craft with supplies I could send my daughter into the other room to grab! :) We made this banner this afternoon and the kids are so proud. I Pinned your post, hope that’s okay!
Amanda says
How fun, so glad you guys had a good time!
melissa says
Cute idea! You have been linked on my blog! Thanks for sharing!
Amanda says
Sounds like so much fun, so glad they had a good time!
Anonymous says
We made this in our after-school program. The children had a great time with this one. The expressions on the ghosts where a hoot!
Amanda says
Thanks again Michelle!
Michelle says
I'm sure they will! I think I'm going to make it even easier by pre-cutting eye and mouth shapes so that all they have to do is pick and choose which ones they'd like. Maybe even have some google eyes. Won't have them make the whole banner, just the hands for them to take home. This is such a nice, simple idea for the younger kids to do. I look forward to seeing what other ideas you have on here!
~Michelle
Amanda says
Hi Michelle! Glad you made it over and that you like this project! :) It's definitely an easy one that kids will really like. Thanks for coming by, I hope the kids enjoy it!
Michelle says
Jason has been telling me you had a craft blog as well as a food one and I FINALLY remembered to check it out! You have some really great ideas, and I LOVE this one. I've been looking for a simple Halloween craft to do with my CCD preschoolers, and this would be perfect!
~Michelle (Jay's wife) :)
Amanda says
Thank you all so much!
Danielle Hunter says
These are fun! I would love to do this project with my girls and I'll be sharing the link on my blog tomorrow!
Connie says
I love that idea. My 7yr daughter made one today. It's going on my blog and I'll refer back to you.
Thanks for sharing.
Tanya says
This is very cute…I might just have to try this with my boys :)
Cristie says
So cute, what a great idea.
amandab says
What a great and simple decoration. Sadly, Halloween isn't that popular over in Oz :(
Lori@Paisley Passions says
What a cute idea!!! I really like how that turned out. It would be a great idea for a teacher to use in a classroom too!
~Lori @ Paisley Passions
Paisley Passions Linky Party Thrilling Thursdays
Megan @ Polish The Stars.com says
I love all of your Halloween crafts and I can't wait to try some of them out for myself! I just wanted to let you know that I passed a blog award on to you! :) http://www.polishthestars.com/2010/09/pinching-pennies-and-blog-awards.html
RedTedArt says
You are the Halloween Queen!! So many fabulous ideas!!! And all as "easy as the next", but so great to look at!
Thank you for linking up :-)
Maggy
Sassy Sites! says
Super cute! I found you at the Today's Creative Blog hop! Come by and visit me at Sassy Sites! We have a giveaway going on AND a header contest. Come by and check it out. xoxo
Marni @ Sassy Sites!
Daisy Day says
We love this!! So fun…so easy….so going to make one!! You are amazing.
RosannaRox says
SO So CUTE!! Totally making this TODAY!! Halloween Crafts all week!
Becky @ Our Sweet Peas says
Love this. I will be doing this with my twin boys. I love handprint crafts to remind me of how they are growing from year to year. Thanks!
Jennifer Juniper says
It will be so fun to pull these out every year and compare hand prints!
Krista says
Cuteness galore! I'm makin' one tomorrow with my three year old! Thanks!
Jenglamgirl says
how cute and creative. I love that the kids are involved too. Great job. Jen
Megan says
What a darling banner! You do the best kids crafts. I love all your ideas
Amanda says
Thanks you guys! :)
Anji* says
What a lovely idea! They look really cool and spooky!
Sandra says
Cute. I love the idea of making using handprints. We used to take our daughter's handprints every year but dropped the tradition years back. (I have no idea why). Love it.
Kathryn says
I love this idea! Thanks for sharing this with us.
Amanda says
Thanks! That's a great compliment coming from the handprint craft queen! :))
artsy_momma says
I love it! And I love that I have never seen that idea before :)
Amanda says
Thanks Amy! Would love to see yours too!
Amanda says
Thanks so much Lorie! Would love to see it if you made it!
Amy says
Love it! We will be making this at our house!
Lorie says
PS – Thanks for linking up to Show and Tell Saturday!!
Lorie says
Amanda! I love it! We are going to have to use that idea tomorrow night for Family night! I think I will make them as a garland for my fireplace!
Amanda says
Thanks you guys!
Jenny @ Embellishing Life says
Now this is cute! Loving your blog. I am now your newest follower :)
http://embellishinglifeeveryday.blogspot.com/
Jean says
This is so cute. I think my niece would like to make something like this.
John, Anna & Rebecca says
What a cute idea! I host a childrens preschool art class and I think we will have to do this craft! I love it!
Anna
http://wastedbandwidth.org
Anonymous says
Adorable! makin' one tomorrow. Thanks