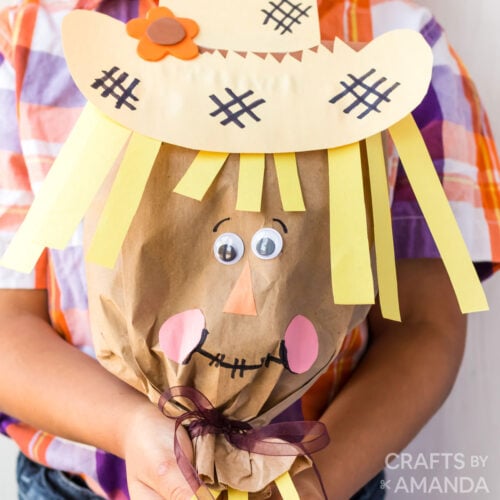
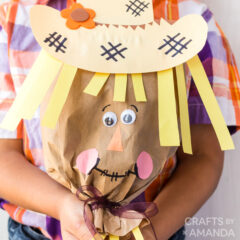
Turn an ordinary lunch bag and a few simple supplies into this adorable paper bag scarecrow! Our scarecrow has a solid handle, making it great for make-believe play time.
Why this project works
It’s likely that you have all or most of the craft supplies on hand already to make your own paper bag scarecrow. If not, you should be able to find them all at the dollar store, making this both a fun and frugal craft.
This craft turns into a toy, perfect for a puppet show or to use as a porch decoration! For a more adult-centered project, check out our coffee can scarecrow.
Helpful Project Information:
Age Level: 5 and up
Mess Factor: Low (glue can be messy though)
Level of Difficulty: Easy
Time to Complete: less than 15 minutes
Cost Estimate: Less than $1.00 each
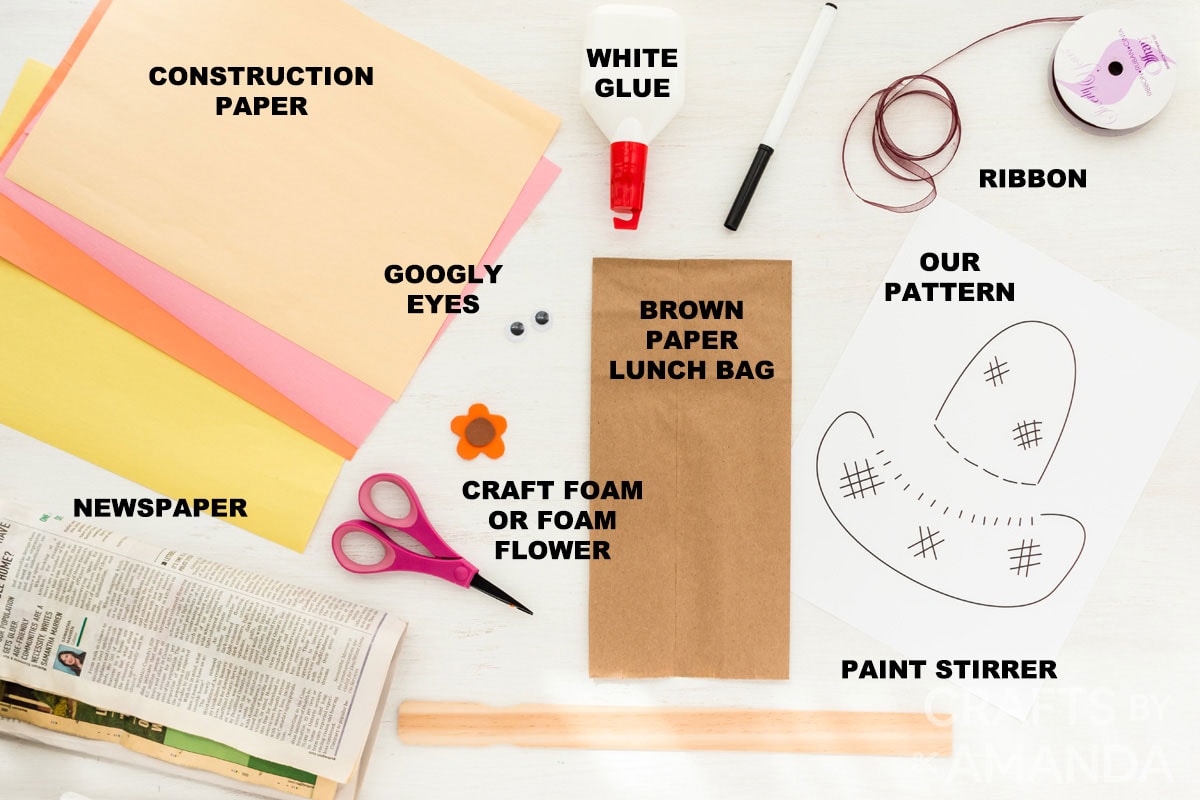
Craft supplies you will need
Get full list of supplies and directions in the printable version at the end of this post.
How to Make a Paper Bag Scarecrow
These step by step photos and instructions are here to help you visualize how to make this project. Please scroll down to simply print out the instructions!
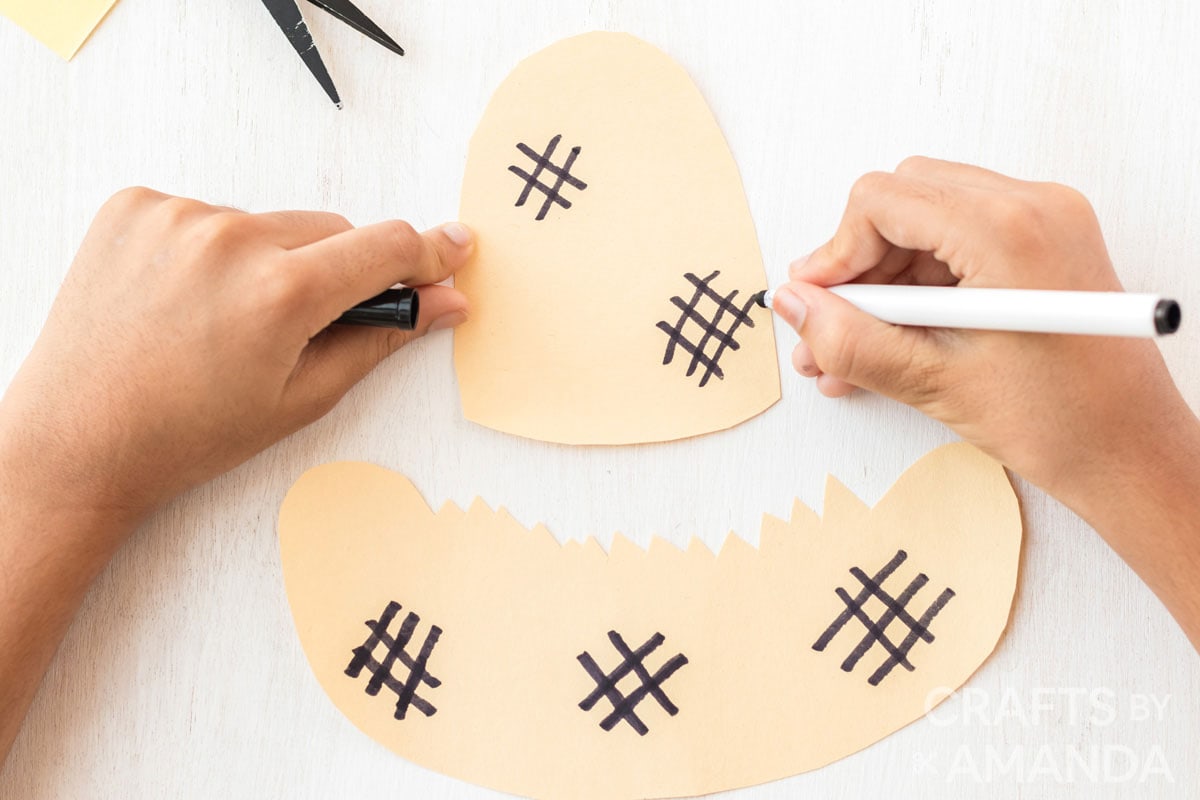
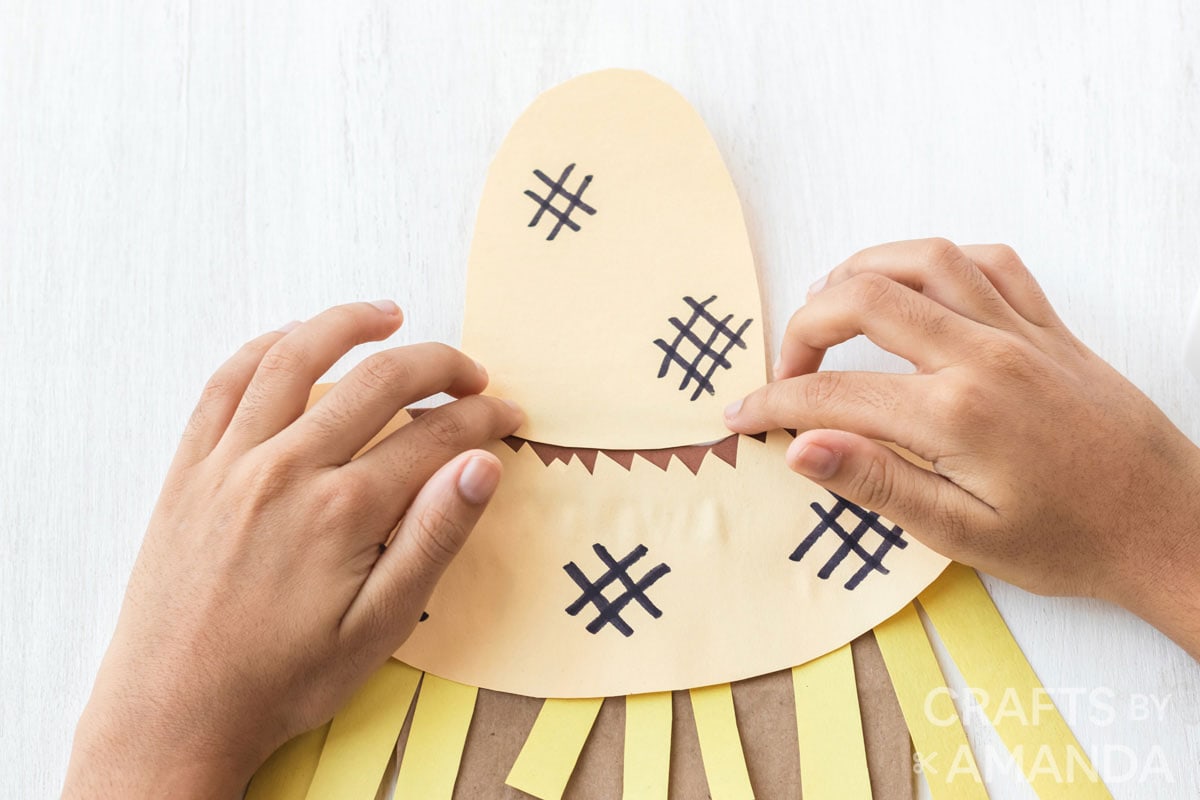
Trace the hat pattern onto white or tan construction paper. Cut out. Draw some stitches onto the rim and hat top by making tic-tac-toe symbols.
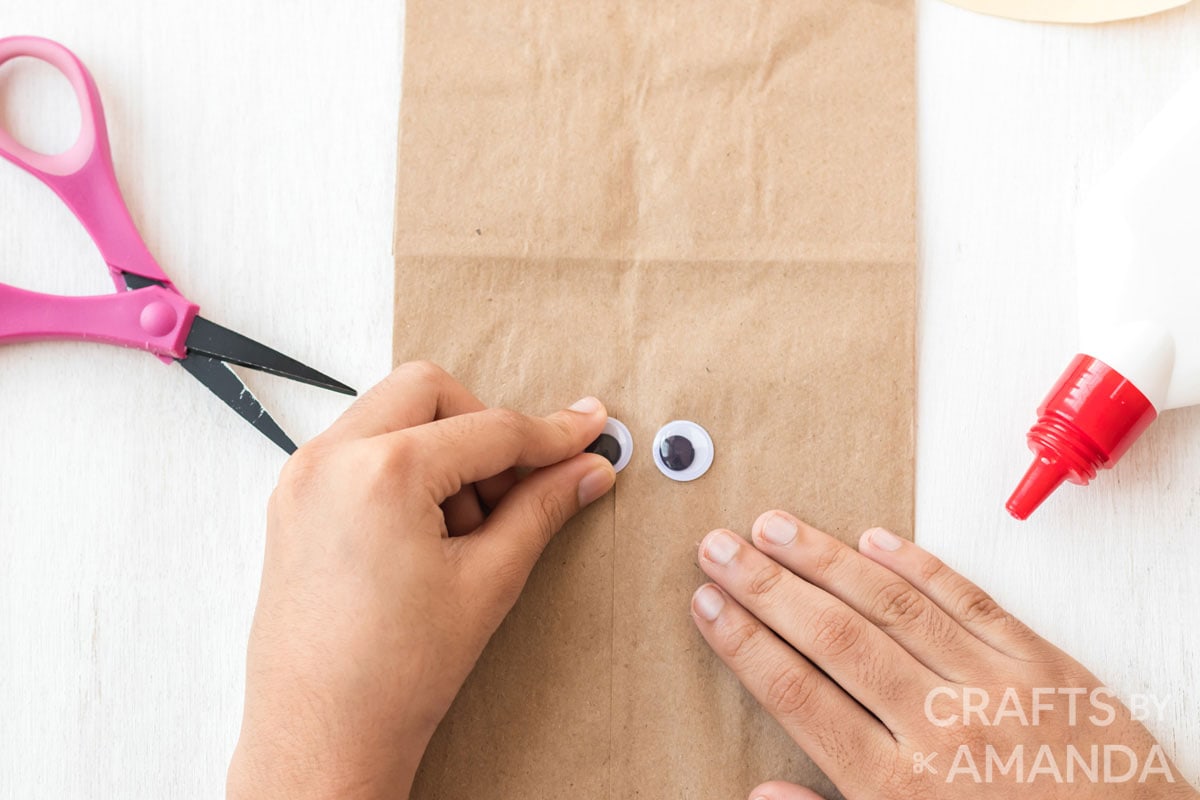
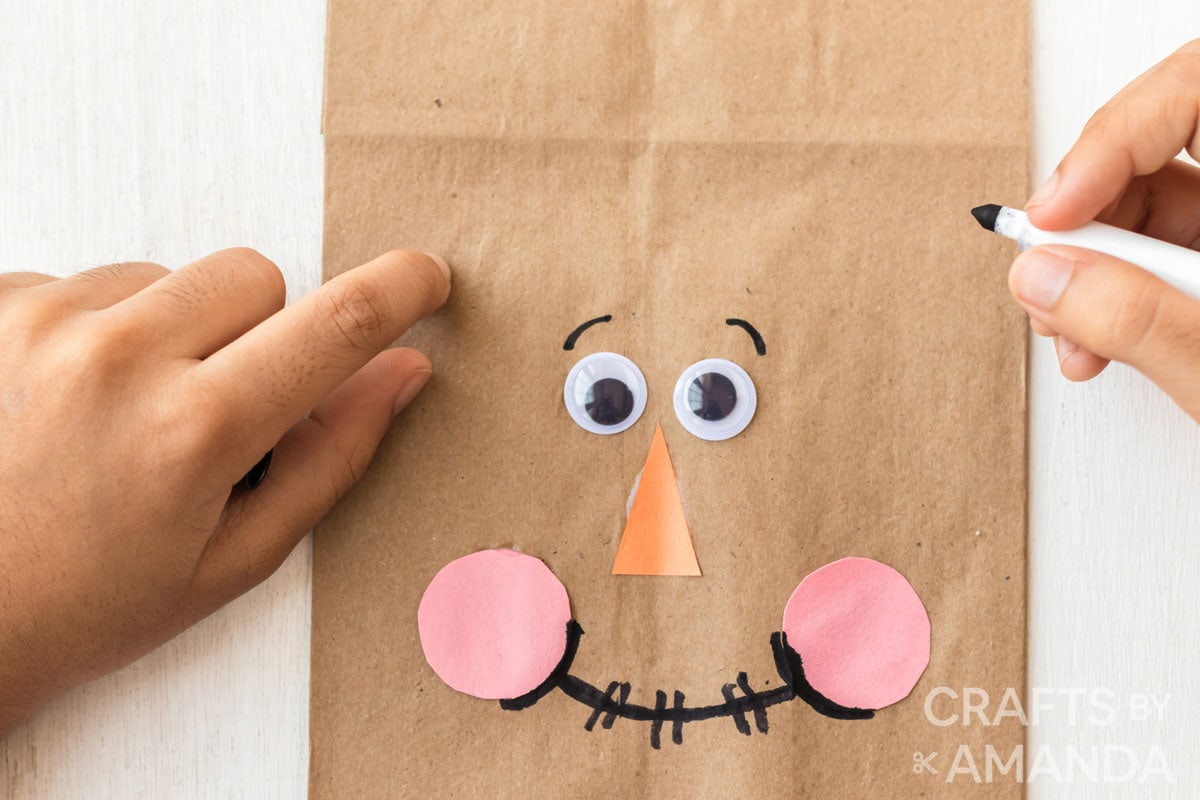
Lay the paper bag on a work surface with the flap side facing down. Glue the googly eyes in place roughly three inches from the top of the bag.
Cut out a triangle from the orange construction paper for the nose. Glue in place slightly below the middle of the eyes.
Then, cut out two circles from the pink construction paper for cheeks. Glue on either side of the nose, and draw a smile from the bottom of one circle to the other. Draw a few stitches on the mouth.
Use a marker to draw eyebrows above the eyes.
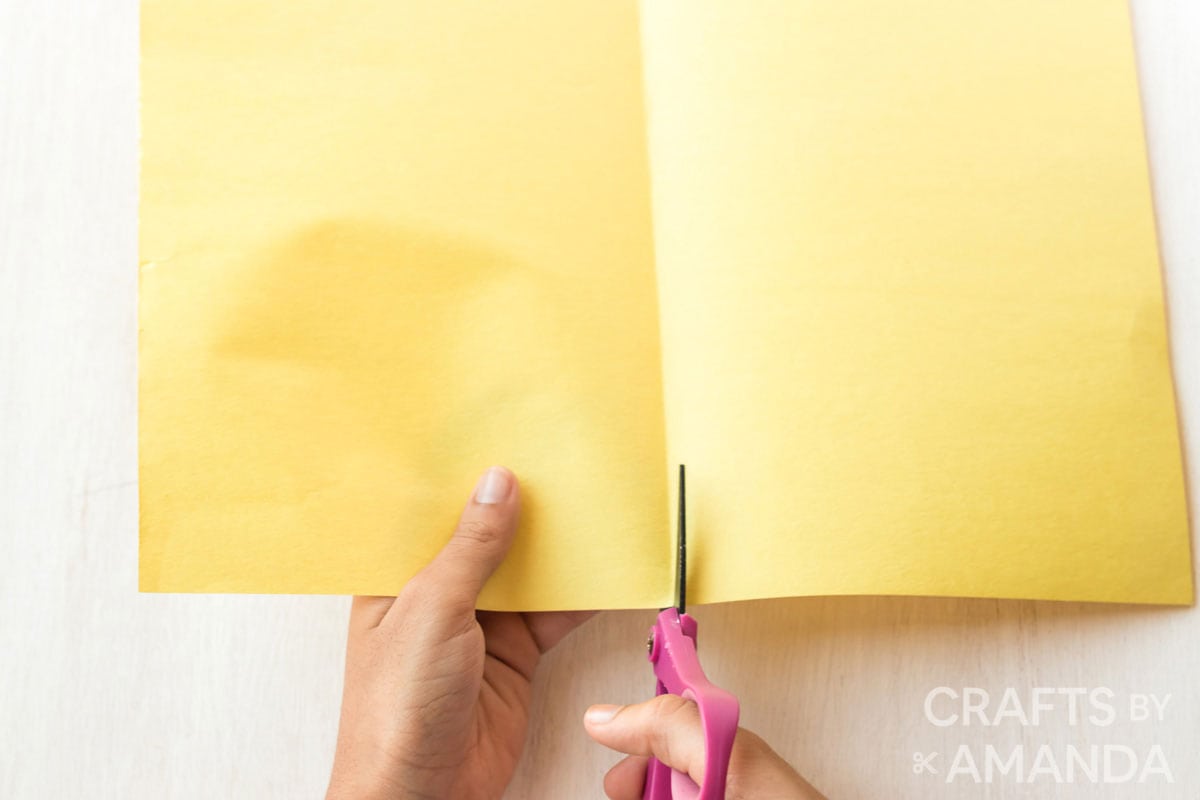
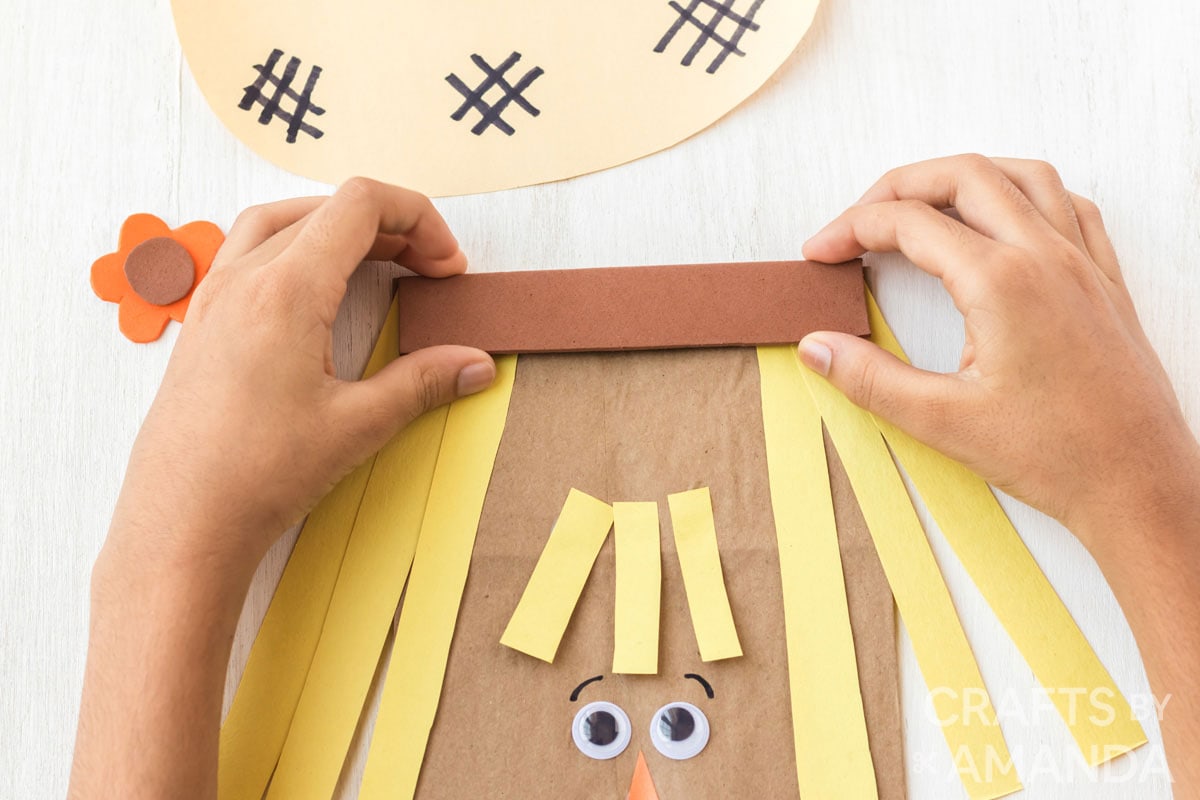
Fold yellow construction paper in half, greeting card style. Cut along the fold so you have two pieces. Cut one piece into thin strips. Starting at the top of the bag, glue some strips on so they hang down like hair. Cut some strips shorter for bangs.
Cut a strip of brown construction paper to glue onto the hat top as the band. Fringe- or scissor-cut the top of the hat brim piece. Glue the brim to the hat top so it partially covers the brown brim.
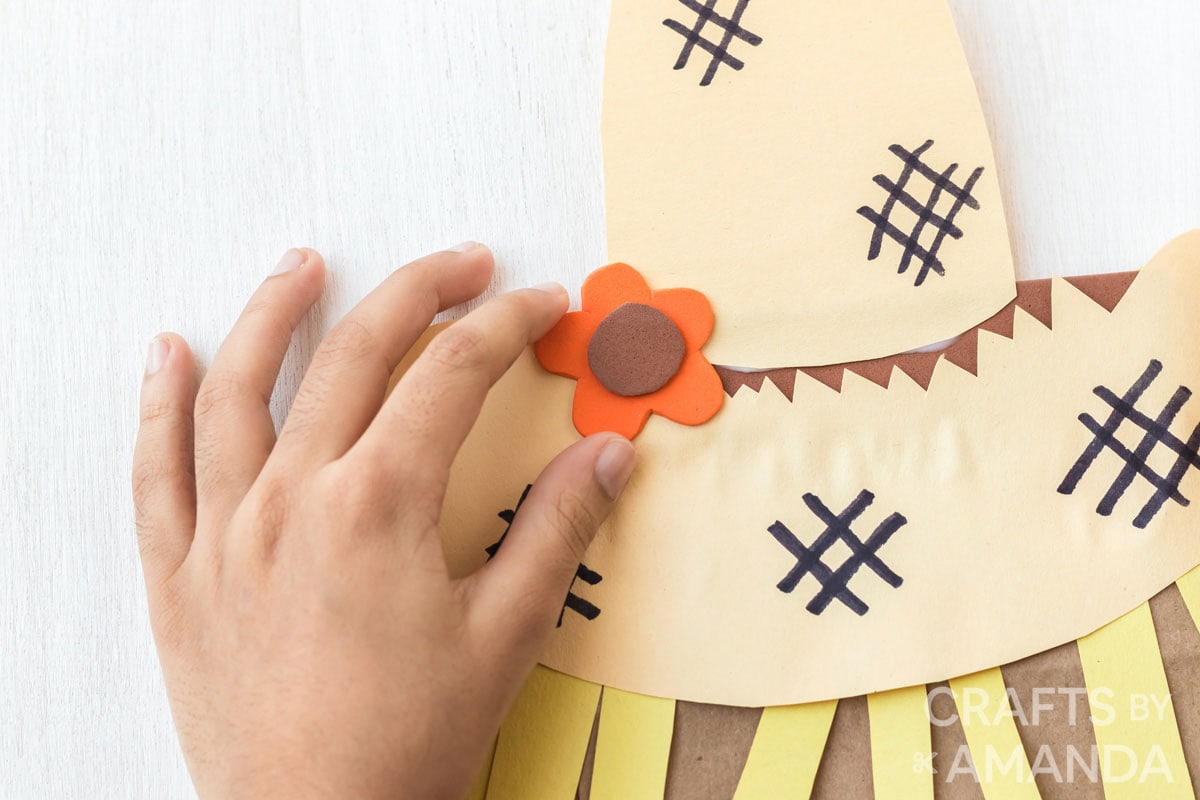
Glue the yellow foam flower to the hat. Cut out a circle from brown construction paper and glue to the center of the flower.
Assembling the Scarecrow
Glue the hat on top of the yellow hair.
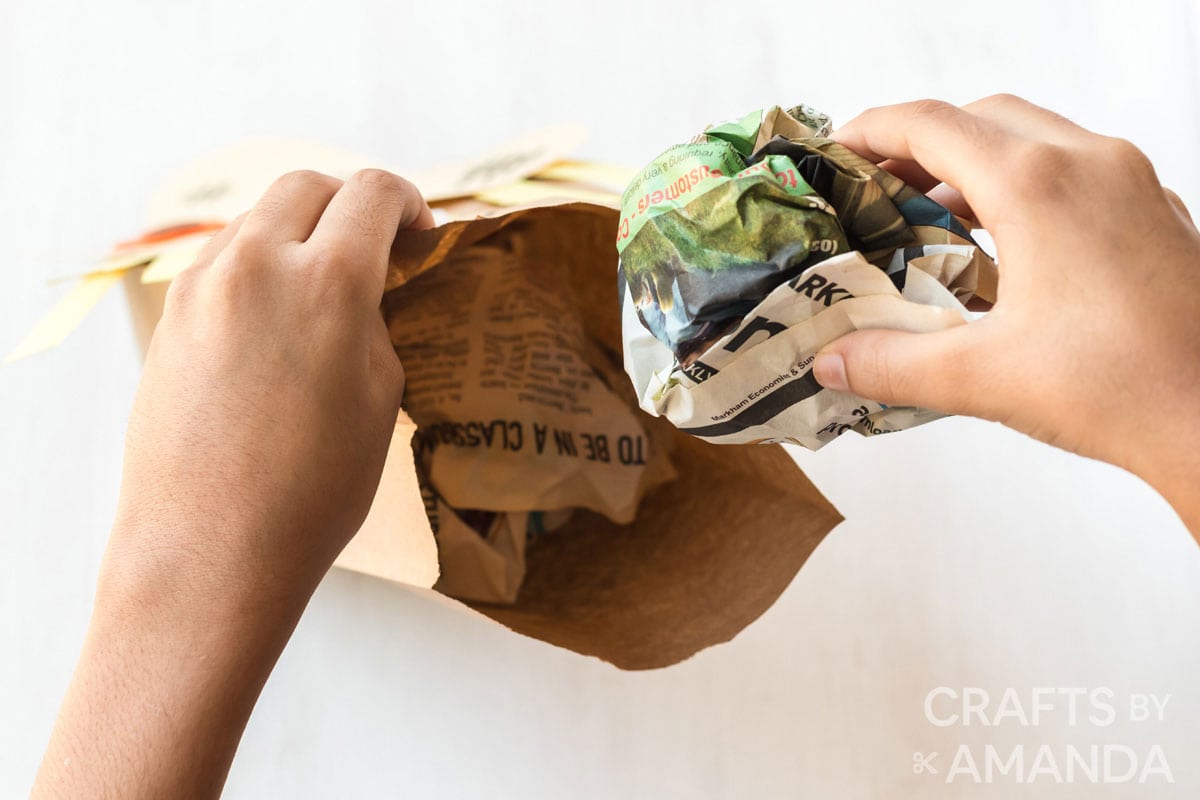
Carefully fill the bag with crumpled newspaper.
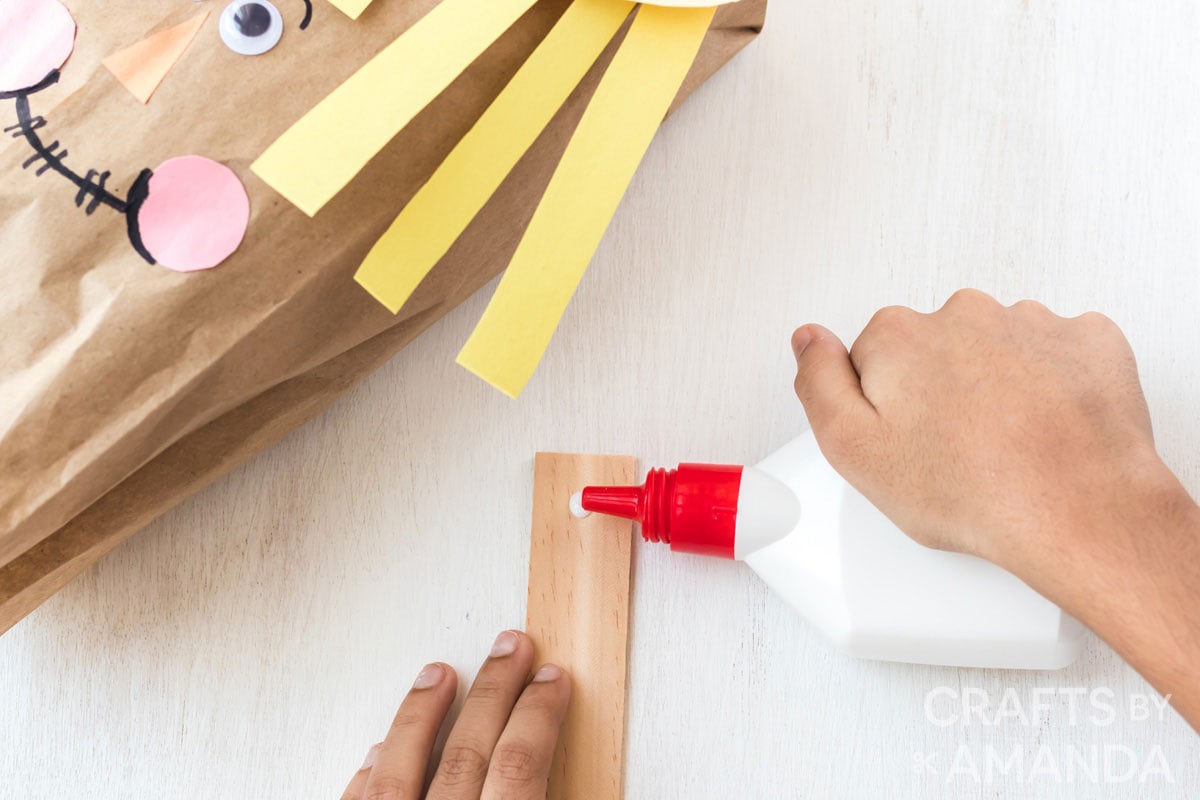
Coat the first three inches of the paint stir stick with glue and insert into the bottom of the bag.
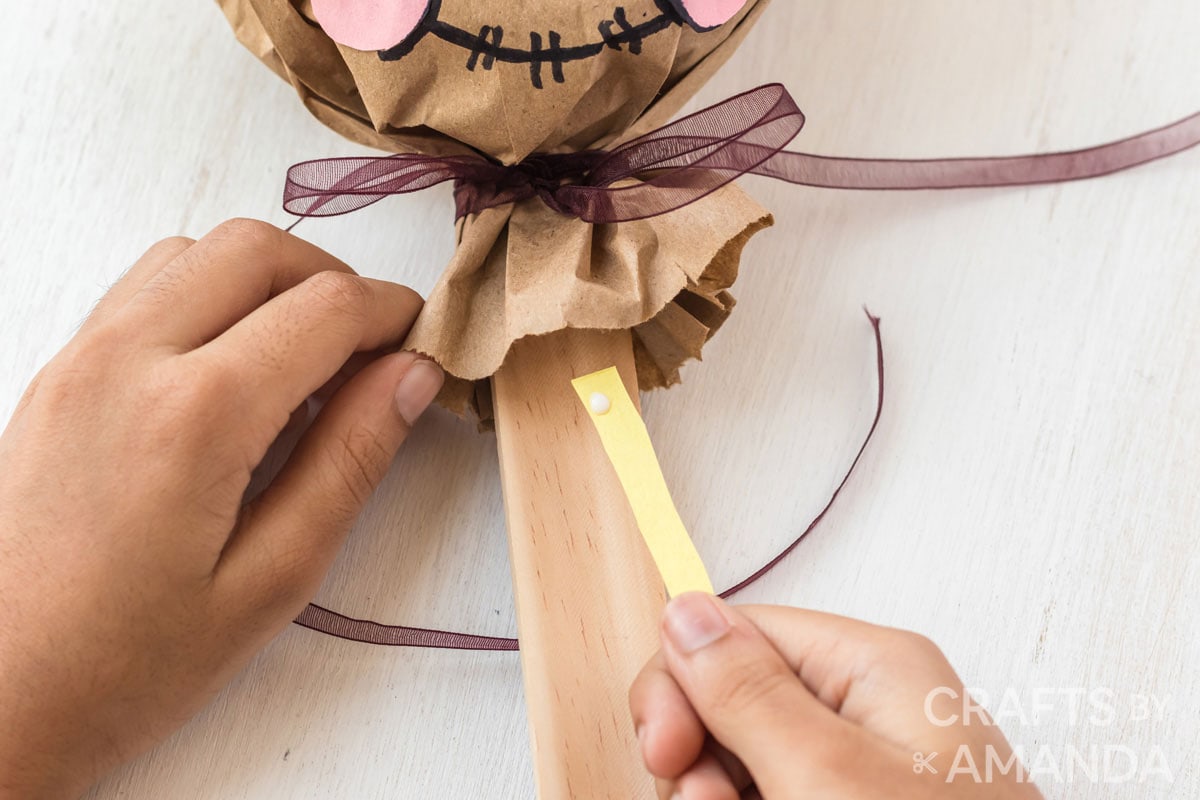
Crumple the bag around the stir stick, being careful not to let the end of the bag stick to the stirrer.
Tie a ribbon around the end of the bag, about two inches above the bottom. Tie the ribbon in a tight knot and then tie into a bow to close the bag.
Cut some of the leftover yellow strips in half or thirds and glue them to the stick under the bag.
Carry your scarecrow by the stir stick.
Expert Tips & FAQs
Smaller children can join the fun too. To make it easier for them, a grown-up can cut out the patterns first.
Construction paper and craft foam can be used interchangeably.
Home improvement stores will give you free paint stir sticks if you ask.
This adorable paper bag scarecrow is a cute autumn craft for the kids. Make several to display on your fall decorated front porch!
What Our Readers Are Saying
Taylor, Sam and I (okay, Sam didn’t really help much, he’s only 2), but Taylor–6 on Monday and I made two scarecrows yesterday. Cute as can be and quite simple. Taylor did do most of the cutting and all the pen drawing and did a great job. He did all the gluing (of course, the the funnest part, right.)
I love to create and share my projects with you! I know it’s hard to remember to come back and search, so I’ve made it easy for you with my weekly newsletter! You can subscribe for free and I’ll send you fun crafts and delicious recipes every week right to your email.
Trace the hat pattern onto white or tan construction paper. Cut out. Draw some stitches onto the rim and hat top by making tic-tac-toe symbols.
Lay the paper bag on a work surface with the flap side facing down. Glue the googly eyes in place roughly three inches from the top of the bag.
Cut out a triangle from the orange construction paper for the nose. Glue in place slightly below the middle of the eyes.
Cut out two circles from the pink construction paper for cheeks. Glue on either side of the nose, and draw a smile from the bottom of one circle to the other. Draw a few stitches on the mouth.
Use a marker to draw eyebrows above the eyes.
Fold yellow construction paper in half, greeting card style. Cut along the fold so you have two pieces. Cut one piece into thin strips. Starting at the top of the bag, glue some strips on so they hang down like hair. Cut some strips shorter for bangs.
Cut a strip of brown construction paper to glue onto the hat top as the band. Fringe- or scissor-cut the top of the hat brim piece. Glue the brim to the hat top so it partially covers the brown brim.
Glue the yellow foam flower to the hat. Cut out a circle from brown construction paper and glue to the center of the flower.
Glue the hat on top of the yellow hair.
Carefully fill the bag with crumpled newspaper.
Coat the first three inches of the paint stir stick with glue and insert into the bottom of the bag.
Crumple the bag around the stir stick, being careful not to let the end of the bag stick to the stirrer.
Tie a ribbon around the end of the bag, about two inches above the bottom. Tie the ribbon in a tight knot and then tie into a bow to close the bag.
Cut some of the leftover yellow strips in half or thirds and glue them to the stick under the bag.
Carry your scarecrow by the stir stick.
Expert Tips & FAQs
Smaller children can join the fun too. To make it easier for them, a grown up can cut out the patterns first.
Construction paper and craft foam can be used interchangeably.
Home improvement stores will give you free paint stir sticks if you ask.
This post originally appeared here on Aug 7th, 2017.
Amanda Davis is the crafty, entrepreneurial mother of four children. She loves to bake, cook, make kid's crafts and create decorative items for her home. She is a crafting expert and guru in the kitchen and has appeared online and in print publications many times over the years.


Amanda says
Hope the kids enjoy them!
Rena says
Oh, these are cute! We usually do a Scarecrow Week for school in November, so I can't wait to do these with my kids then!
Amanda says
Thanks ladies!
creative gal says
Cute ideaa!
Katrina says
So fun, Amanda! Thanks! Now everyone who sees them at our house points out how cute they are and asks about them.