• Home
  • About
    • About Crafts by Amanda
    • Visit Our Recipe Site
  • Work With Us
  • Join
    • Free Newsletters
    • Join our Facebook craft group
↑
  • Tutorials
    • Tutorial Index
    • Adult Crafts
    • Crafts for Kids
    • Crafts for Seniors
    • Recycled Crafts
    • Seasonal Crafts
    • Holiday Crafts
    • Free Printables
    • Craft Collections
  • Adult Crafts
    • Bath & Body
    • Beach Crafts
    • Clay Pot Crafts
    • Crafts for Seniors
    • Decoupage Crafts for Adults
    • DIY Gift ideas
    • Garden Crafts
    • Home Decor Projects
    • Kitchen Crafts
    • Light Bulb Crafts
    • Luminary Crafts
    • Mason Jar Crafts
    • Needlework
    • Photo Display Ideas
    • Recycled Crafts for Adults
    • Wearable Crafts for Adults
  • Crafts for Kids
    • Animal Crafts for Kids
    • Back to School Crafts
    • Beach Crafts for Kids
    • Camp Crafts
    • Cardboard Tube Crafts for Kids
    • Decoupage Crafts for Kids
    • Easy Crafts for Kids
    • Nature Crafts for Kids
    • Other Kid’s Crafts
    • Paper Plate Crafts for Kids
    • Recycled Crafts for Kids
    • Slimes, Doughs, & Clay
    • Wearable Crafts for Kids
  • Holiday Crafts
    • 4th of July Crafts
    • Christmas Crafts
    • DIY Gift ideas
    • Earth Day Crafts
    • Easter Crafts
    • Father’s Day Crafts
    • Halloween Crafts
    • Memorial Day Crafts
    • Mother’s Day Crafts
    • New Year’s
    • Other Holidays
    • Patriot Day Crafts
    • St. Patrick’s Day Crafts
    • Thanksgiving Crafts
    • Valentine’s Day Crafts
  • Seasonal Crafts
    • Winter Crafts
    • Spring Crafts
    • Summer Crafts
    • Fall Crafts
  • Skip to primary navigation
  • Skip to main content
  • Skip to primary sidebar
  • Skip to footer

Crafts by Amanda

crafts for adults and kid's crafts

  • Tutorials
    • Tutorial Index
    • Adult Crafts
    • Crafts for Kids
    • Crafts for Seniors
    • Recycled Crafts
    • Seasonal Crafts
    • Holiday Crafts
    • Free Printables
    • Craft Collections
  • Adult Crafts
    • Bath & Body
    • Beach Crafts
    • Clay Pot Crafts
    • Crafts for Seniors
    • Decoupage Crafts for Adults
    • DIY Gift ideas
    • Garden Crafts
    • Home Decor Projects
    • Kitchen Crafts
    • Light Bulb Crafts
    • Luminary Crafts
    • Mason Jar Crafts
    • Needlework
    • Photo Display Ideas
    • Recycled Crafts for Adults
    • Wearable Crafts for Adults
  • Crafts for Kids
    • Animal Crafts for Kids
    • Back to School Crafts
    • Beach Crafts for Kids
    • Camp Crafts
    • Cardboard Tube Crafts for Kids
    • Decoupage Crafts for Kids
    • Easy Crafts for Kids
    • Nature Crafts for Kids
    • Other Kid’s Crafts
    • Paper Plate Crafts for Kids
    • Recycled Crafts for Kids
    • Slimes, Doughs, & Clay
    • Wearable Crafts for Kids
  • Holiday Crafts
    • 4th of July Crafts
    • Christmas Crafts
    • DIY Gift ideas
    • Earth Day Crafts
    • Easter Crafts
    • Father’s Day Crafts
    • Halloween Crafts
    • Memorial Day Crafts
    • Mother’s Day Crafts
    • New Year’s
    • Other Holidays
    • Patriot Day Crafts
    • St. Patrick’s Day Crafts
    • Thanksgiving Crafts
    • Valentine’s Day Crafts
  • Seasonal Crafts
    • Winter Crafts
    • Spring Crafts
    • Summer Crafts
    • Fall Crafts
Craft Tutorials | Adult Crafts | Beach Crafts | Seashell Wreath
Beach Crafts

Seashell Wreath

Author by Jane and Sonja on December 18, 2019 Updated on January 7, 2022

5 from 8 votes
Enjoy a little bit of the summer anytime of year by making a beautiful coastal seashell wreath.
Jump to Project
DIY seashell wreath
26654 shares
  • Share
  • Tweet
  • Flipboard
  • Email

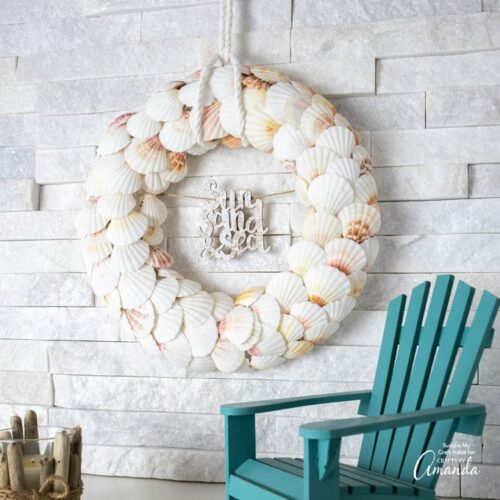
Enjoy a little bit of the summer any time of the year by making a beautiful coastal seashell wreath.

See our Coastal Twig Wreath for more inspiration!

Sea Shell Wreath


Beautiful DIY Seashell Wreath

Hi creative friend. It’s Jane from Sustain my Craft Habit, a DIY and crafts blog which I write with my sister Sonja.

We love to collect treasures along the beach near our family cottage each summer. These nature-made supplies are perfect for all sorts of crafting! For example, we collect beach pebbles for art, driftwood to make mirrors, and sea glass to make Christmas trees to name just a few.

Sea shell wreath hanging on wall

The one thing we do not have a lot of along our beach is nice seashells. I had to order a whole bag of them to make this pretty beach-themed centerpiece a few years ago.

The leftover seashells have been lurking around for ages. So I thought it was high time to put them to use and make a lovely coastal seashell wreath. It’s perfect for our cottage, or I may put it in my coastal-themed bathroom.

close up of sea shell wreath

Materials Needed to Make a Seashell Wreath

  • Round foam wreath form (12″ diameter)
  • About 100 medium sized seashells
  • Hot glue gun and clear craft glue
  • Wooden cut out with a beachy phrase (the one we used, reads “Sun, Sand & Sea”)
  • Twine
  • White cotton rope


supplies needed to make a sea shell wreath

How to Make a Seashell Wreath

Gather all your materials. Decide what color you would like your wreath to be. Although the seashells I had included various shades of colors, I decided to use the shells which were mostly white for my wreath.

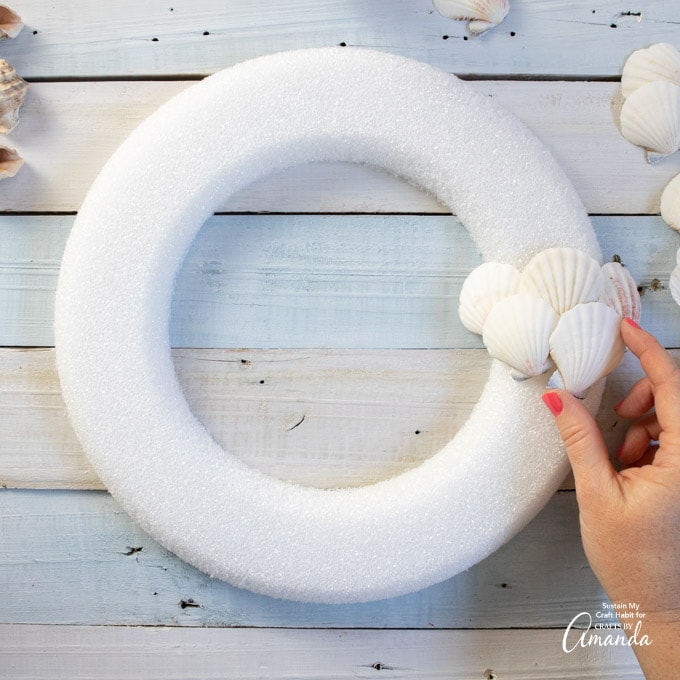
Start by practicing the arrangement of the seashells to get a sense for which sizes and placements you’ll need. On my wreath form, it took about 3 shells to make each row across.

arranging seashells on wreath form

Once you’re happy with the arrangement start gluing the seashells in place.

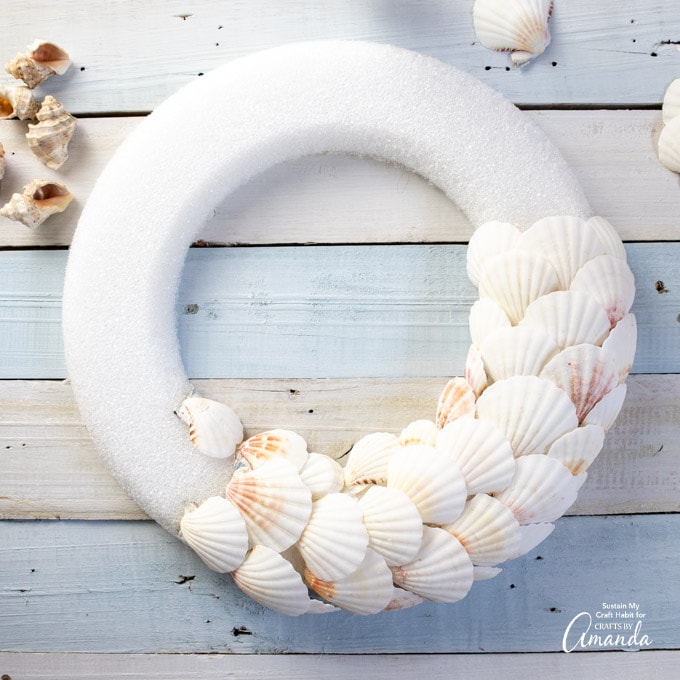
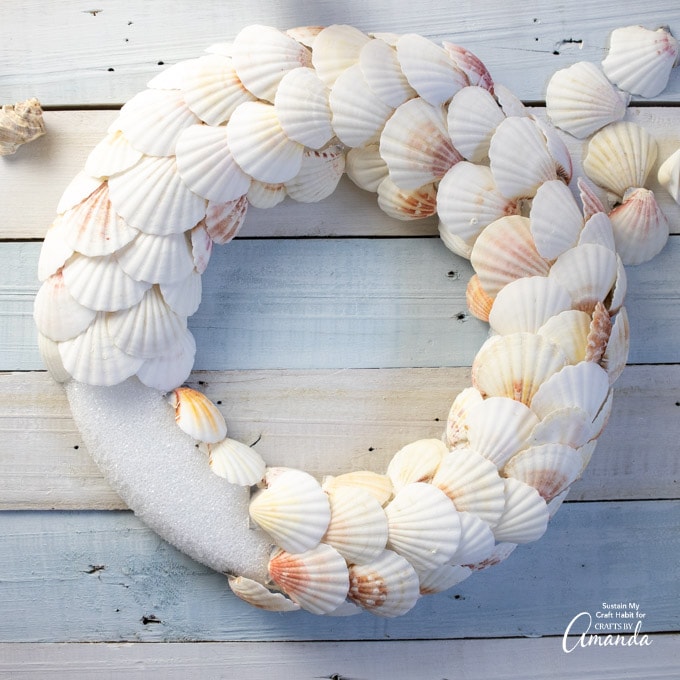
Work row by row and make your way around the entire wreath. Make sure you use enough glue to keep the seashell firmly in the wreath.

adding seashells to wreath form

adding seashells to wreath form

You’ll likely need to use the smallest of the seashells a lot around the inner and outer surfaces of the wreath. Use the bigger shells for the front of the wreath.

Make sure the sea shells slightly overlap each other as you go around to create a lovely scalloped effect.
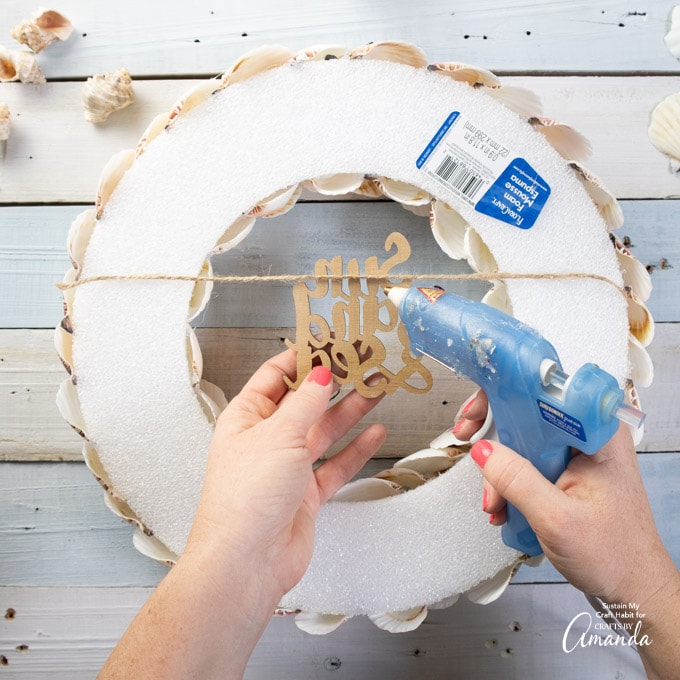
overhead shot of seashell wreath

Once you are done with the seashells it’s time to add on the phrase if you choose to do so.

Glue a section of twine to the back of the wreath and then glue the phrase to the twine.

attaching wooden cut out sign to the back of the wreath

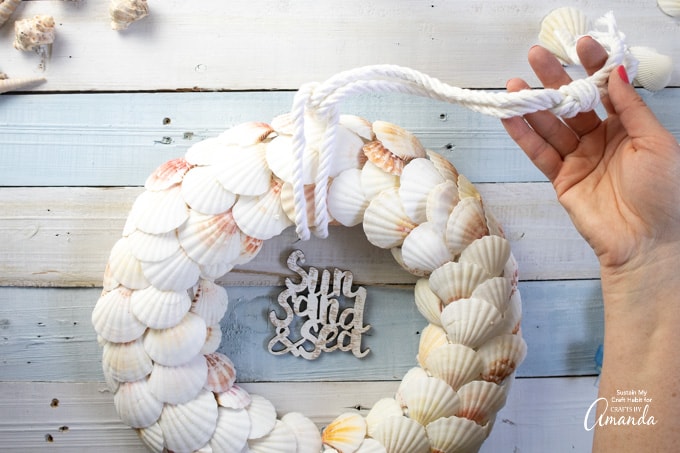
For the final step, loop your cotton rope around the top of the wreath and then tie a knot for hanging.

tying rope to wreath

I love how this wreath turned out. I knew it was a winner when my kids started ooing and ahhing over it. My 8-year-old even said, “Mama I can’t believe it! It’s like you brought it straight from the store.” She’s my favorite ;D.

wreath made from scalloped sea shells

Do you have lovely seashells on the beach near where you live?

Have any leftover sea shells? See how you can make these adorable seashell creatures with the kids, or for the adults, you’ll love these DIY seashell wine charms!

More Coastal Crafts

  • Coastal Wood Slice Coasters
  • Beach Terrarium
  • Twig Coastal Wreath
  • Beach Sign Ornaments
  • Cottage Slat Beach Frames
DIY seashell wreath
Print Project
5 from 8 votes

DIY Seashell Wreath

Enjoy a little bit of the summer anytime of year by making a beautiful coastal seashell wreath.
Age Group: Adult Crafts
Project Type: Crafts
Makes: 1 large wreath

Supplies

  • 1 round foam wreath form 12" D
  • 100 medium sized seashells
  • 1 hot glue gun with clear glue sticks
  • 1 wooden cut out with a beachy phrase
  • 1 piece twine 12" long
  • 1 piece cotton rope in white

Instructions

  • Gather materials.
  • Start by practicing the arrangement by placing a few rows of seashells on the foam wreath.
  • Working one seashell at a time, add glue to the back side of each seashell and hold in place until glue sets.
  • Continue working one row of seashells at a time.
  • Overlap each row of seashells slightly to firm a scalloped affect.
  • Position a piece of twine through the center of the wreath, gluing the ends in place on the reverse side.
  • Glue the wooden cut out to the center of the twine.
    gluing twine to wreath
  • Tie a piece of cotton rope to the top of the wreath for hanging.

Video

  • Author
  • Recent Posts
Follow Along
Jane and Sonja
Bloggers at Sustain My Craft Habit
Jane and Sonja are sisters, moms and lifelong craft addicts both living near Toronto, Canada with their families. They share their love of creativity, nature and coastal craft and DIY ideas on their blog Sustain My Craft Habit.
Follow Along
Latest posts by Jane and Sonja (see all)
  • Kid-Friendly DIY Stained Glass - February 25, 2025
  • Pressed Flower Resin Magnets - February 21, 2025
  • Fabric Scrap Heart Garland - January 24, 2025
26654 shares
  • Share
  • Tweet
  • Flipboard
  • Email

Filed Under: Beach Crafts, DIY Gift ideas, Home Decor Projects, Summer Crafts Tagged With: coastal, coastal decor, coastal wall art, diy wreath, sea shell crafts, seashells

Reader Interactions

Free CraftsBy email every week

Latest crafts straight to your inbox!

Comments

  1. Julie says

    April 15, 2023 at 8:52 am

    This shell wreath is beautiful!

    However, as someone who plays around with shells ALOT, I’d like to offer some ideas.

    The styrofoam can break/crack easily and that would make all your efforts a loss. I would use a wood form.

    A hot glue gun is not going to last. In a short time the shells will fall off, especially if you hang the wreath on a front door that gets sun exposure.

    Best to use a clear industrial glue like E6000 or Bond 527. Shells won’t come off.

    May your creations last forever!
    JulsOfParadisedotetsydotcom

    Reply
  2. Linda says

    November 21, 2021 at 9:42 am

    I’ve found that if you don’t score the back of the shells, they fall off very easily . This happened with both my wreath and a seashell Christmas tree. Also, a change in temperature, especially to cold makes the shells fall off at the slightest touch.
    I’ve since drilled and wired all my shell arrangements. Yes, it takes more time but there’s nothing worse then having a customer come back seeking a refund for a beautiful and costly piece that you’ve made because the shells have fallen off.
    Your work is lovely and I hope you continue…I’m just hoping to save you some of the embarrassment I felt when a piece was returned.
    Good luck.

    Reply
  3. Debby says

    July 12, 2021 at 8:19 am

    How does the glue hold up on the outdoors? Is there something else that can be used to withstand the outdoor elements?

    Reply
    • Amanda Formaro says

      July 12, 2021 at 10:23 am

      It should be fine, unless the wreath will be exposed to long hours of hot sunlight. That could melt and loosen the hot glue. Instead you can use E6000, it will just take longer to assemble :)

      Reply
  4. Sue Charlton McEndree says

    February 24, 2021 at 6:37 pm

    This is a great idea. Now I have to find all my shells so I can make one. Thanks for posting this one.

    Reply
  5. Tiffany McMurdie says

    October 19, 2020 at 10:42 pm

    Hi, do you by chance just sell the wreath completed? :).

    Reply
    • Amanda Formaro says

      November 2, 2020 at 7:52 am

      I’m sorry, we don’t!

      Reply
5 from 8 votes (6 ratings without comment)

Leave a Reply Cancel reply

Your email address will not be published. Required fields are marked *

Rate This Project


The maximum upload file size: 640 MB. You can upload: image, video. Links to YouTube, Facebook, Twitter and other services inserted in the comment text will be automatically embedded. Drop files here

Primary Sidebar

Hi! I’m Amanda and I’m the founder and head designer of Crafts by Amanda. I have spent over 25 years creating projects to share, but it’s not just me anymore! It’s turned into a complete family affair. Come and meet the Creative Team!

Free CraftsBy email every week

Latest crafts straight to your inbox!

All Time Favorites

snowy pinecone candle jar luminaries

Winter Luminaries: Snowy Pinecone…

Make pretty winter luminaries that appear to be covered ... Go To project

Make this wonderful deco mesh pumpkin wreath to hang on your door this fall!

Deco Mesh Pumpkin Wreath…

Adorn your door this fall with a pretty deco mesh ... Go To project

Learn to make these adorable ladybug painted rocks. use special outdoor paint for this adorable garden craft so you can keep garden ladybugs all summer!

Ladybug Painted Rocks…

I'm going to show you how to make these adorable ... Go To project

Reuse those empty prescription pill bottles in all sorts of ways. From organizing to making cookies. Yes, cookies! See how to use your empty pill bottles!

20 Uses for Prescription Pill…

You've been collecting prescription pill bottles for ... Go To project

Meet the Family

Amanda

Founder and Designer

Kristen

Editorial Manager

Lindsay

Social Media Manager

As seen on:

Footer

Favorites

  • Jar Photo Frames
  • No-Sew Roman Shade
  • Paper Flowers
  • How to Make a Scrunchie
  • Mermaid Slime

About

  • Home
  • Meet the Creative Team
  • Work with Us
  • Privacy Policy
  • Accessibility
  • Contact Us

Images/text copyright Amanda Formaro 2020. To feature a post from Crafts by Amanda, you may use one photo credited and linked back directly to the project post.

Free CraftsBy email every week

Latest crafts straight to your inbox!

Copyright ©2025, Crafts by Amanda. All Rights Reserved.
Design by Pixel Me Designs

Rate This Tutorial

Your vote:


To share a photo with your comment click here!

A rating is required
A name is required
An email is required

Recipe Ratings without Comment

Something went wrong. Please try again.