• Home
  • About
    • About Crafts by Amanda
    • Visit Our Recipe Site
  • Work With Us
  • Join
    • Free Newsletters
    • Join our Facebook craft group
↑
  • Tutorials
    • Tutorial Index
    • Adult Crafts
    • Crafts for Kids
    • Crafts for Seniors
    • Recycled Crafts
    • Seasonal Crafts
    • Holiday Crafts
    • Free Printables
    • Craft Collections
  • Adult Crafts
    • Bath & Body
    • Beach Crafts
    • Clay Pot Crafts
    • Crafts for Seniors
    • Decoupage Crafts for Adults
    • DIY Gift ideas
    • Garden Crafts
    • Home Decor Projects
    • Kitchen Crafts
    • Light Bulb Crafts
    • Luminary Crafts
    • Mason Jar Crafts
    • Needlework
    • Photo Display Ideas
    • Recycled Crafts for Adults
    • Wearable Crafts for Adults
  • Crafts for Kids
    • Animal Crafts for Kids
    • Back to School Crafts
    • Beach Crafts for Kids
    • Camp Crafts
    • Cardboard Tube Crafts for Kids
    • Decoupage Crafts for Kids
    • Easy Crafts for Kids
    • Nature Crafts for Kids
    • Other Kid’s Crafts
    • Paper Plate Crafts for Kids
    • Recycled Crafts for Kids
    • Slimes, Doughs, & Clay
    • Wearable Crafts for Kids
  • Holiday Crafts
    • 4th of July Crafts
    • Christmas Crafts
    • DIY Gift ideas
    • Earth Day Crafts
    • Easter Crafts
    • Father’s Day Crafts
    • Halloween Crafts
    • Memorial Day Crafts
    • Mother’s Day Crafts
    • New Year’s
    • Other Holidays
    • Patriot Day Crafts
    • St. Patrick’s Day Crafts
    • Thanksgiving Crafts
    • Valentine’s Day Crafts
  • Seasonal Crafts
    • Winter Crafts
    • Spring Crafts
    • Summer Crafts
    • Fall Crafts
  • Skip to primary navigation
  • Skip to main content
  • Skip to primary sidebar
  • Skip to footer

Crafts by Amanda

crafts for adults and kid's crafts

  • Tutorials
    • Tutorial Index
    • Adult Crafts
    • Crafts for Kids
    • Crafts for Seniors
    • Recycled Crafts
    • Seasonal Crafts
    • Holiday Crafts
    • Free Printables
    • Craft Collections
  • Adult Crafts
    • Bath & Body
    • Beach Crafts
    • Clay Pot Crafts
    • Crafts for Seniors
    • Decoupage Crafts for Adults
    • DIY Gift ideas
    • Garden Crafts
    • Home Decor Projects
    • Kitchen Crafts
    • Light Bulb Crafts
    • Luminary Crafts
    • Mason Jar Crafts
    • Needlework
    • Photo Display Ideas
    • Recycled Crafts for Adults
    • Wearable Crafts for Adults
  • Crafts for Kids
    • Animal Crafts for Kids
    • Back to School Crafts
    • Beach Crafts for Kids
    • Camp Crafts
    • Cardboard Tube Crafts for Kids
    • Decoupage Crafts for Kids
    • Easy Crafts for Kids
    • Nature Crafts for Kids
    • Other Kid’s Crafts
    • Paper Plate Crafts for Kids
    • Recycled Crafts for Kids
    • Slimes, Doughs, & Clay
    • Wearable Crafts for Kids
  • Holiday Crafts
    • 4th of July Crafts
    • Christmas Crafts
    • DIY Gift ideas
    • Earth Day Crafts
    • Easter Crafts
    • Father’s Day Crafts
    • Halloween Crafts
    • Memorial Day Crafts
    • Mother’s Day Crafts
    • New Year’s
    • Other Holidays
    • Patriot Day Crafts
    • St. Patrick’s Day Crafts
    • Thanksgiving Crafts
    • Valentine’s Day Crafts
  • Seasonal Crafts
    • Winter Crafts
    • Spring Crafts
    • Summer Crafts
    • Fall Crafts
Craft Tutorials | Holiday Crafts | St. Patrick's Day Crafts | Styrofoam Cup Leprechaun Hats

Styrofoam Cup Leprechaun Hats

Author by Amanda Davis on February 28, 2011 Updated on March 4, 2022

5 from 7 votes
Jump to Project
191 shares
  • Share
  • Tweet
  • Flipboard
  • Email


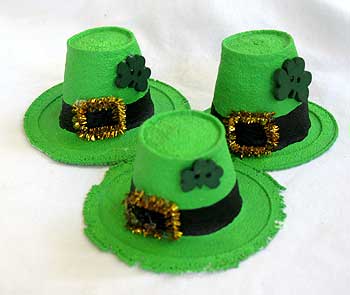
I made these cute little Leprechaun hats quite a few years ago. You may have seen these pretty little spring bonnets made from shrunken foam coffee cups that I posted previously as well. These are really fun and super cute, they make a great party favor or just a fun craft for the kids. Get the kids together and have some fun making these miniature leprechaun hats!

Styrofoam Cup Leprechaun Hats

Note: The temperature and instructions in this craft are based off of a dark coated cookie sheet at 250 degrees F in an electric oven. You may want to experiment with different temps until you receive satisfactory results. I recommend baking one or two cups at the recommended temperature and time first. If they seem to melt too quickly or the ends curl up and under, try reducing the temperature and trying again.

Note: Instead of the buttons, you can either paint a shamrock on by dipping the eraser of a new pencil into dark green paint and dotting it onto the hat three times, or cut your own out of felt or craft foam.

More St. Patrick’s Day Crafts for Kids

  • 3D Tissue Paper Shamrock
  • End of the Rainbow Loot Buckets
  • Monster Cards for St. Patrick’s Day
  • St. Patrick’s Day Cootie Catcher
  • Paper Plate Leprechaun
  • Rainbow Crafts for Kids
  • Craft Stick Leprechaun Hat
  • Cereal Box Leprechaun Trap
Print Project
5 from 7 votes

Styrofoam Cup Leprechaun Hats

Author: Amanda Formaro

Supplies

  • Styrofoam cups
  • acrylic paint in green and black
  • gold chenille stems
  • scissors
  • hot glue gun
  • shamrock buttons
  • magnets optional

Instructions

  • Preheat oven to 250 degrees F.
  • Place Styrofoam cups upside down (open end of cup down) on a dark coated cookie sheet, placing them about 1-2" apart. Note: we experimented with both dark coated and silver cookie sheets, the cups did not melt properly on the silver sheets.
  • Bake in the oven for approximately 3 minutes, don't walk away! It will take about one minute before you see any changes to the cups, then the heat will begin to melt and shrink them rather rapidly after that. It's lots of fun for the kids to watch, so be sure to turn the oven light on.
  • Remove the cookie sheet from the oven and set aside to cool completely. DO NOT try to remove the cups from the cookie sheet until they are completely cooled. As they cool, the Styrofoam that is stuck to the sheet will relax and release its grip from the sheet, allowing you to remove them easily. Most cups will melt rather well, thought you may end up with one or two that look rather distorted or disfigured.
  • Paint the "hats" with green paint, one coat is usually enough, and allow them to dry completely. Once they are dry paint a black rim around the hat and allow to dry again.
  • Mean while, take a gold chenille stem and bend it into a square or rectangle for the hat's buckle, trim end off with scissors. When paint is dry, hot glue the buckle to the front of the hat on the black rim. Hot glue a shamrock shaped button to the top portion of the front of the hat.
  • If you like, you can hot glue a small round magnet to the bottom of the hat at the brim and hang on the refrigerator.

If you are looking for fun St. Patrick’s Day crafts, try my Pot of Gold Greeting Card or my Welcome Shamrock!

  • Author
  • Recent Posts
Amanda Davis
Amanda Davis is the crafty, entrepreneurial mother of four children. She loves to bake, cook, make kid's crafts and create decorative items for her home. She is a crafting expert and guru in the kitchen and has appeared online and in print publications many times over the years.
Latest posts by Amanda Davis (see all)
  • Rainbow Tie Dye Shirts - July 4, 2025
  • Mason Jar Solar Lights - June 27, 2025
  • Patriotic Pinwheels - June 20, 2025
191 shares
  • Share
  • Tweet
  • Flipboard
  • Email

Filed Under: St. Patrick's Day Crafts Tagged With: holidays, kid's crafts, st pat, st patrick day, st patricks, st patricks day, st pattys day

Reader Interactions

Free CraftsBy email every week

Latest crafts straight to your inbox!

Comments

  1. mary says

    March 1, 2013 at 8:22 am

    you can also make little easter baskets out of the melted cups. use a pipe cleaner for handle and decorate as you like .

    Reply
    • Amanda Formaro says

      March 2, 2013 at 7:26 am

      Great idea!

      Reply
      • Judy says

        October 13, 2019 at 2:18 pm

        The styrofoam cups that I have purchased recently do not work. Does anyone have a source for cups that will shrink to form a hat and bill or edge?

        Reply
        • Patty Domenick says

          March 16, 2021 at 3:28 pm

          With the new styrofoam cups, 400 degrees and we used a light not dark cookie sheet. Didn’t even take 3 minutes and they are adorable!

          Reply
  2. Karan says

    March 13, 2011 at 3:08 am

    Just had to comment on these. and I took a look at the spring ones. I worked for the County in one of the Senior Centers and we did a Voluntier Banquet with the theme of " Hats off to our Voluntiers". This was 7 years ago. I did many of these up and took them into the center and the ladies decorated them. They had so many cute ones. We sat them on our nut cups on the tables. They looked adorable.We had one lady that had worked as a milinary making hats when she was younger. She did a beautiful job on hers. It was so much fun working with these ladies and making these. We also used my moms hat collection in the line of decorating. Funny as I pulled out of the yard at mom and dads dad hollared and said don't bring them back. LOL I now have hat box upon hatbox of hats.

    Reply
  3. wifemomwoman says

    March 11, 2011 at 6:41 pm

    how cute! i linked to your project on my blog today. http://wifemomwoman.wordpress.com/2011/03/11/st-patricks-day-crafts-for-kids/

    Reply
  4. creativejewishmom/sara says

    March 10, 2011 at 4:13 pm

    Shrunken foam cups, who would have thought? Thanks so much for sharing this and your other great projects on Craft schooling Sunday!

    Reply
  5. Erin says

    March 8, 2011 at 6:47 pm

    These are so darn cool! I can't wait to make these with my kids!!!

    Reply
  6. Amanda says

    March 8, 2011 at 11:31 am

    Anon – interesting discovery! So glad you liked them, they are so fun and cute! :)

    Reply
  7. Anonymous says

    March 8, 2011 at 3:32 am

    Thank you Amanda for the awesome idea. I too, had no idea that styrofoam cups would do that. I did it one cup per time, as I kept getting really floppers with no brim. Because I was needing a class set of 12, there was a bit of odour. I turned on the exhaust fan which I later found seemed to be drawing the melting cups towards the heat vent in the oven and disforming the end product. I then covered the oven vent hole and turned off the fan. They then melted uniformly and with a brim and I had to do that in a 350 oven for 24 seconds. Wonderful craft, though. My class of seniors with love making these. Thank you.

    Reply
  8. Sarah says

    March 7, 2011 at 4:59 pm

    I had no idea that styrofoam would do that! I love this idea!

    Reply
  9. TidyMom says

    March 6, 2011 at 2:05 am

    These are so cute Amanda!
    Thanks for linking up! I featured you on my wrap up post http://tidymom.net/2011/st-patricks-day-food-and-crafts/

    Reply
  10. Allie says

    March 5, 2011 at 3:41 pm

    Whoa! so cool! They turned out so cute!

    Reply
  11. Sue says

    March 4, 2011 at 11:19 pm

    Very cute, Amanda! I bet the kids(and adults) have fun watching the cups shrink. I think we will make the Easter bonnets too.

    Reply
  12. Rachel {BubblyNatureCreations.com} says

    March 4, 2011 at 3:25 pm

    so cute!!!! Here’s another party if you would like to link up… http://www.bubblynaturecreations.com/2011/03/project-party-weekend-5-ways-to-re.html

    Reply
  13. phasejumper says

    March 2, 2011 at 7:38 pm

    Very cute!

    Reply
  14. RedTedArt says

    March 2, 2011 at 12:22 pm

    Aaah these are VERY cute and what fun!!!

    Thanks for linking up :-)

    Maggy

    Reply
  15. Dawn says

    February 28, 2011 at 8:35 pm

    Loving the Spring bonnets so darling. I have just subscribed you have so much on here and I don't want to miss a thing

    Love Dawn xx

    Reply
  16. P K Glitz says

    February 28, 2011 at 5:09 pm

    These are absolutely adorable!

    Reply
  17. Nimi SunilKumar says

    February 28, 2011 at 1:17 pm

    these r super cute..Amanda:)
    You are so talented!

    Reply
  18. Alison says

    March 11, 2010 at 8:32 pm

    These are gorgeous!!!

    Reply
  19. Kim @ seven thirty three says

    March 11, 2010 at 6:22 pm

    Those are really cute! Such a creative idea! Thanks for linking up with What are little boys made of?

    Kim

    Reply
  20. [email protected] says

    March 9, 2010 at 12:36 am

    I can't believe those are coffee cups- amazing! Thanks so much for this, I'll be linking.

    Reply
  21. KKL Primitives says

    March 7, 2010 at 6:49 pm

    These are so cute!!!!

    Thank you Amanda!

    ~Neenee~

    Reply
  22. Amanda says

    March 7, 2010 at 3:15 pm

    Lori – thanks so much for the feature! I'll add your button today :)

    Ginger thank you!!

    Reply
  23. Ginger says

    March 7, 2010 at 4:17 am

    What a wonderful idea thank you for sharing this hats with us!

    Reply
  24. Lori says

    March 6, 2010 at 7:05 pm

    Amanda,
    I just featured this, so please stop by and grab my I was featured button..

    http://lifeaslori.blogspot.com/2010/03/saint-patricks-day-ideas-and-shout-outs.html

    Reply
  25. Lori says

    March 6, 2010 at 6:35 pm

    Totally cute..
    Thanks for joining Get Your Craft on Thurs. Please join me next week for another great party.
    Lori

    Reply
  26. Amanda says

    March 6, 2010 at 12:35 pm

    Thank you everyone! :)

    Reply
    • Joanne Bergman says

      March 8, 2014 at 9:37 am

      Hi Amanda I have tried these multiple times and they just melt on me and I’m standing right here watching them. Could you tell me what I’m doing wrong.

      Reply
      • Amanda Formaro says

        March 8, 2014 at 12:22 pm

        Hi Joanne. You may have to experiment with the temperature as well as the amount of time. I had one woman tell me that she ended up having to turn the temp up to 350 before they would work for her.

        Reply
  27. jennwa says

    March 5, 2010 at 11:53 pm

    Super cute. Love it!!!

    Reply
  28. Andy Porter says

    March 5, 2010 at 9:02 pm

    What a fun St. Patty's day craft! Thanks for the idea!

    Andy
    Poppies at Play

    Reply
  29. Jennifer Juniper says

    March 5, 2010 at 1:15 pm

    very cute! You could do this with a bowl and the kids could wear them :)

    Reply
  30. Tiffiny Felix says

    March 4, 2010 at 6:31 pm

    My sister and I are so going to make these with our kids! I love them! :)

    Reply
  31. Jennifer, A Self-Confessed Foodie says

    March 4, 2010 at 4:34 pm

    These are really cute! You could use them to top off a cup of treats!

    Reply
  32. Megan says

    March 4, 2010 at 2:58 pm

    These are adorable Amanda as well as the spring bonnets. It's to late for my girlscout troop but I'm going to tell my friend about them for her GS troop. Lots of ideas here!

    Reply
  33. Deeba PAB says

    March 4, 2010 at 1:46 pm

    I love baking eats, but I think these are too cool Amanda! Lovely idea!

    Reply
5 from 7 votes (6 ratings without comment)

Leave a Reply Cancel reply

Your email address will not be published. Required fields are marked *

Rate This Project


The maximum upload file size: 640 MB. You can upload: image, video. Links to YouTube, Facebook, Twitter and other services inserted in the comment text will be automatically embedded. Drop files here

Primary Sidebar

Hi! I’m Amanda and I’m the founder and head designer of Crafts by Amanda. I have spent over 25 years creating projects to share, but it’s not just me anymore! It’s turned into a complete family affair. Come and meet the Creative Team!

Free CraftsBy email every week

Latest crafts straight to your inbox!

All Time Favorites

Learn to make these adorable ladybug painted rocks. use special outdoor paint for this adorable garden craft so you can keep garden ladybugs all summer!

Ladybug Painted Rocks…

These colorful little ladybug painted rocks are the ... Go To project

snowy pinecone candle jar luminaries

Winter Luminaries: Snowy Pinecone…

Make pretty winter luminaries that appear to be covered ... Go To project

Make this wonderful deco mesh pumpkin wreath to hang on your door this fall!

Deco Mesh Pumpkin Wreath…

Adorn your door this fall with a pretty deco mesh ... Go To project

Reuse those empty prescription pill bottles in all sorts of ways. From organizing to making cookies. Yes, cookies! See how to use your empty pill bottles!

20 Uses for Prescription Pill…

You've been collecting prescription pill bottles for ... Go To project

Meet the Family

Amanda

Founder and Designer

Kristen

Editorial Manager

Lindsay

Social Media Manager

As seen on:

Footer

Favorites

  • Jar Photo Frames
  • No-Sew Roman Shade
  • Paper Flowers
  • How to Make a Scrunchie
  • Mermaid Slime

About

  • Home
  • Meet the Creative Team
  • Work with Us
  • Privacy Policy
  • Accessibility
  • Contact Us

Images/text copyright Amanda Formaro 2020. To feature a post from Crafts by Amanda, you may use one photo credited and linked back directly to the project post.

Free CraftsBy email every week

Latest crafts straight to your inbox!

Copyright ©2025, Crafts by Amanda. All Rights Reserved.
Design by Pixel Me Designs

Rate This Tutorial

Your vote:


To share a photo with your comment click here!

A rating is required
A name is required
An email is required

Recipe Ratings without Comment

Something went wrong. Please try again.