
Crackling is something I used to do years ago when I was creating a lot of primitive tole paintings. Crackle mediums can be finicky and you are pretty much limited to crackling a paint color. That has recently changed and I’m about to show you how you can add a crackled finish over the top of any design you like! With the official first day of autumn only days away, I thought a flower pot filled with pretty mums would be a great way to introduce you to this project.

I know that some people think that the planting season ends when fall begins, but that’s so not true! Whether it be mums and pansies dressing up your garden, or planting shrubs and bulbs, Fall gardening is definitely not over, not by a long shot. So let’s add some character to a plain pot, fill it with pretty mums to dress up the front step.

After we’ve finished this project, you’ll want to plant some pretty fall flowers, like mums. This is also a good transition project – in the fall I bring my fairy garden inside, so this is a nice replacement.
 I recently attended the Michaels Blogger Event in Dallas, Texas where I stopped by the DecoArt booth and saw these amazing barstools. After talking with Donna (pictured) she told me she had decoupaged some posters onto the stools and used One-Step Crackle over the top and then stained them. I seriously could not wait to try this! I actually have another project ready for you that I did before this pot, I just need to get some good pictures. So let’s get started…
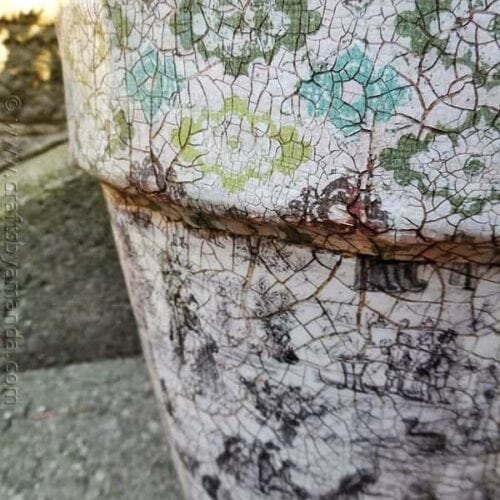
 In case you are wondering about the papers that I used, I found them at Michaels in the individual paper racks. They are Recollections Toile and MME Curtains.
 To get started you will need a large terra cotta pot, scrapbook paper of your choice, and some decoupage medium. I cut my paper into strips 4-inches wide to make it easier to apply. Use a large paintbrush to brush the decoupage medium onto the pot, just in a section big enough for one of your paper strips. Paint the back of the paper with decoupage as well and apply to the pot, carefully smoothing it out to remove any air bubbles. Repeat until the pot is covered.
 I actually did the rim of the pot with a different patterned paper than the body. This particular paper was heavier so I cut it into 5-inch lengths and made slits ever inch or so along the edges to make it easier to apply around the top and bottom of the rim. Use decoupage medium as above to apply to pot. Add a generous (but not dripping) coat of decoupage medium over the entire pot and let it dry for at least two hours.

Next you’ll apply One-Step Crackle. The trick to this product is NOT overworking it. In fact, you’ll want to try to apply in one stroke if you can, but definitely no more than two or it may not work. The thicker the amount you apply, the larger the cracks will be. I wanted larger cracks so I chose to use a generous amount. You want to allow this to dry for 3-4 hours, but overnight is best. You should begin to see cracking after a couple of hours as pictured above.
 To make these wonderful cracks visible you’ll need to apply a glaze or stain. I use staining/antiquing medium mixed with acrylic craft paint. I also use a simple household sponge dampened with all excess water squeezed out. Apply the mixture in sections over the crackling with the sponge. Use a soft cloth to wipe back. This will remove the stain from the surface and leave it in the cracks, making them more visible. If it’s not dark enough for your liking, apply it again until it is.

After you’re finished and everything has been allowed to dry thoroughly, apply a UV-Resistant clear coat, I used matte finish. This will make it safe to remain outside in the elements without damaging all of your hard work.
 Next you’ll want to plant some beautiful mums in your new pot!
More Clay Pot Crafts
- Faux Chalkboard Terra Cotta Pots
- Terra Cotta Pot Windchime
- Sea Glass Planter
- Clay Pot Lighthouse
- Strawberry Terra Cotta Pots
- Seed Packet Decoupage Clay Pots
- Fingerprint Flower Pot

Vintage Crackled Flower Pot
Supplies
- Clay pot
- Scrapbook papers
- Decoupage medium
- One-Step Crackle
- Antiquing gel
- Dark brown paint
- Soft cloth
- UV Protectant sealer spray
Instructions
- Cut paper into strips 4-inches wide. Use a large paintbrush to brush the decoupage medium onto the pot, just in a section big enough for one of your paper strips. Paint the back of the paper with decoupage as well and apply to the pot, carefully smoothing it out to remove any air bubbles. Repeat until the pot is covered.
- Choose a different patterned paper for the pot's rim. This particular paper was heavier so I cut it into 5-inch lengths and made slits ever inch or so along the edges to make it easier to apply around the top and bottom of the rim. Use decoupage medium as above to apply to pot. Add a generous (but not dripping) coat of decoupage medium over the entire pot and let it dry for at least two hours.
- Apply One-Step Crackle. The trick to this product is NOT overworking it. In fact, you'll want to try to apply in one stroke if you can, but definitely no more than two or it may not work. The thicker the amount you apply, the larger the cracks will be. I wanted larger cracks so I chose to use a generous amount. You want to allow this to dry for 3-4 hours, but overnight is best. You should begin to see cracking after a couple of hours.
- Mix staining/antiquing medium with brown acrylic craft paint according to bottle directions. Use a simple household sponge dampened with all excess water squeezed out. Apply the mixture in sections over the crackling with the sponge. Use a soft cloth to wipe back. This will remove the stain from the surface and leave it in the cracks, making them more visible. If it's not dark enough for your liking, apply it again until it is.
- After you're finished and everything has been allowed to dry thoroughly, apply a UV-Resistant clear coat, I used matte finish. This will make it safe to remain outside in the elements without damaging all of your hard work.
- Tie Dye Beach Towels - July 24, 2026
- Swirling Twirling Ladybugs - July 21, 2026
- Drip Tie Dye Backpack - July 17, 2026


Billie Sue Patrick says
Lovely effect, but I wouldn’t use it on terracotta pots unless I sealed them well on the inside first. Terracotta is very pourous and soaks up water like crazy. Even if you kept your pot out of the weather, decopauge medium won’t hold up to the moisture wicking through the terracotta from the inside. Maybe the idea is to leave your plants in the plastic nursery container and take them out of the decorated pot for watering.
Amanda Formaro says
I’ve had this outside for three years and it’s fine. You don’t want to paint the inside if you are going to put a plant in it.
Jackie says
Your pot is beautiful! I’ve done this several times and wanted to tell you something that works very well…I use seasonal paper napkins! Just carefully peel the white paper back off and glue to your pot. If you don’t want the terracotta to show through then you can leave the paper on or spray paint first.
Amanda Formaro says
You’re right jackie, paper napkins are great for decoupaging!
SewGlo says
Very nice work! Which were the 4″ strips of paper glued—horizontally or vertically? Thanks.
Amanda Formaro says
Actually they were applied at an able (see the photo in the post). It doesn’t matter which direction, as long as the pot is covered! :)
Jivvy says
Fantastic! Thank you for the information, I tend to distress everything I can get my hands on and can’t wait to add this to my arsenal.
PamB says
I love crackle but not its limitations to paint and its fickle nature and tendency to fail. I MUST try this new medium with paper!!! Thank you so much for sharing!! Your tutorial is wonderful and your results are spectacular!! Pin pin pin!!
Diane {Created by Diane} says
what a fun way to decorate the pots!
Angie @ Big Bear's House says
I love this! Pinning it now!
Nikki says
Love this! The crackle look is great! Definitely going to have to make a few!
-Nikki
Come by for a visit ncmrsdye.blogspot.com
Jen (Balancing Beauty and Bedlam) says
That is so cute!!!ANd we LOVE Miracle Gro…used it all summer long. :)
carolina says
Oh how fun! I love getting a crackle-look. I’ve never seen it applied over a treatment… always under paint. This is great! :)
Niki Knows says
What a beautiful pot!!! I really love the crackling technique. I never realized you could use it this way!
Amanda says
Thanks Niki! It’s actually not traditional crackle medium, but rather a new product that goes over the top. Pretty cool huh? :)
Jen Goode says
I really love how this turned out, the process looks so easy and the result is beautiful! Now I need to get my hands on some One-Step Crackle… 1 step, gotta love it! Thanks so much for sharing.
Amanda says
Thanks Jen! I have a feeling I’ll be crackling everything now LOL!
Sylvie @ Gourmande in the Kitchen says
This is perfect, I’ve been wanting to make a few crackle backdrops!
Amanda says
What a GREAT idea! I may just have to do that!
April Sinclair says
Just wondering how you managed to get your cracks so big. I’ve made one but the crackle hasn’t worked all that well. Some of the pop has tiny cracks in it and some of it hasn’t cracked at all. I tried to put it on with one stroke but it’s almost impossible using a paintbrush to do this, and I also tried to put a thick layer on but it just ran down the pot and so I’ve got drip marks. I love the idea…could you give some more tips please! Thanks
Amanda Formaro says
Hi April. Are you using a crackle medium or the one step crackle? I know some people try to do this with glue and it doesn’t always work. I use a paintbrush and while I usually try to do it with one stroke, I have been known to go over it once to avoid drips. Also, you want to make sure you follow the instructions for drying as stated on the bottle. I know this probably isn’t much help, but the only time I’ve had an issue with a product not crackling for me is when I brushed it too many times.